
Popular OEM Mercury Mariner Parts
- Body & Hardware Parts View More >
- Electrical Parts View More >
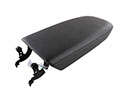
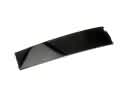
- Interior & Exterior Trim Parts View More >
- Air & Fuel Delivery Parts View More >
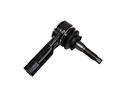
- Steering Parts View More >
- Emission Control & Exhaust Parts View More >
- Charging & Starting Parts View More >
- Engine Parts View More >
- Belts & Cooling Parts View More >
- Suspension Parts View More >
- Brakes Parts View More >
- A/C & Heating Parts View More >


Why Buy Genuine Mercury Mariner Parts From FordPartsDeal.com
FordPartsDeal.com offers a smart and convenient way to buy genuine parts online. We sell new OEM Mercury Mariner parts, including Headlights & Lighting. Authorized dealers directly provide all the Mercury Mariner parts and assemblies to ensure the optimal quality and fit. We also provide all properly fitting Mercury Mariner parts, such as Transmission, Driveline & Axles specific to your model. When you shop here, you get real Mercury value at highly competitive prices. All our products come with the same Mercury warranty available at other dealerships. Our easy-to-use catalog helps you quickly identify the right part for your car. You'll receive fast shipping from our warehouse network, keeping your Mercury Mariner running smoothly. Our staff consists of Mercury professionals who are ready to assist you. We aim to treat each customer as if they were stepping out of a Mercury showroom. VIN verification and our live support ensure that the part you order is the right Mercury Mariner part for your vehicle.
The Mercury Mariner crossover SUV appeared in 2005 through the CD2 platform which also supported the Mazda Tribute and Ford Escape vehicles. Two manufacturing periods spanned the existence of this SUV model before it finally stopped production in 2010 with its five-door SUV body design. The Mercury Mariner offers two engine options: a 2.3L I4 engine as standard and an optional 3.0L V6 engine, providing a balance of performance and efficiency. The powertrain system comes equipped with two transmission choices: customers can select between four-speed automatic and six-speed automatic transmissions which improve driving performance. The Mercury Mariner's front engine configuration provides customers the option to choose between front-wheel drive and four-wheel drive which suites multiple weather conditions. The Mercury Mariner utilizes a 103.1-inch wheelbase for steady handling and comfort together with its I4, V6, and Premier I4 and Premier V6 trim choices to suit different consumer choices. During its manufacturing period the Mercury Mariner received many updates that enhanced its features including sitting areas and lighting components and cabin materials to raise its market attractiveness. The use of original parts from the manufacturer provides Mercury Mariner owners a reliable method to sustain their vehicles because OEM components maintain both original quality standards and design specifications to protect car integrity while ensuring consistent performance.
Mercury Mariner problems break down to HVAC controls, transmission cooling and rear suspension. In HVAC, the Mariner is often lost at lower fan speeds, due to a failed blower motor resistor. Airflow is poor at the vents and defrost starts to degrade when stationary or in traffic. Check the resistor connector behind the glove box, confirm power and ground then replace blower motor resistor. The Mariner, for drivetrain reliability, can leak fluid from the transmission oil cooler. Inspect for red spots close to lines, launch slipping or climbing temps. Perform a pressure test of the cooler, replace the hangout and flush fluid to the specification. Rear shock absorber bushings sagging in the rear cause squeaks and a body tap over bumps. The Mariner may exhibit uneven tire tread-wear and loose rear-end handling. Check bushing play, shock mounts and tighten hardware to specifications. Change bench bushings, ride height recheck after a test drive. The Mercury Mariner enjoys quick leak detection, along with early suspension maintenance. Use factory schedules, record repair data, keep Mercury Mariner charged, with a good battery. With all these done, the Mercury Mariner should cool well, shift cleanly and remain quiet.
Mercury Mariner Parts and Q&A
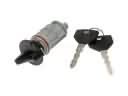
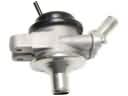
- Q: What safety precautions should be observed when servicing the fuel gauge sender and fuel pump module on Mercury Mariner?A:When having serviced the fuel gauge sender and pump module, the priority should be safety as there are flammable mixtures. Take off pressure of fuel, unattach battery and clean connections. Absorb the spills, empty the fuel, and take out the pump module using absorbent towels. Cross-examine and install broken seals and then re-fit them taking care that they are correctly aligned.
- Q: How to service and repair the air filter element on Mercury Mariner?A:To check the air filter element and repair it, you have to begin by examining the parts of the intake air system, which includes; the air cleaner assembly, intake pipe, outlet pipe and the intake air resonator. Check and maintain all the parts carefully to make sure that the air intake system works as well as possible.
- Q: How to service the Variable Camshaft Timing (VCT) System Oil Filter on Mercury Mariner?A:To change the VCT System Oil Filter, take off the VCT oil control solenoid, intake camshaft thrust cap oil filter plug and filter. Install the new filter with a tightening of up to 17 Nm (150 lb-in) and reverse the steps of removal to install the filter.


