FordParts
My Garage
My Account
Cart
OEM 2006 Ford Escape Alternator
Generator- Select Vehicle by Model
- Select Vehicle by VIN
Select Vehicle by Model
orMake
Model
Year
Select Vehicle by VIN
For the most accurate results, select vehicle by your VIN (Vehicle Identification Number).
3 Alternators found

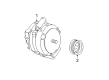
2006 Ford Escape Alternator Part Number: 6L8Z-10346-BARM
Product Specifications- Other Name: Re-Manufactured Alternator Assembly
- Replaces: GL-682-RM, GL-8810-RM, 6L8Z-10346-CCRM, 6L8Z-10346-CBRM1
- Item Weight: 16.30 Pounds
- Condition: New
- Fitment Type: Direct Replacement
- SKU: 6L8Z-10346-BARM
- Warranty: This genuine part is guaranteed by Ford's factory warranty.

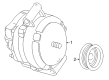
2006 Ford Escape Alternator Part Number: 6L8Z-10346-ADRM
$268.30 MSRP: $427.27You Save: $158.97 (38%)Product Specifications- Other Name: Re-Manufactured Alternator Assembly
- Replaces: 6L8Z-10346-LA, GL-8868-RM, GL-681, 6L8Z-10346-BB, GL-681-RM, 6L8Z-10346-AARM, 6L8Z-10346-BBRM1, 6L8Z-10346-BCRM, GL-8809-RM
- Condition: New
- Fitment Type: Direct Replacement
- SKU: 6L8Z-10346-ADRM
- Warranty: This genuine part is guaranteed by Ford's factory warranty.

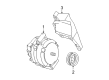
2006 Ford Escape Alternator Part Number: 4U2Z-10V346-DERM
$179.25 MSRP: $283.64You Save: $104.39 (37%)Product Specifications- Other Name: Re-Manufactured Alternator Assembly
- Replaces: 6L8Z-10346-BDRM, 6L8Z-10V346-ABRM, 6L8Z-10346-AB, 6L8Z-10V346-ACRM, 6L8Z-10346-ABRM2, 6L8Z-10346-ACRM, GL-8870-RM, GLV-8618-RM, GL-680, GLV-8775-RM, 4U2Z-10V346-ADRM, GLV-8733-RM, 6L8Z-10346-BFRM, GL-9021-RM, GL-8808-RM, GL-938-RM
- Condition: New
- Fitment Type: Direct Replacement
- SKU: 4U2Z-10V346-DERM
- Warranty: This genuine part is guaranteed by Ford's factory warranty.
2006 Ford Escape Alternator
If you're seeking quality and affordability, look no further than our extensive inventory of genuine 2006 Ford Escape Alternator available at FordPartsDeal.com. You can confidently purchase our OEM 2006 Ford Escape Alternator as they are supported by the manufacturer's warranty and our hassle-free return policy, alongside the benefit of our fast delivery service.
2006 Ford Escape Alternator Parts Q&A
- Q: How to service the alternator on 2006 Ford Escape?A: You should begin the alternator service by disconnecting the battery to eliminate electrical short circuits. First remove the right-hand intermediate axle shaft and then the six lower splash shield bolts and two pin-type retainers which need tightening at 8 Nm (71 lb-in) torque. The removal of the left-hand lower splash shield needs to happen before proceeding to the right-hand shield. You should remove the securing nut from the bracket before placing the wiring harness to the side. Turn the front end accessory drive tensioner clockwise for moving the accessory drive belt to an alternate position. To reinstall the generator B+ protective cover you should disconnect the B+ terminal nut then replace it while tightening it to 8 Nm (71 lb-in). Disconnect the generator electrical connector followed by removing the bolt that fastens the generator air duct to tighten it to 4 Nm (35 lb-in) when reinstalling. Remove the generator lower air duct by first loosening its two lower bolts. For generator shield assembly install the pin-type retainer and bolt while tightening them to 4 Nm (35 lb-in). The technician should initially remove the generator stud nut with proper torque settings set at 47 Nm (35 lb-ft) before removing the generator stud at 7 Nm (62 lb-in). Position the generator attention by removing two generator bolts and tightening them to 47 Nm (35 lb-ft) when replacing them. Set the generator aside before taking out the three upper air duct nuts. Reinstall these nuts with 4 Nm (35 lb-in). Before removing the upper air ducts users should rotate the generator to free up space for installation through the available fender well opening. The needed generator bracket bolts should be removed first followed by its bracket before final tightening at 47 Nm (35 lb-ft). The replacement of the new generator requires performing the forward installation steps in reverse.
Related 2006 Ford Escape Parts
 2006 Ford Escape Starter
 2006 Ford Escape Battery Cable
 2006 Ford Escape Battery Tray
 2006 Ford Escape Car Batteries