FordParts
My Garage
My Account
Cart
OEM 2006 Mercury Monterey Shock Absorber
Suspension Shock Absorber- Select Vehicle by Model
- Select Vehicle by VIN
Select Vehicle by Model
orMake
Model
Year
Select Vehicle by VIN
For the most accurate results, select vehicle by your VIN (Vehicle Identification Number).
3 Shock Absorbers found

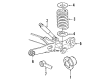
2006 Mercury Monterey Shock Absorber, Rear Part Number: 6F2Z-18125-AB
$40.24 MSRP: $54.76You Save: $14.52 (27%)Product Specifications- Other Name: Shock Absorber Assembly; Suspension Shock Absorber, Rear
- Position: Rear
- Replaced by: 2F2Z-18125-B
- Base No.: 18125
- Item Weight: 4.60 Pounds
- Item Dimensions: 3.5 x 3.4 x 21.6 inches
- Condition: New
- Fitment Type: Direct Replacement
- SKU: 6F2Z-18125-AB
- Warranty: This genuine part is guaranteed by Ford's factory warranty.
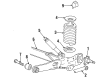
2006 Mercury Monterey Shock Absorber, Rear Part Number: 2F2Z-18125-B
$40.24 MSRP: $54.76You Save: $14.52 (27%)Product Specifications- Other Name: Shock Absorber Assembly; Suspension Shock Absorber, Rear; Shock
- Position: Rear
- Replaces: 6F2Z-18125-A, ASH-24577, 2F2Z-18125-A, 3F2Z-18125-AA, 2F2Z-18125-AB, ASH-239, ASH-1121, ASH-52, 6F2Z-18125-AB
- Base No.: 18125
- Item Weight: 4.80 Pounds
- Item Dimensions: 20.9 x 3.5 x 3.5 inches
- Condition: New
- Fitment Type: Direct Replacement
- SKU: 2F2Z-18125-B
- Warranty: This genuine part is guaranteed by Ford's factory warranty.

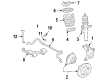
2006 Mercury Monterey Strut, Front Part Number: 3F2Z-18124-AA
Product Specifications- Other Name: Shock Absorber Assembly; Front Suspension Strut Kit; Complete Strut Set.; Shock Absorber
- Manufacturer Note: Includes Attaching Hardware
- Position: Front
- Replaces: 6F2Z-18124-AD, AST-233
- Base No.: 18124
- Item Weight: 11.50 Pounds
- Item Dimensions: 29.3 x 6.6 x 6.6 inches
- Condition: New
- Fitment Type: Direct Replacement
- Require Quantity: 2
- SKU: 3F2Z-18124-AA
- Warranty: This genuine part is guaranteed by Ford's factory warranty.
2006 Mercury Monterey Shock Absorber
If you're seeking quality and affordability, look no further than our extensive inventory of genuine 2006 Mercury Monterey Shock Absorber available at FordPartsDeal.com. You can confidently purchase our OEM 2006 Mercury Monterey Shock Absorber as they are supported by the manufacturer's warranty and our hassle-free return policy, alongside the benefit of our fast delivery service.
2006 Mercury Monterey Shock Absorber Parts Q&A
- Q: How to Service and Repair the Front Shock Absorber on 2006 Mercury Monterey?A: You should start suspension strut service and repair by taking out the cowl panel grille. The vehicle must be placed in neutral position and positioned on a hoist. Use the hex holding function to stop stud movement during stabilizer bar upper link nut removal followed by its discarding. When installing the suspension component tighten the nut to 76 ft. lbs. so it reaches 103 Nm (76 ft. lbs.). Keeping the axle shaft inside its limits is essential because extended position of the tripod CV joint may trigger internal part disconnection that could break the shaft. Tighten the pinch bolt to 115 Nm (85 ft. lbs.) when reinstalling after removing it and pushing down on the front wheel knuckle to free the strut and spring assembly while supporting the front wheel knuckle to stop axle shaft outboard motion. To begin, remove the cabin air filter then disconnect the electrical connector of the hood disarm switch followed by the wiper motor electrical connector. First tighten the two LH cowl panel bolts to 6 Nm (53 inch lbs.), then remove them followed by the removal of seven remaining bolts that must be tightened to 6 Nm (53 inch lbs.) during reinstallation. First remove the cowl panel and disconnect the speed control cable from vehicles with this feature as a step before setting it aside. Tighten the 3 shock absorber upper nuts to 35 Nm (26 ft. lbs.) before removal before taking out the shock absorber along with its spring assembly. Read the relevant section for instructions about disassembly and assembly of shock absorber and spring assembly. The removal process ends when you follow procedure steps in reverse and verify the front end alignment with necessary adjustments.
Related 2006 Mercury Monterey Parts
 2006 Mercury Monterey Axle Support Bushings
 2006 Mercury Monterey Bump Stop
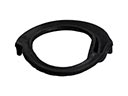 2006 Mercury Monterey Coil Spring Insulator
 2006 Mercury Monterey Coil Springs
 2006 Mercury Monterey Control Arm
 2006 Mercury Monterey Front Cross-Member
 2006 Mercury Monterey Shock And Strut Mount
 2006 Mercury Monterey Steering Knuckle
 2006 Mercury Monterey Sway Bar Bracket
 2006 Mercury Monterey Sway Bar Bushing
 2006 Mercury Monterey Sway Bar Kit
 2006 Mercury Monterey Sway Bar Link