FordParts
My Garage
My Account
Cart
OEM 2006 Mercury Mountaineer Fuel Filler Hose
- Select Vehicle by Model
- Select Vehicle by VIN
Select Vehicle by Model
orMake
Model
Year
Select Vehicle by VIN
For the most accurate results, select vehicle by your VIN (Vehicle Identification Number).
1 Fuel Filler Hose found

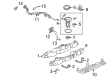
2006 Mercury Mountaineer Filler Hose Part Number: 4L2Z-9047-AA
Product Specifications- Other Name: Hose - Filler Pipe; Fuel Filler Hose; Filler Neck Hose; Fuel Hose; Hose
- Replaces: 1L2Z-9047-AA
- Base No.: 9047
- Item Weight: 0.80 Pounds
- Condition: New
- Fitment Type: Direct Replacement
- SKU: 4L2Z-9047-AA
- Warranty: This genuine part is guaranteed by Ford's factory warranty.
2006 Mercury Mountaineer Fuel Filler Hose
If you're seeking quality and affordability, look no further than our extensive inventory of genuine 2006 Mercury Mountaineer Fuel Filler Hose available at FordPartsDeal.com. You can confidently purchase our OEM 2006 Mercury Mountaineer Fuel Filler Hose as they are supported by the manufacturer's warranty and our hassle-free return policy, alongside the benefit of our fast delivery service.
2006 Mercury Mountaineer Fuel Filler Hose Parts Q&A
- Q: How to Safely Service and Properly Install the Fuel Filler Hose on 2006 Mercury Mountaineer?A: Service the fuel tank filler pipe with utmost safety by staying away from fuel components both flames and smoking because the region contains volatile mixtures. The procedure for fuel tank repairs requires a cap or tape to cover all liquid and vapor fuel openings but they must be removed before final installation. To start the procedure use neutral mode and place a hoist beneath the vehicle. Take these steps for service on the fuel tank filler pipe by disconnecting the battery ground cable while opening the fuel tank filler cap. Reinstall the fuel tank filler cap bolts using 2 Nm (18 lb-in) torque then tighten each of the three bolts before completion. The two tabs situated on the fresh air vent tube in the fuel filler door pocket must be pressed down to detach it from the inner fenderwell. Commence by disconnecting the fuel pressure sensor vapor tube coupling to the fuel filler pipe vapor tube assembly and then proceed with taking off the rear axle vent hose and the dust separator hose. To remove the fuel tank filler pipe hose, loosen the clamp and disconnect the hose and reinstall it by tightening the clamp to 3 Nm (27 lb-in). Gently tighten the two mounting bolts of the fuel tank filler pipe assembly to 15 Nm (11 lb-ft) torque specifications during the installation process. Complete the installation process by performing the reverse actions of the removal procedure.
Related 2006 Mercury Mountaineer Parts
 2006 Mercury Mountaineer Fuel Pump
 2006 Mercury Mountaineer Fuel Tank
 2006 Mercury Mountaineer Gas Cap
 2006 Mercury Mountaineer Fuel Filler Neck
 2006 Mercury Mountaineer Fuel Pump Gasket
 2006 Mercury Mountaineer Fuel Pump Seal
 2006 Mercury Mountaineer Fuel Pump Tank Seal
 2006 Mercury Mountaineer Fuel Tank Lock Ring
 2006 Mercury Mountaineer Fuel Tank Sending Unit
 2006 Mercury Mountaineer Fuel Tank Skid Plate
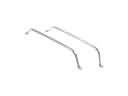 2006 Mercury Mountaineer Fuel Tank Strap
 2006 Mercury Mountaineer Intake Manifold Gasket