FordParts
My Garage
My Account
Cart
OEM 2008 Ford Focus Alternator
Generator- Select Vehicle by Model
- Select Vehicle by VIN
Select Vehicle by Model
orMake
Model
Year
Select Vehicle by VIN
For the most accurate results, select vehicle by your VIN (Vehicle Identification Number).
1 Alternator found

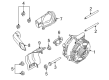
2008 Ford Focus Alternator Part Number: 8S4Z-10346-A
$282.99 MSRP: $467.27You Save: $184.28 (40%)Ships in 1-2 Business DaysProduct Specifications- Other Name: Remanufactured Denso First Time Fit Alternator Assembly.
- Base No.: 10346
- Item Weight: 15.20 Pounds
- Item Dimensions: 8.7 x 8.3 x 8.2 inches
- Condition: New
- Fitment Type: Direct Replacement
- SKU: 8S4Z-10346-A
- Warranty: This genuine part is guaranteed by Ford's factory warranty.
2008 Ford Focus Alternator
If you're seeking quality and affordability, look no further than our extensive inventory of genuine 2008 Ford Focus Alternator available at FordPartsDeal.com. You can confidently purchase our OEM 2008 Ford Focus Alternator as they are supported by the manufacturer's warranty and our hassle-free return policy, alongside the benefit of our fast delivery service.
2008 Ford Focus Alternator Parts Q&A
- Q: How to service and repair the alternator on 2008 Ford Focus?A: Begin the alternator service and repair process by hoisting the vehicle into neutral gear with the battery disconnection. To begin the process disconnect the generator electrical connector and remove the RH halfshaft then uninstall the 3 bolts from the center support bracket. The accessory drive splash shield requires the removal of its two screws before rotating the front end accessory drive (FEAD) belt tensioner clockwise to extract the generator drive pulley belt while you set aside the FEAD belt. Free the two retainers to get the lower generator air duct out, then move back the protective cover to access the generator B+ terminal nut before putting the generator B+ terminal aside. Take out the generator by unfastening its 2 generator nuts, 2 generator studs, and generator bolt. The installation process also requires detachment of the bolt together with the upper air duct for the generator. During reinstallation of the upper air duct always mount it together with the bolt before tightening to 12 Nm (9 lb-ft). Place the generator bolt loosely without completing torque adjustment at this time. Secure the 2 generator studs first at 24 Nm (18 lb-ft) then place and tighten the 2 generator nuts to 47 Nm (35 lb-ft). Position the generator B+ terminal on the generator while you install the nut then secure it to 12 Nm (9 lb-ft) before placing the protective cover on top of the nut. Reinstall the lower generator air duct before you rotate the FEAD belt tensioner clockwise to put back the FEAD belt. Secure the accessory drive splash shield with 2 screws that have a tightness setting of 5 Nm (44 lb-in). The last step includes installing the center support bracket by tightening the 3 bolts to 30 Nm (22 lb-ft) followed by reinstallation of the RH halfshaft and generator electrical connector connection and battery reconnection.
Related 2008 Ford Focus Parts
 2008 Ford Focus Starter
 2008 Ford Focus Battery Cable
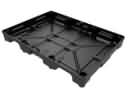 2008 Ford Focus Battery Tray
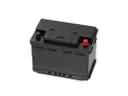 2008 Ford Focus Car Batteries