FordParts
My Garage
My Account
Cart
OEM 2009 Ford F-150 Control Arm
Suspension Arm- Select Vehicle by Model
- Select Vehicle by VIN
Select Vehicle by Model
orMake
Model
Year
Select Vehicle by VIN
For the most accurate results, select vehicle by your VIN (Vehicle Identification Number).
4 Control Arms found


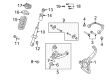
2009 Ford F-150 Upper Control Arm, Front Passenger Side Part Number: EL3Z-3084-B
$123.76 MSRP: $203.64You Save: $79.88 (40%)Ships in 1 Business DayProduct Specifications- Other Name: Arm Assembly - Front Suspension; Front Right Upper Control Arm and Ball Joint Assembly.; Suspension Control Arm; Control Arm
- Manufacturer Note: RH Upper
- Position: Front Upper Passenger Side
- Replaces: BL3Z-3084-A, 9L3Z-3084-A, 7L1Z-3084-A, EL3Z-3084-A, MCSOE-71, MCSOE-85, MCF-2289
- Item Weight: 6.00 Pounds
- Item Dimensions: 5.4 x 10.5 x 14.3 inches
- Condition: New
- Fitment Type: Direct Replacement
- SKU: EL3Z-3084-B
- Warranty: This genuine part is guaranteed by Ford's factory warranty.

2009 Ford F-150 Upper Control Arm, Front Driver Side Part Number: EL3Z-3085-B
$123.76 MSRP: $203.64You Save: $79.88 (40%)Ships in 1 Business DayProduct Specifications- Other Name: Arm Assembly - Front Suspension; Front Left Upper Control Arm and Ball Joint Assembly.; Suspension Control Arm; Control Arm
- Manufacturer Note: LH Upper
- Position: Front Upper Driver Side
- Replaces: 9L3Z-3085-A, BL3Z-3085-A, MCF-2290, 7L1Z-3085-A, EL3Z-3085-A, MCSOE-73, MCSOE-86
- Item Weight: 5.80 Pounds
- Item Dimensions: 5.6 x 10.1 x 14.0 inches
- Condition: New
- Fitment Type: Direct Replacement
- SKU: EL3Z-3085-B
- Warranty: This genuine part is guaranteed by Ford's factory warranty.


2009 Ford F-150 Lower Control Arm, Front Passenger Side Part Number: 9L3Z-3078-A
$183.96 MSRP: $305.45You Save: $121.49 (40%)Ships in 1-2 Business DaysProduct Specifications- Other Name: Arm Assembly - Front Suspension; Front Right Lower Control Arm and Ball Joint Assembly; Control Arm
- Position: Front Lower Passenger Side
- Base No.: 3078
- Item Weight: 25.90 Pounds
- Item Dimensions: 5.9 x 20.9 x 23.0 inches
- Condition: New
- Fitment Type: Direct Replacement
- SKU: 9L3Z-3078-A
- Warranty: This genuine part is guaranteed by Ford's factory warranty.

2009 Ford F-150 Lower Control Arm, Front Driver Side Part Number: 9L3Z-3079-A
$194.91 MSRP: $323.64You Save: $128.73 (40%)Ships in 1 Business DayProduct Specifications- Other Name: Arm Assembly - Front Suspension; Front Left Lower Control Arm and Ball Joint Assembly.; Control Arm
- Position: Front Lower Driver Side
- Base No.: 3078
- Item Weight: 32.70 Pounds
- Item Dimensions: 26.8 x 21.4 x 21.2 inches
- Condition: New
- Fitment Type: Direct Replacement
- SKU: 9L3Z-3079-A
- Warranty: This genuine part is guaranteed by Ford's factory warranty.
2009 Ford F-150 Control Arm
If you're seeking quality and affordability, look no further than our extensive inventory of genuine 2009 Ford F-150 Control Arm available at FordPartsDeal.com. You can confidently purchase our OEM 2009 Ford F-150 Control Arm as they are supported by the manufacturer's warranty and our hassle-free return policy, alongside the benefit of our fast delivery service.
2009 Ford F-150 Control Arm Parts Q&A
- Q: How to Service and Repair the Front Lower Control Arm on 2009 Ford F-150?A: Measure the center-to-fender distance of the hub area using level ground before starting any lower arm maintenance on the front suspension. You should place the wheel aside before locking the stud with the hex holder mechanism while you remove both the stabilizer bar link lower nut and lower ball joint nut. A Ball Joint Separator tool should detach the lower ball joint from the knuckle without harming the ball joint boot. The first step requires removing all three nuts that hold the lower arm rearward and lower arm forward and shock absorber lower components. After that, treat the lower arm by removing the installed nuts and bolts. Begin by placing the new lower arm then install the new shock absorber lower bolt and nut as loose fastening before tightening the new lower arm forward and rearward nuts and bolts. The wheel knuckle accepts the lower ball joint which requires tightening of the new lower ball joint nut to 150 Nm (111 lb-ft). Install the new stabilizer bar link lower nut then apply a torque of 80 Nm (59 lb-ft) to it. A suitable jack should lift the suspension at the correct height to create equalities between the hub-to-fender measurement and the initial reading. Apply torque values by using a crowfoot wrench to tighten the lower arm rearward nut at 350 Nm (258 lb-ft), then perform the same procedure for the lower arm forward nut and shock absorber lower nut with torques of 350 Nm (258 lb-ft) and 550 Nm (406 lb-ft), respectively. In the last step install the wheel and tire before examining and readjusting the front end alignment if needed.
Related 2009 Ford F-150 Parts
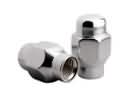 2009 Ford F-150 Lug Nuts
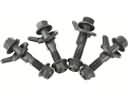 2009 Ford F-150 Alignment Bolt
 2009 Ford F-150 Axle Shaft
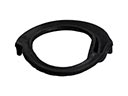 2009 Ford F-150 Coil Spring Insulator
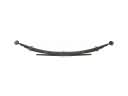 2009 Ford F-150 Leaf Spring
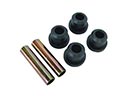 2009 Ford F-150 Leaf Spring Bushing
 2009 Ford F-150 Steering Knuckle
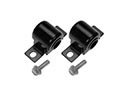 2009 Ford F-150 Sway Bar Bushing
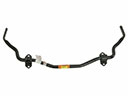 2009 Ford F-150 Sway Bar Kit
 2009 Ford F-150 Sway Bar Link
 2009 Ford F-150 Wheel Seal
 2009 Ford F-150 Wheel Stud