FordParts
My Garage
My Account
Cart
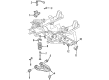
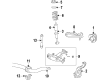
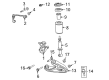
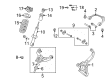
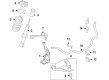
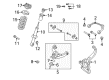
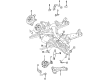
OEM Ford F-150 Control Arm
Suspension Arm- Select Vehicle by Model
- Select Vehicle by VIN
Select Vehicle by Model
orMake
Model
Year
Select Vehicle by VIN
For the most accurate results, select vehicle by your VIN (Vehicle Identification Number).
47 Control Arms found


Ford F-150 Upper Control Arm, Front Passenger Side Part Number: 5L3Z-3084-B
$128.18 MSRP: $210.91You Save: $82.73 (40%)Ships in 1-2 Business Days


Ford F-150 Upper Control Arm, Front Driver Side Part Number: AL3Z-3085-B
$193.82 MSRP: $321.82You Save: $128.00 (40%)Ships in 1-2 Business Days

Ford F-150 Lower Control Arm, Front Passenger Side Part Number: 7L3Z-3078-C
$369.92 MSRP: $632.73You Save: $262.81 (42%)Ships in 1-2 Business Days

Ford F-150 Upper Control Arm, Front Driver Side Part Number: EL3Z-3085-B
$123.76 MSRP: $203.64You Save: $79.88 (40%)Ships in 1 Business Day


Ford F-150 Upper Control Arm, Front Passenger Side Part Number: EL3Z-3084-B
$123.76 MSRP: $203.64You Save: $79.88 (40%)Ships in 1 Business Day
Ford F-150 Upper Control Arm, Front Driver Side Part Number: 5L3Z-3085-B
$123.76 MSRP: $203.64You Save: $79.88 (40%)Ships in 1 Business Day


Ford F-150 Upper Control Arm, Front Passenger Side Part Number: FL3Z-3084-B
$135.92 MSRP: $223.64You Save: $87.72 (40%)Ships in 1-2 Business Days

Ford F-150 Lower Control Arm, Front Passenger Side Part Number: EL3Z-3078-A
$148.07 MSRP: $243.64You Save: $95.57 (40%)Ships in 1-2 Business Days
Ford F-150 Lower Control Arm, Front Passenger Side Part Number: 9L3Z-3078-A
$179.01 MSRP: $294.55You Save: $115.54 (40%)Ships in 1-2 Business Days


Ford F-150 Upper Control Arm, Front Passenger Side Part Number: AL3Z-3084-B
$193.82 MSRP: $321.82You Save: $128.00 (40%)
Ford F-150 Lower Control Arm, Front Driver Side Part Number: 9L3Z-3079-A
$172.38 MSRP: $283.64You Save: $111.26 (40%)Ships in 1 Business Day
Ford F-150 Lower Control Arm, Front Driver Side Part Number: EL3Z-3079-A
$236.52 MSRP: $392.73You Save: $156.21 (40%)Ships in 1-2 Business Days


Ford F-150 Lower Control Arm, Front Passenger Side Part Number: FL3Z-3078-C
$366.83 MSRP: $609.09You Save: $242.26 (40%)Ships in 1-2 Business Days


Ford F-150 Lower Control Arm, Front Driver Side Part Number: FL3Z-3079-C
$316.46 MSRP: $525.45You Save: $208.99 (40%)Ships in 1-2 Business Days


Ford F-150 Lower Control Arm, Front Passenger Side Part Number: AL3Z-3078-B
$870.53 MSRP: $1445.45You Save: $574.92 (40%)Ships in 1-3 Business Days
Ford F-150 Lower Control Arm, Front Driver Side Part Number: AL3Z-3079-B
$1326.15 MSRP: $2202.00You Save: $875.85 (40%)Ships in 1-3 Business Days

Ford F-150 Upper Control Arm, Front Driver Side Part Number: KL3Z-3085-C
$186.67 MSRP: $303.64You Save: $116.97 (39%)Ships in 1-3 Business Days


Ford F-150 Upper Control Arm, Front Driver Side Part Number: 6L3Z-3085-AL
$135.11 MSRP: $214.55You Save: $79.44 (38%)

Ford F-150 Upper Control Arm, Front Part Number: 5L3Z-3085-C


Ford F-150 Upper Control Arm, Front Part Number: 5L3Z-3084-C
| Page 1 of 3 |Next >
1-20 of 47 Results
Ford F-150 Control Arm
OEM Control Arm boasts unmatched quality. Each part goes through full quality checks. They adhere to Ford's official factory standards. These steps remove flaws and inconsistencies. So you can get Control Arm with long life and a perfect fit. Come to our website and find genuine Ford F-150 parts. We keep a wide inventory of OEM F-150 parts at the highly affordable prices. It's easy to search, compare, and pick what you need. You'll love the clear info and simple checkout. We offer top-rated customer service, and we reply fast. We also ship promptly to ensure your order arrives on time.
The Control Arm of Ford F-150 vehicles is a link between the frame and the wheel by means of pivots and mounts that support shock absorbers and springs. These arms enable the wheels to translate vertically in accordance with the changes in the road and springs. Control Arms of Ford F-150 are found in different shapes and kinds of material that used stamped steel while others used cast iron or even aluminium to enhance more strength and toughness. These usually incorporate bushings at the point where they are rusty to the frame and ball joints where they are coupled to the knuckle or axle. Other Control Arms which include the upper and the lower arms are also used in F-150 trucks for the premier steering and handling. Wear components such as bushings and ball joints that develop wear over time must be replaced or the overall maintenance of alignment of the wheels properly, safe handling along with the wear on tires will be required. The regular Performance Control Arms can be complemented by those who want to increase the sturdiness and maneuverability for high speed operations or customized cars.
Ford F-150 Control Arm Parts and Q&A
- Q: How to service and repair the lower control arm on Ford F-150?A:First raise the vehicle on a hoist and remove the wheel tire set. Then detach the brake disc shield for lower control arm service work. You must loosen and take away the upper Shock Absorber nut before removing the front shock absorber by detaching its connecting parts. Loosen the screw that holds the front suspension lower arm brake hose bracket then remove it together with the bracket. Place the Coil Spring Compressor onto the coil spring before unscrewing the lower Ball Joint castellated nut after removing the cotter pin. To remove the lower ball joint from the front wheel Spindle use a Pitman Arm Puller. Detach the front suspension lower arm and front coil spring pieces by unplugging all their nuts and bolts. You should place the coil spring end into the first hole with the tip showing from the second hole and insert it into front suspension lower arm. Begin by tightening the forward lower arm nut keeping the control arm at curb position. Then position the assembled suspension arm and coil spring and install their bolts and nuts. Put the lower ball joint with its castellated nut and new cotter pin in place then fasten the front stabilizer bar link nut. Reinstall the coil spring compressor after putting on both shock absorber components and their lower nuts followed by the upper shock absorber washer and nut. Hook up the brake hose bracket screw, the brake disc shield, and wheel and tire parts last to complete the install. Complete your process by checking and readjusting the front suspension alignment.

Related Ford F-150 Parts
 Ford F-150 4WD Actuator
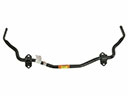 Ford F-150 Sway Bars
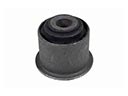 Ford F-150 Axle Pivot Bushing
 Ford F-150 Axle Shaft
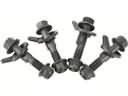 Ford F-150 Camber and Alignment Kit
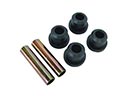 Ford F-150 Leaf Spring Bushing
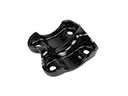 Ford F-150 Leaf Spring Plate
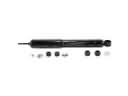 Ford F-150 Shock Absorber
 Ford F-150 Spindle
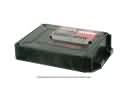 Ford F-150 Suspension Control Module
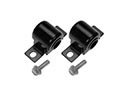 Ford F-150 Sway Bar Bushing
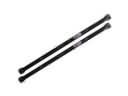 Ford F-150 Torsion Bar