FordParts
My Garage
My Account
Cart
OEM 2009 Lincoln Town Car A/C Condenser
Air Conditioning Condenser- Select Vehicle by Model
- Select Vehicle by VIN
Select Vehicle by Model
orMake
Model
Year
Select Vehicle by VIN
For the most accurate results, select vehicle by your VIN (Vehicle Identification Number).
1 A/C Condenser found

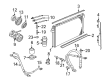
2009 Lincoln Town Car Condenser Assembly Part Number: BW7Z-19712-A
$155.81 MSRP: $256.36You Save: $100.55 (40%)Ships in 1-2 Business DaysProduct Specifications- Other Name: A/C Condenser; Condenser A/C; Condenser
- Replaces: 8W7Z-19712-A, 6W1Z-19712-AA, 6W7Z-19712-A, 9W7Z-19712-A, YJ-541, YJ-507, YJ-508, YJ-520
- Base No.: 19712
- Item Weight: 11.90 Pounds
- Item Dimensions: 6.5 x 36.8 x 24.4 inches
- Condition: New
- Fitment Type: Direct Replacement
- SKU: BW7Z-19712-A
- Warranty: This genuine part is guaranteed by Ford's factory warranty.
2009 Lincoln Town Car A/C Condenser
If you're seeking quality and affordability, look no further than our extensive inventory of genuine 2009 Lincoln Town Car A/C Condenser available at FordPartsDeal.com. You can confidently purchase our OEM 2009 Lincoln Town Car A/C Condenser as they are supported by the manufacturer's warranty and our hassle-free return policy, alongside the benefit of our fast delivery service.
2009 Lincoln Town Car A/C Condenser Parts Q&A
- Q: What are the steps involved in servicing and repairing the condenser core and ensuring proper installation of a new A/C condenser on 2009 Lincoln Town Car?A: During servicing operations you need to handle the condenser core properly because its bottom components operate as an oil-to-air (OTA) transmission cooler while also functioning as a combination cooling device. The installation of any new condenser for refrigerant leak repairs depends on confirming the source of fluorescent dye as coming from the transmission fluid rather than from strong A/C condenser leaks. Start the procedure by recovering all refrigerant fluid followed by securing the vehicle in neutral position on a hoist. Start by taking off the upper radiator sight shield while following with the removal of the four lower side air deflector pin-type retainers and bottom cooling module air deflector. Detach the transmission cooler line fittings at the condenser before removing its two fitting nuts and disconnecting the pieces while discarding both O-ring seals and gasket seals. The fittings require tightening to 15 Nm during the reinstallation process (133 lb-in). Tighten the two cooling module bracket bolts to 10 Nm (89 lb-in) after installation and also disconnect the four upper side air deflector pin-type retainers. The first step requires removing the condenser bolt as well as separating both cooling module brackets. Finally detach the power steering cooler from the module clips. The cooling module should be tilted backward to access the condenser core during installation then follow the removal steps in reverse order by using new O-ring seals and gasket seals and adding the proper amount of clean PAG oil to the refrigerant system. The final procedure includes evacuating the refrigerant system a leak test and charging the system because it also requires adding transmission fluid to its proper level.
Related 2009 Lincoln Town Car Parts
 2009 Lincoln Town Car Blend Door Actuator
 2009 Lincoln Town Car Blower Motor
 2009 Lincoln Town Car Blower Motor Resistor
 2009 Lincoln Town Car Heater Core
 2009 Lincoln Town Car A/C Accumulator
 2009 Lincoln Town Car A/C Clutch
 2009 Lincoln Town Car A/C Compressor
 2009 Lincoln Town Car A/C Compressor Cut-Out Switches
 2009 Lincoln Town Car A/C Hose
 2009 Lincoln Town Car A/C Idler Pulley
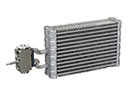 2009 Lincoln Town Car Evaporator
 2009 Lincoln Town Car HVAC Pressure Switch