FordParts
My Garage
My Account
Cart
OEM Ford E-150 Oil Pan
Oil Drain Pan- Select Vehicle by Model
- Select Vehicle by VIN
Select Vehicle by Model
orMake
Model
Year
Select Vehicle by VIN
For the most accurate results, select vehicle by your VIN (Vehicle Identification Number).
2 Oil Pans found


Ford E-150 Oil Pan Part Number: F7UZ-6675-AC
$148.85 MSRP: $216.67You Save: $67.82 (32%)
Ford E-150 Oil Pan Part Number: 3L3Z-6675-CA
$89.54 MSRP: $130.33You Save: $40.79 (32%)Ships in 1-3 Business Days
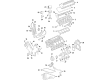
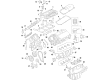
Ford E-150 Oil Pan
OEM Oil Pan boasts unmatched quality. Each part goes through full quality checks. They adhere to Ford's official factory standards. These steps remove flaws and inconsistencies. So you can get Oil Pan with long life and a perfect fit. Come to our website and find genuine Ford E-150 parts. We keep a wide inventory of OEM E-150 parts at the highly affordable prices. It's easy to search, compare, and pick what you need. You'll love the clear info and simple checkout. We offer top-rated customer service, and we reply fast. We also ship promptly to ensure your order arrives on time.
The Ford E-150 Oil Pan is also an important component that contributes greatly in the performance and durability of Ford E-150 automobiles. Being a vital component in the storage and circulation of engine oil, the Oil Pan is responsible for the greasing of other moving parts within the engine, a factor that would determine the general health of the Engine. The Ford E-150 popularly known for its ability to pull through any task thrown at it and is incredibly rugged now has an Oil Pan that can adjust to any operating lag while at the same time stopping oil leakage. This is especially the case with the various generations of the E-150, which began with the car's launch in 1957, and then includes trucks, cars, and FWD vans. The contemporary Ford E-150 Oil Pan may be made of cast aluminum materials to boost performance and efficiency as contrasted to stamped steel. It is a way that enhances the strength of the Oil Pan while adding a layer to the vehicle's safety by guaranteeing efficient circulation of oil. Similar to other parts of the Oil Pan is designed as part of the wet sump system through which the oil pump successfully draws oil through a pickup tube circulating the oil adequately within the engine. The Ford E-150 Oil Pan is popular in the automotive industry especially because of its reliability and quality, any driver who is interested in the durability of his/her car cannot afford to mis out on the efficiency of the Ford E-150 Oil Pan.
Ford E-150 Oil Pan Parts and Q&A
- Q: How to service and repair the oil pan on all engines on Ford E-150?A:All engine oil pan servicing requires the vehicle placement on a hoist using neutral transmission gear position. Start by removing the Intake Manifold and fan shroud together with the engine cooling fan and disconnect both generator electrical connections by removing the B+ terminal nut followed by disconnecting the S and ASI electrical connectors. The service requires first loosening two bolts to position the generator aside so that you can remove the retainers and shield. The heater outlet tube operation for 4.6L (2V) engines involves removing the tube stud after unhinging the coolant hose from its position on the outlet tube. The Knock Sensor electrical connector and engine wiring harness retainers must come off before disconnecting the heater coolant hose and pulling the two heater outlet tube studs on 5.4L (2V) engines. Detach the heater outlet tube from the vehicle and throw away O-ring seals. The procedure requires you to first eliminate both upper transmission-to-engine bolts before assembling the Engine Lifting Bracket and Modular Engine Lift Bar Adapter while installing them alongside the Engine Support Bar to maintain engine support. Begin the procedure by draining the engine oil while removing the oil filter before removing the nut that positions aside both the transmission cooler tube support bracket and starter wiring harness support bracket. Rise the engine 10.25 inches (260.35 mm) above its original position from the crankshaft pulley point to the lower edge of the first crossmember after removing the four insulator nuts on the crossmember and the two bolts and flexplate inspection plate. Start by removing the 16 oil pan bolts followed by partial oil pan lowering after which you should remove the three bolts from the oil pump screen and pickup tube arrangement and position them inside the oil pan. Use a plastic scraper to clean and prepare the sealing surfaces before discarding the oil pan gasket by removing the oil pan from the engine's rear section. Avoid any use of metal scrapers or abrasive materials during cleaning. Start by setting the oil pump screen and pickup tube into the oil pan through the three bolts and afterward install the oil pan with its new gasket on the crossmember. Secure the bolts that hold the oil pump screen and pickup tube to the oil pump with 10 Nm torque (89 lb-in) and the bolt between the screen and pickup tube and spacer with 25 Nm torque (18 lb-ft). An unsecured oil pan within four minutes requires cleaning of the sealing area followed by silicone gasket and sealant application between the front cover and the cylinder block. Next, position the new oil pan gasket alongside the oil pan and loosely install its 16 bolts. Engine-builders should tighten the bolts on 4.6L (2V) and 5.4L (2V) engine blocks through three stages starting at 2 Nm (18 lb-in) and progressing to 20 Nm (177 lb-in) before adding a 60-degree torque. The installation process begins with new filter installation and engine lowering and subsequent removal of three support components: Engine Support Bar, Engine Lifting Bracket, Modular Engine Lift Bar Adapter. After assembly of the flexplate inspection cover apply force of 34 Nm (25 lb-ft) to its two bolts. Install the 4.6L (2V) engine transmission cooler tube support bracket together with the starter wiring harness support bracket and fasten the nut to 10 Nm (89 lb-in). When installing the 5.4L (2V) engine you should position transmission fluid cooler tubes and their support bracket then install and tighten the nut to 28 Nm (21 lb-ft). Fasten the two upper transmission-to-engine bolts until they reach 60 Nm torque (44 lb-ft). Before heater outlet tube installation, O-ring seals require lubrication with clean engine coolant. Then connect the coolant hose to the heater outlet tube before screwing in the stud, fasten at 25 Nm (18 lb-ft) torque setting for 4.6L (2V) engines and at 40 Nm (30 lb-ft) for 5.4L (2V) engines. Before installation of the generator position first install the shield along with retainers followed by connecting the KS electrical connector and engine wiring harness retainers. Then install the two bolts at 25 Newton meters (18 lb-ft). Connect the generator electrical wiring before tightening the B+ terminal nut to 8 Nm (71 lb-in) and join the S and ASI electrical fittings. Place the fan gear and cooling fan inside the fan shroud before refitting the intake manifold and adding clean oil to the engine while performing a leak test after starting the engine.

Related Ford E-150 Parts
 Ford E-150 Cam Gear
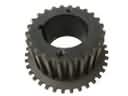 Ford E-150 Crankshaft Gear
 Ford E-150 Cylinder Head
 Ford E-150 Dipstick
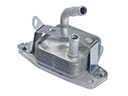 Ford E-150 Engine Oil Cooler
 Ford E-150 Exhaust Valve
 Ford E-150 Oil Drain Plug Gasket
 Ford E-150 Oil Filler Cap
 Ford E-150 Timing Chain Guide
 Ford E-150 Timing Chain Tensioner
 Ford E-150 Valve Cover Gasket
 Ford E-150 Variable Timing Sprocket