FordParts
My Garage
My Account
Cart
OEM Ford Expedition Center Console Base
- Select Vehicle by Model
- Select Vehicle by VIN
Select Vehicle by Model
orMake
Model
Year
Select Vehicle by VIN
For the most accurate results, select vehicle by your VIN (Vehicle Identification Number).
73 Center Console Bases found


Ford Expedition Floor Console, Center Part Number: HC3Z-25045A36-AA
$154.35 MSRP: $224.67You Save: $70.32 (32%)Ships in 1-2 Business Days

Ford Expedition Rear Panel Part Number: 2L1Z-78045E24-AAA
$28.12 MSRP: $38.91You Save: $10.79 (28%)Ships in 1-2 Business Days

Ford Expedition Rear Panel Part Number: GL1Z-7804567-AA
$57.31 MSRP: $79.28You Save: $21.97 (28%)Ships in 1-2 Business Days
Ford Expedition Floor Console Part Number: JL1Z-78045A36-BE
$659.52 MSRP: $1046.85You Save: $387.33 (37%)Ships in 1-3 Business Days
Ford Expedition Rear Trim Panel Part Number: JL1Z-78045E24-CD
$231.49 MSRP: $360.58You Save: $129.09 (36%)Ships in 1-2 Business Days
Ford Expedition Lower Panel, Camel, Center Part Number: 8L1Z-78045E24-AD
$55.11 MSRP: $84.65You Save: $29.54 (35%)Ships in 1-2 Business DaysFord Expedition Floor Console Part Number: JL1Z-78045A36-AF
$697.12 MSRP: $1032.77You Save: $335.65 (33%)Ships in 1-3 Business DaysFord Expedition Floor Console Part Number: JL1Z-78045A36-AE
$697.12 MSRP: $1032.77You Save: $335.65 (33%)Ships in 1-3 Business Days
Ford Expedition Front Panel, Upper Part Number: JL1Z-78045A76-DC
$828.32 MSRP: $1227.13You Save: $398.81 (33%)Ships in 1-3 Business DaysFord Expedition Front Panel, Upper Part Number: JL1Z-78045A76-DB
$828.32 MSRP: $1227.13You Save: $398.81 (33%)Ships in 1-3 Business DaysFord Expedition Front Panel, Upper Part Number: JL1Z-78045A76-CD
$872.47 MSRP: $1292.55You Save: $420.08 (33%)Ships in 1-3 Business DaysFord Expedition Front Panel, Upper Part Number: JL1Z-78045A76-JC
$1869.93 MSRP: $2770.27You Save: $900.34 (33%)Ships in 1-3 Business DaysFord Expedition Rear Panel Part Number: GL1Z-7804567-AB
$85.96 MSRP: $125.12You Save: $39.16 (32%)Ships in 1-3 Business DaysFord Expedition Rear Trim Panel Part Number: JL1Z-78045E24-BB
$246.33 MSRP: $361.72You Save: $115.39 (32%)Ships in 1-3 Business DaysFord Expedition Front Panel, Upper Part Number: JL1Z-78045A76-CC
$311.09 MSRP: $456.82You Save: $145.73 (32%)Ships in 1-3 Business Days
Ford Expedition Net, Front Part Number: 9L1Z-78043B62-AA
$28.48 MSRP: $40.40You Save: $11.92 (30%)Ships in 1-3 Business Days
Ford Expedition Finish Panel Part Number: 7L1Z-78045A76-CD
$10.71 MSRP: $14.82You Save: $4.11 (28%)Ships in 1-2 Business Days
Ford Expedition Rear Panel, Charcoal Part Number: 7L1Z-7804567-AB
$11.45 MSRP: $15.84You Save: $4.39 (28%)Ships in 1-2 Business Days
Ford Expedition Finish Panel, Front Part Number: 2L1Z-78045A76-AAA
$14.39 MSRP: $19.90You Save: $5.51 (28%)Ships in 1-2 Business Days
Ford Expedition Console, Center Part Number: 4L1Z-78045A36-TAA
$42.30 MSRP: $58.51You Save: $16.21 (28%)Ships in 1-2 Business Days
| Page 1 of 4 |Next >
1-20 of 73 Results
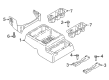
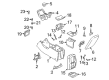
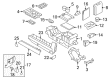
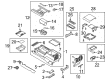
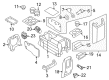
Ford Expedition Center Console Base
OEM Center Console Base boasts unmatched quality. Each part goes through full quality checks. They adhere to Ford's official factory standards. These steps remove flaws and inconsistencies. So you can get Center Console Base with long life and a perfect fit. Come to our website and find genuine Ford Expedition parts. We keep a wide inventory of OEM Expedition parts at the highly affordable prices. It's easy to search, compare, and pick what you need. You'll love the clear info and simple checkout. We offer top-rated customer service, and we reply fast. We also ship promptly to ensure your order arrives on time.
Ford Expedition Center Console Base Parts and Q&A
- Q: How to service and repair the front Center Console Base on Ford Expedition?A:First disconnect the battery negative terminal to start working on the front console. Take off the mat section and front screw of the console finish panel if these accessories are present and remove the two screws lastly. You need to take off the console finish panel from its space. Take off all three electrical connections of the parking aid switch, navigation display unit, and auxiliary A/C control. Unbolt the front floor console from its position and disconnect the front floor console electrical wires plus the cellular phone electrical connector if present. Lift away both bolt covers at the back of the front floor console and unfasten its two rear bolts. Push the front floor console toward the back to disconnect it from its floor mounting positions. Unhook all components and reinstall in the opposite order to reassemble this part.
- Q: How to remove and reinstall the front Center Console Base from all on Ford Expedition?A:Before uninstalling the front floor console everyone must engage the vehicle's parking brake and set the selector lever to neutral. Pull the front seats ahead and take off their back bolts before moving the seats back to access and remove the front bolts. Uncover and eliminate each of the two bolt covers then bolts from their positions. Next comes the selector lever trim ring extraction. To access the double-sided tape under the serial numbered name plate use a pry tool on the lower right corner. Next insert piano wire to cut and detach the name plate for Funkmaster Flex edition. To start the process you need to take the utility tray mat and screw off from the utility tray before removing the upper finish panel and setting aside the selector lever indicator bezel by releasing all four retainers. Separate the selector lever handle and front electrical connectors at their base while loosening bulkhead electrical nut and panel bolts to detach them. You can start the installation process by first reinstalling the front floor console then connecting electrical connectors and tightening the front screws to 7 Nm (62 lb-in). Insert the selector lever cable and indicator bezel back into place while making sure the upper trim panel fits properly within the retaining clips. Replace the utility tray screw alongside applying 3M PT1100 double-sided adhesive tape on the name plate and positioning it on the console finish panel for the Funkmaster Flex edition model only. Once complete, place the selector lever trim element. Thread and secure the front bolts to 11 Nm (97 lb-in). Add the bolt covers, set the front seats at the desired distance, bolt the rear screws to 11 Nm (97 lb-in), move the seats to their rearmost position, put the selector lever to park, and take off the parking brake.


Related Ford Expedition Parts
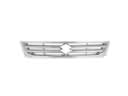 Ford Expedition Grille
 Ford Expedition Ashtray
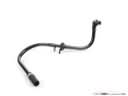 Ford Expedition Brake Booster Vacuum Hose
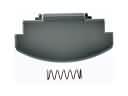 Ford Expedition Center Console Latch
 Ford Expedition Cigarette Lighter
 Ford Expedition Cup Holder
 Ford Expedition Seat Heater
 Ford Expedition Seat Switch
 Ford Expedition Shift Knob
 Ford Expedition Trunk Lid Latch
 Ford Expedition Wheelhouse
 Ford Expedition Windshield Washer Fluid Reservoir