FordParts
My Garage
My Account
Cart
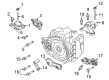
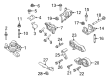
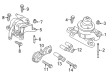
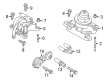
OEM Ford Explorer Engine Mount
Engine Motor Mount- Select Vehicle by Model
- Select Vehicle by VIN
Select Vehicle by Model
orMake
Model
Year
Select Vehicle by VIN
For the most accurate results, select vehicle by your VIN (Vehicle Identification Number).
58 Engine Mounts found


Ford Explorer Transmission Mount Part Number: GB5Z-6068-A
$46.02 MSRP: $65.83You Save: $19.81 (31%)


Ford Explorer Mount Bracket, Front Passenger Side Part Number: 8M8Z-6038-A
$113.72 MSRP: $175.00You Save: $61.28 (36%)Ships in 1-2 Business Days

Ford Explorer Transmission Mount Part Number: FB5Z-6068-D
$108.66 MSRP: $158.17You Save: $49.51 (32%)


Ford Explorer Torque Arm Part Number: DB5Z-6068-A
$56.56 MSRP: $82.33You Save: $25.77 (32%)

Ford Explorer Lower Bracket Part Number: BB5Z-6031-A
$87.59 MSRP: $127.50You Save: $39.91 (32%)Ships in 1-3 Business Days


Ford Explorer Motor Mount, Passenger Side Part Number: 7A2Z-6038-D
$70.30 MSRP: $102.33You Save: $32.03 (32%)Ships in 1-3 Business Days

Ford Explorer Transmission Mount, Upper Part Number: FB5Z-6038-E
$71.10 MSRP: $103.50You Save: $32.40 (32%)


Ford Explorer Transmission Mount Part Number: BB5Z-6068-B
$91.14 MSRP: $132.67You Save: $41.53 (32%)Ships in 1-2 Business Days


Ford Explorer Motor Mount Bracket Part Number: 5L2Z-6031-BA
$22.74 MSRP: $31.46You Save: $8.72 (28%)Ships in 1-2 Business Days


Ford Explorer Transmission Mount Part Number: F5TZ-6068-B
$55.66 MSRP: $77.00You Save: $21.34 (28%)Ships in 1-2 Business Days


Ford Explorer Transmission Mount Part Number: 5L2Z-6068-AA
$106.76 MSRP: $147.70You Save: $40.94 (28%)Ships in 1-2 Business Days

Ford Explorer Motor Mount Bracket, Driver Side Part Number: 7A2Z-6031-AA
$17.30 MSRP: $23.54You Save: $6.24 (27%)

Ford Explorer Front Mount Part Number: BB5Z-6038-F
$148.85 MSRP: $216.67You Save: $67.82 (32%)

Ford Explorer Motor Mount, Driver Side Part Number: 7A2Z-6038-CA
$62.98 MSRP: $91.67You Save: $28.69 (32%)


Ford Explorer Transmission Mount, Front Lower Part Number: AA5Z-6068-B
$133.97 MSRP: $195.00You Save: $61.03 (32%)


Ford Explorer Front Mount Part Number: GB5Z-6038-A
$98.24 MSRP: $143.00You Save: $44.76 (32%)


Ford Explorer Transmission Mount, Upper Part Number: FB5Z-6038-B
$120.23 MSRP: $175.00You Save: $54.77 (32%)


Ford Explorer Front Mount Part Number: DB5Z-6038-C
$123.66 MSRP: $180.00You Save: $56.34 (32%)

Ford Explorer Wheel Seal Part Number: E5TZ-6068-G


Ford Explorer Transmission Mount Part Number: 5L2Z-6068-BA
| Page 1 of 3 |Next >
1-20 of 58 Results
Ford Explorer Engine Mount
OEM Engine Mount boasts unmatched quality. Each part goes through full quality checks. They adhere to Ford's official factory standards. These steps remove flaws and inconsistencies. So you can get Engine Mount with long life and a perfect fit. Come to our website and find genuine Ford Explorer parts. We keep a wide inventory of OEM Explorer parts at the highly affordable prices. It's easy to search, compare, and pick what you need. You'll love the clear info and simple checkout. We offer top-rated customer service, and we reply fast. We also ship promptly to ensure your order arrives on time.
Ford Explorer Engine Mount Parts and Q&A
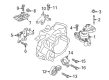
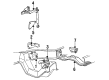
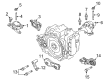
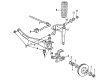
- Q: How to service and repair the engine mounts on all on Ford Explorer?A:The procedure for servicing and repairing engine support insulators on all vehicles requires disconnecting the battery ground cable followed by upper radiator Fan Shroud removal. Entering maintenance on the engine support insulators begins with lifting the vehicle onto a hoist after removing nuts from the right side motor mount. The first service starts by allowing both transmission-to-crossmember nuts to loosen and then removing nuts from the right side and left side stabilizer bars. Correct service and repair of 4X4 vehicle axle housing bushings begins with extracting the right side bolt followed by removal of left side lower and upper axle housing bushings. All vehicles require removal of the left front tire before proceeding to take off the right lower mount nut followed by its washer then the left lower mount nut with its washer. Start by taking out the bolt from the left side motor mount before inserting an appropriate jack to lift the right engine side. This will create enough space to remove the right motor mount followed by taking out the right side motor mount. The engine lifting process will be repeated to remove the left motor mount by lifting the engine from its left side. The installation ends when you perform the reverse procedure of removal.
- Q: How to remove and replace the engine mount on Ford Explorer?A:A hoist positioned vehicle requires neutral gear position and disconnecting Battery Cables for the start of engine mount removal and replacement. The installation requires removing the weather strip and bolt to set aside the power steering fluid reservoir then tightening everything to 7 Nm (62 lb-in) before completing reinstallation. Let your engine temperature decrease first before taking off the coolant expansion tank to stop air from entering the Radiator while you disconnect the overflow hose and tighten its supporting bolts to 7 Nm (62 lb-in). The next step requires the removal of two bolts accompanied by unclipping the clips to extract the upper Fan Shroud before reinstalling with screws tightened to 7 Nm (62 lb-in). The Engine Lifting Bracket requires 42 Nm (31 lb-ft) tightening for its bolt before adding the Engine Support Bar while also installing the pair of Adapters for 303-290A. The LH engine mount requires removal via its bolt which needs tightening to 103 Nm (76 lb-ft) before reinstalling. After that disconnect the five pushpins and the RH inner fender splash shield. Replace the RH engine mount by first loosening the three nuts to 90 Nm (66 lb-ft) torque then raising the engine by 60 mm (2.36 in). AWD models need four bolts removal and two stabilizer bar brackets extraction to suspend the bar until setting torque to 55 Nm (41 lb-ft) at reassembly. Hang the assembly from a jack which should be set away from obstacles before performing any lower or upper motions and use a proper jack to stabilize the axle housing. Disconnect the axle housing vent tube and remove three bolts along with three flag nuts then lower the housing 25 mm (1 in) and retighten bolts to 66 Nm (49 lb-ft). To finish the installation normalize the reinstallation of the LH engine mount nut while tightening it to 90 Nm (66 lb-ft) and proceed with the removal procedure in reverse order.


Related Ford Explorer Parts
 Ford Explorer Crankshaft Pulley
 Ford Explorer Timing Chain Tensioner
 Ford Explorer Automatic Transmission Dipstick
 Ford Explorer Camshaft Bearing
 Ford Explorer Engine Mount Bracket
 Ford Explorer Intake Valve
 Ford Explorer Oil Drain Plug Gasket
 Ford Explorer Pushrod
 Ford Explorer Rod Bearing
 Ford Explorer Spool Valve
 Ford Explorer Transfer Case Cover
 Ford Explorer Valve Stem Seal
Browse Ford Explorer Engine Mount by Years
2025
2024
2023
2022
2021
2020
2019
2018
2017
2016
2015
2014
2013
2012
2011
2010
2009
2008
2007
2006
2005
2004
2003
2002
2001
2000
1999
1998
1997
1996
1995
1994
1993
1992
1991