FordParts
My Garage
My Account
Cart
OEM Ford Explorer Rack And Pinion
Steering Gear- Select Vehicle by Model
- Select Vehicle by VIN
Select Vehicle by Model
orMake
Model
Year
Select Vehicle by VIN
For the most accurate results, select vehicle by your VIN (Vehicle Identification Number).
29 Rack And Pinions found

Ford Explorer Steering Gear Part Number: BB5Z-3504-L
$1331.16 MSRP: $2196.36You Save: $865.20 (40%)Ships in 1-2 Business Days
Ford Explorer Gear Assembly Part Number: DB5Z-3504-P
$1408.91 MSRP: $2325.45You Save: $916.54 (40%)Ships in 1-3 Business Days

Ford Explorer Steering Gear Part Number: HB5Z-3504-Y
$1573.95 MSRP: $2710.91You Save: $1136.96 (42%)Ships in 1-2 Business Days

Ford Explorer Steering Gear Part Number: F87Z-3504-HCRM
$256.10 MSRP: $420.00You Save: $163.90 (40%)Ships in 1-3 Business Days
Ford Explorer Steering Gear Part Number: 1L2Z-3504-NARM
$328.37 MSRP: $540.00You Save: $211.63 (40%)Ships in 1-3 Business Days
Ford Explorer Gear - Rack And Pinion Steering Part Number: P1MZ-3504-Y
$1169.10 MSRP: $1927.27You Save: $758.17 (40%)Ships in 1-2 Business DaysFord Explorer Gear - Rack And Pinion Steering Part Number: P1MZ-3504-X
$1196.48 MSRP: $1972.73You Save: $776.25 (40%)Ships in 1-2 Business Days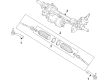
Ford Explorer Gear - Rack And Pinion Steering Part Number: P1MZ-3504-Q
$1353.06 MSRP: $2232.73You Save: $879.67 (40%)Ships in 1-2 Business DaysFord Explorer Steering Gear Part Number: EB5Z-3504-CL
$1353.06 MSRP: $2232.73You Save: $879.67 (40%)Ships in 1-3 Business DaysFord Explorer Steering Gear Part Number: BB5Z-3504-M
$1382.63 MSRP: $2281.82You Save: $899.19 (40%)Ford Explorer Steering Gear Part Number: FB5Z-3504-BK
$1399.05 MSRP: $2309.09You Save: $910.04 (40%)Ford Explorer Gear Assembly Part Number: EB5Z-3504-BL
$1399.05 MSRP: $2309.09You Save: $910.04 (40%)Ford Explorer Steering Gear Part Number: FB5Z-3504-CK
$1424.24 MSRP: $2350.91You Save: $926.67 (40%)Ford Explorer Steering Gear Part Number: HB5Z-3504-Z
$1614.77 MSRP: $2667.27You Save: $1052.50 (40%)
Ford Explorer Gear Assembly Part Number: 5L2Z-3504-BARM
$304.76 MSRP: $498.18You Save: $193.42 (39%)Ships in 1-2 Business DaysFord Explorer Steering Gear Part Number: 8L2Z-3504-ARM
$311.85 MSRP: $509.09You Save: $197.24 (39%)Ships in 1-2 Business DaysFord Explorer Steering Gear Part Number: FB5Z-3504-AK
$1362.00 MSRP: $2220.00You Save: $858.00 (39%)Ford Explorer Steering Gear Part Number: E5BZ-3504-AM
$1437.39 MSRP: $2343.64You Save: $906.25 (39%)

Ford Explorer Steering Gear Part Number: F8TZ-3504-ACRM
$310.74 MSRP: $492.73You Save: $181.99 (37%)

Ford Explorer Steering Gear Part Number: F57Z-3504-GERM
| Page 1 of 2 |Next >
1-20 of 29 Results
Ford Explorer Rack And Pinion
OEM Rack And Pinion boasts unmatched quality. Each part goes through full quality checks. They adhere to Ford's official factory standards. These steps remove flaws and inconsistencies. So you can get Rack And Pinion with long life and a perfect fit. Come to our website and find genuine Ford Explorer parts. We keep a wide inventory of OEM Explorer parts at the highly affordable prices. It's easy to search, compare, and pick what you need. You'll love the clear info and simple checkout. We offer top-rated customer service, and we reply fast. We also ship promptly to ensure your order arrives on time.
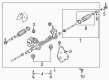
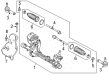
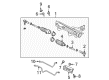
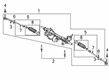
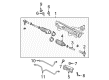
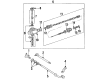
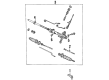
The steering rack in Ford explorer motor vehicle is important component which convert rotational movement of steering wheel into lateral movement of front wheels. The system is a rack and pinion type with pinion gear located on the steering column while the rack gear is present in a metal tube connected to the tie-rods and steering knuckles of the vehicle. Due to this design, the operator can have appropriate control of the steering with the required feedback. In the course of updating the manufacturing of the Ford Explorer models, the primary type of the steering systems that has been embraced over the years has been the power-assisted type of the rack and pinion, which provides ease and quick response to the driver. Such systems can be hydraulic or electric with hydraulic designs typically containing fluid-filled cylinder and a piston which adds extra pressure for steering. As straight gears are very efficient, preference is given to these gears but if Helical gears have to be used then there could be some problems like increased wear. There can also be minor problems like fluid leaks or worn out gears and for these, you need to have Steering Rack replaced.
Ford Explorer Rack And Pinion Parts and Q&A
- Q: How to service and repair the front rack and pinion steering gear on Ford Explorer?A:Welding and servicing the rack and pinion system should start with eliminating foreign material from entering the power steering system to stop component failure. You should use Hunter(R) 28-75-1 as a Steering Wheel holding device to maintain the wheel in a straight-ahead position. The service and repair of the rack and pinion begins with wheel removal followed by a clean-up of the 2 bolts, pin-type retainer, and oil shield as well as proper torque specification to 15 Nm (133 lb-in) when replacing them. Replace the lower steering column shaft-to-rack and pinion bolt with a new one while securing it at 48 Nm (35 lb-ft). After disconnecting the lower steering column shaft from the rack and pinion, it is necessary to remove the steering line clamp plate nut while tightening it to 25 Nm (18 lb-ft) prior to reinstalling it. When disconnecting the power steering pressure line and fluid cooler through rotating the steering line clamp plate, users must replace both O-rings. Replace the existing 2 tie-rod end nuts with new ones which should be tightened to 103 Nm (76 lb-ft). The procedure requires using a C-Frame and Screw to detach the 2 tie-rod ends from the wheel knuckle before removing the 2 rack and pinion-to-crossmember nuts and bolts which should be retightened at 350 Nm (258 lb-ft). The shock absorber lower bolt needs to be removed together with the flagnut from 4WD vehicles before tightening a new bolt to 350 Nm (258 lb-ft). Wait until the repair procedure is done and the vehicle sits on its wheels to tighten the LH lower arm nuts and bolts because this avoids incorrect clamp load or bushing damage. The installation process begins by throwing away both lower arm forward and rearward flag bolt and nut. Finally, new replacement bolts receive 400 Nm (296 lb-ft) and 200 Nm (148 lb-ft) torques when installing them. The stabilizer bar link nut acts as disposable material during installation because technicians must discard this component while tightening the new nut to 35 Nm (26 lb-ft). First, remove the rack and pinion from the LH side of the vehicle while analyzing the decision to replace it with a new rack and pinion. The removal step includes elimination of 4 rack and pinion bushings and 2 nuts. To reinstall, use the opposite order of steps while installing two new O-ring seals and new flag nuts along with filling the power steering system and checking setting the front toe.

Related Ford Explorer Parts
 Ford Explorer Steering Wheel
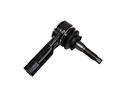 Ford Explorer Tie Rod
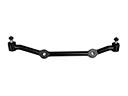 Ford Explorer Center Link
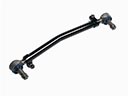 Ford Explorer Drag Link
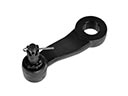 Ford Explorer Pitman Arm
 Ford Explorer Power Steering Control Valve
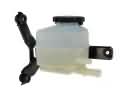 Ford Explorer Power Steering Reservoir
 Ford Explorer Rack & Pinion Bushing
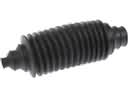 Ford Explorer Rack and Pinion Boot
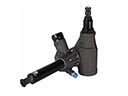 Ford Explorer Steering Gear Box
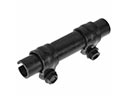 Ford Explorer Tie Rod Adjusting Sleeve
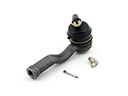 Ford Explorer Tie Rod End