FordParts
My Garage
My Account
Cart
OEM Ford Explorer Timing Cover
Engine Timing Cover- Select Vehicle by Model
- Select Vehicle by VIN
Select Vehicle by Model
orMake
Model
Year
Select Vehicle by VIN
For the most accurate results, select vehicle by your VIN (Vehicle Identification Number).
16 Timing Covers found


Ford Explorer Timing Cover, Front Part Number: BT4Z-6019-B
$122.17 MSRP: $177.83You Save: $55.66 (32%)
Ford Explorer Timing Cover, Front Part Number: 7T4Z-6019-C
$127.10 MSRP: $185.00You Save: $57.90 (32%)Ships in 1-3 Business Days

Ford Explorer Timing Cover, Front Part Number: 4C2Z-6019-CA
$128.47 MSRP: $187.00You Save: $58.53 (32%)Ships in 1-3 Business Days
Ford Explorer Timing Cover, Front Part Number: BB5Z-6019-C
$112.21 MSRP: $163.33You Save: $51.12 (32%)Ships in 1-3 Business Days
Ford Explorer Cover - Cylinder Front Part Number: PB5Z-6019-D
$127.10 MSRP: $185.00You Save: $57.90 (32%)Ships in 1-2 Business Days
Ford Explorer Cover - Cylinder Front Part Number: K2GZ-6019-L
$144.27 MSRP: $210.00You Save: $65.73 (32%)Ships in 1-2 Business Days
Ford Explorer Timing Cover, Front Part Number: L1MZ-6019-C
$153.66 MSRP: $223.67You Save: $70.01 (32%)Ships in 1-3 Business Days
Ford Explorer Timing Cover, Front Passenger Side Part Number: 7R3Z-6019-A
$170.61 MSRP: $248.33You Save: $77.72 (32%)
Ford Explorer Timing Cover, Front Part Number: N1MZ-6019-B
$343.34 MSRP: $504.17You Save: $160.83 (32%)Ships in 1-2 Business Days
Ford Explorer Valve Cover, Front Part Number: K2GZ-6019-B
$52.77 MSRP: $75.50You Save: $22.73 (31%)Ships in 1-3 Business Days
Ford Explorer Cover - Cylinder Front Part Number: PB5Z-6019-B
$325.75 MSRP: $478.33You Save: $152.58 (32%)Ships in 1-2 Business Days


Ford Explorer Timing Cover, Front Part Number: 5L2Z-6019-AA
$63.86 MSRP: $92.95You Save: $29.09 (32%)


Ford Explorer Timing Cover, Front Part Number: 2L2Z-6019-AA

Ford Explorer Timing Cover, Front Part Number: F67Z-6019-AA
Ford Explorer Timing Cover, Front Part Number: DA8Z-6019-A
Ford Explorer Timing Cover, Front Part Number: 4L1Z-6019-AA
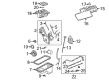
Ford Explorer Timing Cover
OEM Timing Cover boasts unmatched quality. Each part goes through full quality checks. They adhere to Ford's official factory standards. These steps remove flaws and inconsistencies. So you can get Timing Cover with long life and a perfect fit. Come to our website and find genuine Ford Explorer parts. We keep a wide inventory of OEM Explorer parts at the highly affordable prices. It's easy to search, compare, and pick what you need. You'll love the clear info and simple checkout. We offer top-rated customer service, and we reply fast. We also ship promptly to ensure your order arrives on time.
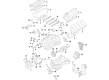
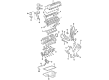
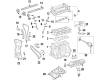
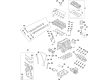
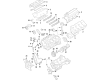
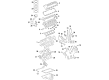
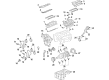
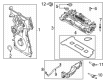
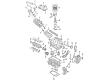
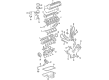
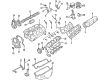
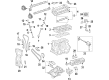
Timing Cover In Each Ford Explorer automobile, protects the engine timing, which can comprise of a timing belt/timing chain/cam belt. Made of durable materials like aluminum, plastic or steel the Timing Cover shields the inside equipments, from being interfered with by debris. Most Ford Explorer Timing Covers have gaskets installed to add to the defense of the timing belt. In all the years that the Ford Explorer has been in production the following styles of Timing Covers have been used depending on the engines needed. However, these covers are very durable and may sometimes break down unpredictably and thus need to be replaced on time to ensure safe operation of the vehicle. The Timing Cover of the Ford Explorer is very important for its longevity as well as its performance and it is crucial that the vehicle be maintained well.
Ford Explorer Timing Cover Parts and Q&A
- Q: How to Service and Repair the Engine Front Timing Cover on Ford Explorer?A:Service repair of the engine front cover begins with disconnecting the battery ground cable together with draining the cooling system. Start by removing the crankshaft front seal followed by unfastening the wiring harness bracket from the front cover with the nut removed while extracting the five Oil Pan-to-front cover bolts. Begin by removing the lower radiator hose followed by removal of the drive tensioner bolt while also disconnecting the heater hose from the coolant pump. To proceed with the procedure start by removing the wiring harness retainer together with the generator electrical connectors and crankshaft position (CKP) sensor electrical connector before extracting the three generator bracket bolts and the bracket itself. Unscrew the coil bracket-to-left-hand (LH) accessory drive bracket bolt before extracting the four bolts which can be followed by removing the LH accessory drive bracket. The technician disconnects both upper radiator hose and heater hose from the Thermostat Housing while removing engine coolant temperature (ECT) sensor electrical connector and discarding CKP sensor wiring harness retainers. Extract the bypass hose clamp from the coolant pump end while removing the thermostat housing through its three mounting bolts and retain the stud bolt locations for later reinstallation. Disassemble the ten bolts from the engine front cover then take out the cover and its gasket which you must throw away. The sealing surfaces require cleaning through the combination of a plastic scraping tool and a silicone gasket remover and metal surface prep but prohibit the use of abrasive tools. Place the new front cover gasket onto its position before sealing the oil pan and engine block surfaces at five spots with silicone gasket material. Take the ten stud bolts back to their factory positions before placing the engine front cover and tightly installing the bolts at 19 Nm (14 ft. lbs.). After securing three bolts to 11 Nm (8 ft. lbs.) on the thermostat housing begin to position the bypass hose clamp and reconnect both upper radiator hose and heater hose to the thermostat housing. Connect the ECT sensor electrical connector followed by new wiring harness retainer setup before installing the CKP sensor electrical connector and positioning its wiring. Place the LH accessory drive bracket into position before installing four bolts that need to be tightened to 42 Nm (31 ft. lbs.). The technician secured the Ignition Coil bracket-to-LH accessory drive bracket bolt at 10 Nm (89 inch lbs.) before setting the generator bracket and fastening its three bolts to 42 Nm (31 ft. lbs.). Connect the generator electrical connectors while tightening the wiring harness retainer to 8 Nm (71 inch lbs.). Install the heater hose to the coolant pump. Position the accessory drive belt tensioner before installing its bolt then apply torque of 47 Nm (35 ft. lbs.). Attach the lower radiator hose and secure the five cylinder block cradle-to-front cover bolts with washers at 10 Nm (89 inch lbs.) while bolts without washers should be tightened to 14 Nm (10 ft. lbs.). The last steps involve fitting the wiring harness bracket and installing the nut which requires torque of 20 Nm (15 ft. lbs.). Next, install the crankshaft front seal after reconnecting the battery ground cable and filling the engine cooling system.

Related Ford Explorer Parts
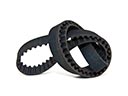 Ford Explorer Timing Belt
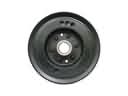 Ford Explorer Harmonic Balancer
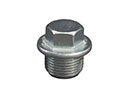 Ford Explorer Oil Drain Plug
 Ford Explorer Cam Gear
 Ford Explorer Crankshaft Seal
 Ford Explorer Cylinder Head Bolts
 Ford Explorer Dipstick Tube
 Ford Explorer Oil Filler Cap
 Ford Explorer Oil Pan Gasket
 Ford Explorer Pushrod
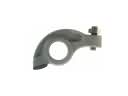 Ford Explorer Rocker Arm
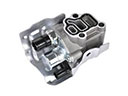 Ford Explorer Spool Valve