FordParts
My Garage
My Account
Cart
OEM Ford F-150 Heritage Exhaust Pipe
Exhaust Tail Pipe- Select Vehicle by Model
- Select Vehicle by VIN
Select Vehicle by Model
orMake
Model
Year
Select Vehicle by VIN
For the most accurate results, select vehicle by your VIN (Vehicle Identification Number).
14 Exhaust Pipes found


Ford F-150 Heritage Intermediate Pipe, Front Part Number: 6L3Z-5A212-J
$103.16 MSRP: $142.71You Save: $39.55 (28%)Ships in 1-2 Business Days
Ford F-150 Heritage Muffler W/Tpipe, Rear Part Number: 4L3Z-5230-A
$398.90 MSRP: $547.29You Save: $148.39 (28%)
Ford F-150 Heritage Muffler W/Tpipe, Front Part Number: 4L3Z-5230-B
$514.16 MSRP: $676.12You Save: $161.96 (24%)

Ford F-150 Heritage Tail Pipe Extension Part Number: 7L3Z-5255-AB


Ford F-150 Heritage Muffler W/Tpipe, Rear Part Number: XL3Z-5230-BA


Ford F-150 Heritage Intermediate Pipe, Front Part Number: F65Z5A212FA


Ford F-150 Heritage Tail Pipe Extension Part Number: 2L3Z-5K238-AA
Ford F-150 Heritage Exhaust Pipe
OEM Exhaust Pipe boasts unmatched quality. Each part goes through full quality checks. They adhere to Ford's official factory standards. These steps remove flaws and inconsistencies. So you can get Exhaust Pipe with long life and a perfect fit. Come to our website and find genuine Ford F-150 Heritage parts. We keep a wide inventory of OEM F-150 Heritage parts at the highly affordable prices. It's easy to search, compare, and pick what you need. You'll love the clear info and simple checkout. We offer top-rated customer service, and we reply fast. We also ship promptly to ensure your order arrives on time.
Ford F-150 Heritage Exhaust Pipe Parts and Q&A
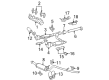
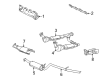
- Q: How to Service and Repair the Dual Converter Exhaust Pipe on 4.2L, 4.6L, and 5.4L Engines on Ford F-150 Heritage?A:Service and repair operations for the dual converter Y-pipe require starting with the vehicle positioned on a hoist in neutral mode followed by muffler and tall pipe removal together with muffler extension pipe if present. Engine models with 4.6L and 5.4L require disconnecting the HO2S and catalyst monitor sensor electrical connectors. The technician should support the catalytic converter near its rear outlet while maintaining the outlet flare and inlet flare and the studs intact. Afterward he should eliminate and dispose of the four nuts connecting the converter to the manifold. The first step requires you to take off the two bolts which steady the heat shield to the transmission support crossmember. A high-lift jack should support the transmission on its oil pan rails to protect internal elements before removing the transmission mount nuts and LH and RH bolts and transmission support crossmember and nuts. Cars equipped with either a 411100 or 41170W transmission need separate bolts during the procedure. The 41170W vehicles require removal of the converter mounting bracket nut. You should remove the dual converter Y-pipe by unfastening its torque clamp nut (if required) while separating the LH and RH converters from each other. All mating surfaces of the exhaust manifold outlet flare and catalytic converter inlet flare should be cleaned while avoiding damage to each component and the inlet pipe and catalytic converter. Install new exhaust fasteners with gaskets when installing components using the reverse removal procedure and wait to tighten any fastener until all components are installed starting from front to rear of the vehicle.

Related Ford F-150 Heritage Parts
 Ford F-150 Heritage Canister Purge Valve
 Ford F-150 Heritage Catalytic Converter
 Ford F-150 Heritage EGR Valve
 Ford F-150 Heritage EGR Valve Gasket
 Ford F-150 Heritage EGR Valve Position Sensor
 Ford F-150 Heritage Exhaust Manifold
 Ford F-150 Heritage Exhaust Manifold Gasket
 Ford F-150 Heritage Exhaust Tip
 Ford F-150 Heritage Muffler
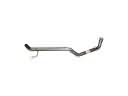 Ford F-150 Heritage Tail Pipe
 Ford F-150 Heritage Vapor Canister
 Ford F-150 Heritage Vapor Pressure Sensor