FordParts
My Garage
My Account
Cart
OEM Ford Five Hundred Timing Cover
Engine Timing Cover- Select Vehicle by Model
- Select Vehicle by VIN
Select Vehicle by Model
orMake
Model
Year
Select Vehicle by VIN
For the most accurate results, select vehicle by your VIN (Vehicle Identification Number).
1 Timing Cover found

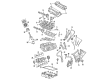
Ford Five Hundred Timing Cover, Front Part Number: 5F9Z-6019-BA
Ford Five Hundred Timing Cover
OEM Timing Cover boasts unmatched quality. Each part goes through full quality checks. They adhere to Ford's official factory standards. These steps remove flaws and inconsistencies. So you can get Timing Cover with long life and a perfect fit. Come to our website and find genuine Ford Five Hundred parts. We keep a wide inventory of OEM Five Hundred parts at the highly affordable prices. It's easy to search, compare, and pick what you need. You'll love the clear info and simple checkout. We offer top-rated customer service, and we reply fast. We also ship promptly to ensure your order arrives on time.
The Ford Five Hundred Timing Cover is an essential component that defines of the Ford automotive production five hundred lineup produced between the years 2004 to 2007. To protect the timing mechanism which can be a timing belt or a chain, the Timing Cover is usually made of hard materials such as aluminum, plastic or steel making it suitable for withstanding the force of every journeys. This essential part does not only protect the fragile teeth of the timing system from debris but also, the gasket that is frequently incorporated in it further adds to its function of protection. There is a specific Ford Five Hundred Timing Cover designed to fit different models within the Five Hundred series, therefore, should appeal to several clients within this category in terms of performance and safety. Owing to the fact that Timing Cover plays a crucial role in the overall workings of the engine, it is important that it is replaced on time, failure to which it results to other huge Problems in the Vehicle. In any case, the Ford Five Hundred model is famous for having a large cabin, innovative security systems, and powerful engines; additionally, the Timing Cover benefits from these same properties. The exceptional qualities of the Ford Five Hundred Timing Cover make it noticeable in the market, for instance, the features that relate to its compatibility with high-performance requirements and the engine reliability. In summary, this component is a critical aspect owing to its contribution in boosting the performance and durability of the Ford Five Hundred while continuing to affirm the company's core values of quality and safety.
Ford Five Hundred Timing Cover Parts and Q&A
- Q: How to Service and Repair the Engine Front Timing Cover on Ford Five Hundred?A:Maintenance of the engine front cover must be performed with clean conditions to stop engine failure from foreign objects. Placing the vehicle on a hoist in neutral position while grounding the battery is the first step. You must remove the crankshaft front seal and left-hand and right-hand valve covers together with the bolt and accessory drive belt tensioner before unfastening the three power steering pump nuts then putting away the power steering pump along with fluid reservoir. Disconnect the crankshaft position (CKP) sensor and camshaft position (CMP) sensor electrical connectors and proceed to remove the two generator-to-engine front cover stud nuts and studs. Remove the three pin-type retainers and the radiator splash shield before unfastening both A/C compressor bolts and nuts while supporting the unit with mechanic's wire. To proceed remove the two bracket-to-engine front cover bolts from the A/C compressor followed by separating the ground wire from the engine front cover stud bolt and removing the two Oil Pan-to-front cover bolts. You should first discard the gaskets together with the engine front cover and fifteen bolts along with the stud bolt. Usage of silicone gasket remover along with a plastic scraping tool is required for sealing surface preparation before installation but metal scrapers or abrasive tools must be avoided. Place three new gaskets on the front cover followed by application of 6 mm (0.23 in) diameter silicone gasket and sealer dots on mating surfaces. Place the engine front cover in position before installing all fifteen bolts and the stud bolt with a torque of 25 Nm (18 lb-ft) according to their installation sequence. Secure both oil pan-to-front cover bolts with 25 Nm (18 lb-ft) torque before draining the engine oil through removing and reinstalling the oil pan plug at 26 Nm (19 lb-ft). Secure the ground wire at the engine front cover stud bolt and apply 20 Nm (15 lb-ft) torque to the nut. Position the A/C compressor before installing both bolts and two nuts to 25 Nm (18 lb-ft). Fasten the radiator splash shield first with its three pin-type retainers before tightening the two generator-to-engine front cover studs up to 8 Nm (71 lb-in) then the two generator-to-engine front cover stud nuts to 48 Nm (35 lb-ft). Install the power steering pump along with its fluid reservoir before securing the three power steering pump nuts to 25 Nm (18 lb-ft). Position the accessory drive belt tensioner along with its bolt, apply torque of 45 Nm (33 lb-ft), reinstall both valve covers and the crankshaft front seal before filling the engine with new clean engine oil and reattaching the battery ground cable.

Related Ford Five Hundred Parts
 Ford Five Hundred Engine Mount
 Ford Five Hundred Cylinder Head
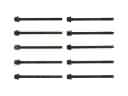 Ford Five Hundred Cylinder Head Bolts
 Ford Five Hundred Dipstick Tube
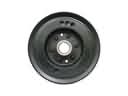 Ford Five Hundred Harmonic Balancer
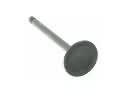 Ford Five Hundred Intake Valve
 Ford Five Hundred Oil Pump
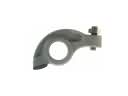 Ford Five Hundred Rocker Arm
 Ford Five Hundred Timing Chain Guide
 Ford Five Hundred Timing Chain Tensioner
 Ford Five Hundred Valve Cover Gasket
 Ford Five Hundred Valve Stem Seal