FordParts
My Garage
My Account
Cart
OEM Ford Mustang Fuel Rail
Engine Fuel Rail- Select Vehicle by Model
- Select Vehicle by VIN
Select Vehicle by Model
orMake
Model
Year
Select Vehicle by VIN
For the most accurate results, select vehicle by your VIN (Vehicle Identification Number).
22 Fuel Rails found


Ford Mustang Fuel Rail Part Number: CJ5Z-9D280-A
$664.65 MSRP: $1150.91You Save: $486.26 (43%)Ships in 1-3 Business Days


Ford Mustang Fuel Rail Part Number: BR3Z-9F792-G
$257.19 MSRP: $377.67You Save: $120.48 (32%)Ships in 1-3 Business Days

Ford Mustang Fuel Rail Part Number: BR3Z-9F792-A
$335.85 MSRP: $493.17You Save: $157.32 (32%)Ships in 1-3 Business Days

Ford Mustang Fuel Rail, Driver Side Part Number: JR3Z-9D280-B
$369.92 MSRP: $632.73You Save: $262.81 (42%)Ships in 1-3 Business DaysFord Mustang Fuel Rail, Passenger Side Part Number: JR3Z-9D280-A
$383.74 MSRP: $656.36You Save: $272.62 (42%)Ships in 1-3 Business Days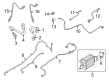
Ford Mustang Fuel Rail Part Number: KR3Z-9D280-A
$687.38 MSRP: $1110.91You Save: $423.53 (39%)Ships in 1-3 Business DaysFord Mustang Fuel Rail Part Number: P2GZ-9D280-A
$87.48 MSRP: $138.91You Save: $51.43 (38%)Ships in 1-2 Business DaysFord Mustang Fuel Rail Part Number: P2GZ-9D280-B
$194.09 MSRP: $310.91You Save: $116.82 (38%)Ships in 1-2 Business DaysFord Mustang Fuel Rail Part Number: ML3Z-9D280-D
$263.32 MSRP: $421.82You Save: $158.50 (38%)Ships in 1-2 Business DaysFord Mustang Fuel Rail Part Number: ML3Z-9D280-C
$273.54 MSRP: $438.18You Save: $164.64 (38%)Ships in 1-2 Business DaysFord Mustang Fuel Rail Part Number: KR3Z-9D280-B
$320.07 MSRP: $512.73You Save: $192.66 (38%)Ships in 1-3 Business DaysFord Mustang Fuel Rail Part Number: JR3Z-9F792-A
$420.95 MSRP: $660.00You Save: $239.05 (37%)Ships in 1-3 Business DaysFord Mustang Fuel Rail Part Number: GR3Z-9F792-C
$1131.08 MSRP: $1675.67You Save: $544.59 (33%)Ships in 1-3 Business DaysFord Mustang Manifold Assembly - Fuel Supply Part Number: JR3Z-9F792-C
$534.59 MSRP: $785.00You Save: $250.41 (32%)Ships in 1-2 Business DaysFord Mustang Manifold Assembly - Fuel Supply Part Number: JR3Z-9F792-B
$467.62 MSRP: $686.67You Save: $219.05 (32%)Ships in 1-3 Business Days

Ford Mustang Fuel Rail Part Number: 7R3Z-9F792-A


Ford Mustang Fuel Rail Part Number: 1L2Z-9D280-ED
$207.25 MSRP: $332.00You Save: $124.75 (38%)

Ford Mustang Fuel Rail, Driver Side Part Number: 6R3Z-9D280-AA

Ford Mustang Fuel Rail Part Number: DR3Z-9F792-B
$995.63 MSRP: $1475.00You Save: $479.37 (33%)
Ford Mustang Fuel Rail Part Number: 7R3Z-9F792-C
| Page 1 of 2 |Next >
1-20 of 22 Results
Ford Mustang Fuel Rail
OEM Fuel Rail boasts unmatched quality. Each part goes through full quality checks. They adhere to Ford's official factory standards. These steps remove flaws and inconsistencies. So you can get Fuel Rail with long life and a perfect fit. Come to our website and find genuine Ford Mustang parts. We keep a wide inventory of OEM Mustang parts at the highly affordable prices. It's easy to search, compare, and pick what you need. You'll love the clear info and simple checkout. We offer top-rated customer service, and we reply fast. We also ship promptly to ensure your order arrives on time.
Ford Mustang Fuel Rail Parts and Q&A
- Q: How should one service the fuel rail while ensuring safety and proper installation on Ford Mustang?A:Using the fuel rail requires you to stay away from any combination of smoking and open flame alongside personal electronic devices near fuel-related components because of its highly flammable mixtures. First release fuel system pressure before disconnecting the battery ground cable. The right-hand side removal includes three steps: taking off the wiring harness retainer from the valve cover stud bolt and removing the three Fuel Injector electrical connectors and then disconnecting the two fuel rail supply tube bolts which should be tightened to 6 Nm (53 lb-in) when reinstalled. Remove the old tube O-ring seal from the fuel rail supply while using 23 Nm (17 lb-ft) torque to fasten the right fuel rail with its two bolts. Launch the three fuel injectors from the fuel rail while discarding the O-ring seals keep special fuel-resistant material as a substitute. Discharge the fuel rail pressure and temperature sensor electrical connector and vacuum hose and radio capacitor electrical connector from the left-hand side. The two upper Ignition Coil bracket bolts require a torque of 80 lb-in before reinstallation followed by tightening the M8 and M12 lower ignition coil bracket bolts to 18 lb-ft and 25 lb-ft torque specifications. After placing the ignition coil and bracket aside, detach the wiring harness retainer from the valve cover stud bolt and disconnect the three fuel injector electrical connectors and the two fuel rail supply tube bolts that need to be tightened to 6 Nm (53 lb-in) for reinstallation. Before continuing discard the old fuel rail supply tube O-ring seal then remove the two bolts retaining the left side fuel rail by tightening them to 23 Nm (17 lb-ft). Discard existing O-ring seals from the fuel injectors then install new fuel-resistant seals that will secure the fuel rail. The installation process completes when you follow the reverse order of removal steps and apply clean engine oil for lubricating the new O-ring seals prior to installation.

Related Ford Mustang Parts
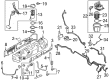
 Ford Mustang Fuel Tank
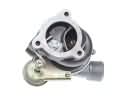 Ford Mustang Turbocharger
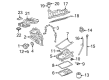
 Ford Mustang Air Filter
 Ford Mustang Fuel Pressure Sensor
 Ford Mustang Fuel Sending Unit
 Ford Mustang Mass Air Flow Sensor
 Ford Mustang Cruise Control Module
 Ford Mustang Cruise Control Servo
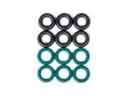 Ford Mustang Fuel Injector O-Rings
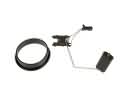 Ford Mustang Fuel Level Sensor
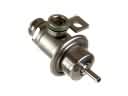 Ford Mustang Fuel Pressure Regulator
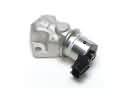 Ford Mustang Idle Control Valve