FordParts
My Garage
My Account
Cart
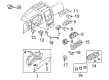
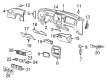
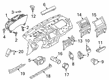
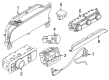
OEM Ford Ranger A/C Switch
Air Conditioning Switch- Select Vehicle by Model
- Select Vehicle by VIN
Select Vehicle by Model
orMake
Model
Year
Select Vehicle by VIN
For the most accurate results, select vehicle by your VIN (Vehicle Identification Number).
21 A/C Switches found


Ford Ranger Fan Switch Part Number: 1L2Z-19986-AA
$50.34 MSRP: $84.36You Save: $34.02 (41%)Ships in 1 Business Day


Ford Ranger Temperature Control Part Number: F4DZ-19986-A
$31.37 MSRP: $49.82You Save: $18.45 (38%)Ships in 1-2 Business Days

Ford Ranger Switch Panel Part Number: F5TZ-19980-D
$27.56 MSRP: $37.51You Save: $9.95 (27%)
Ford Ranger Heater Control Part Number: KB3Z-19980-UB
$352.59 MSRP: $585.45You Save: $232.86 (40%)Ships in 1-3 Business DaysFord Ranger Heater Control Part Number: KB3Z-19980-DB
$340.55 MSRP: $565.45You Save: $224.90 (40%)Ships in 1-3 Business Days
Ford Ranger Bezel Part Number: N1WZ-18842-F
$602.58 MSRP: $892.72You Save: $290.14 (33%)Ships in 1-2 Business DaysFord Ranger Bezel Part Number: N1WZ-18842-C
$603.80 MSRP: $894.52You Save: $290.72 (33%)Ships in 1-2 Business Days
Ford Ranger Heater Control Part Number: KB3Z-18842-SA
$676.65 MSRP: $1002.45You Save: $325.80 (33%)Ships in 1-3 Business DaysFord Ranger Heater Control Part Number: KB3Z-18842-JA
$676.65 MSRP: $1002.45You Save: $325.80 (33%)Ships in 1-3 Business Days
Ford Ranger Heater Control Part Number: KB3Z-18842-SC
$722.22 MSRP: $1069.95You Save: $347.73 (33%)Ships in 1-3 Business DaysFord Ranger Heater Control Part Number: KB3Z-18842-SB
$748.63 MSRP: $1109.08You Save: $360.45 (33%)Ships in 1-3 Business Days
Ford Ranger Temperature Control Part Number: 3L5Z-18549-AA
$49.77 MSRP: $68.85You Save: $19.08 (28%)Ships in 1-2 Business Days

Ford Ranger Blower Motor Switch Part Number: E9TZ-19986-A
$110.26 MSRP: $152.53You Save: $42.27 (28%)Ships in 1-2 Business Days

Ford Ranger Temperature Control Part Number: 3L5Z-19980-AA
Ford Ranger Switch Panel Part Number: F87Z-19980-AA
Ford Ranger Heater Control Part Number: KB3Z-18842-KA
$594.80 MSRP: $881.18You Save: $286.38 (33%)Ford Ranger Temperature Control Part Number: YL5Z-19980-AA
Ford Ranger Temperature Control Part Number: YL5Z-18549-AA
Ford Ranger Temperature Control Part Number: F87Z-18549-AA

Ford Ranger Dash Control Unit Part Number: F3TZ-19980-A
| Page 1 of 2 |Next >
1-20 of 21 Results
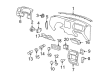
Ford Ranger A/C Switch
OEM A/C Switch boasts unmatched quality. Each part goes through full quality checks. They adhere to Ford's official factory standards. These steps remove flaws and inconsistencies. So you can get A/C Switch with long life and a perfect fit. Come to our website and find genuine Ford Ranger parts. We keep a wide inventory of OEM Ranger parts at the highly affordable prices. It's easy to search, compare, and pick what you need. You'll love the clear info and simple checkout. We offer top-rated customer service, and we reply fast. We also ship promptly to ensure your order arrives on time.
Ford Ranger A/C Switch Parts and Q&A
- Q: How to Remove and Replace the A/C Switch in a Control Assembly on Ford Ranger?A:Begin services on the control assembly by turning the temperature control knob to its complete COOL setting. Start with removing both the audio unit and center instrument panel finish panel through screw removal and spring clip disengagement steps. First detach the electrical cables before removing screws which will release the climate control assembly. The electrical connectors along with the vacuum connector need removal before you can detach the temperature control knob. The installation requires you to remove the screw which holds the temperature control switch onto the climate control head then turn the switch to break its connection to the control head without disconnecting the temperature blend door control cable. The installation process should be performed in the reverse order of removal steps while transferring the function selector switch and blower motor switch to the new climate control assembly when replacing units.
- Q: How to service and repair the A/C Switch in the climate control assembly on Ford Ranger?A:The first step for climate control assembly service starts with removing the audio unit. First you should detach the electrical connector followed by unscrewing the two mounting screws located on the instrument panel center finish panel. After unfastening the four screws which secure the climate control assembly you should disconnect all electrical wires and vacuum components connected to it. Conduct the removal of the climate control assembly as the final step. Put all steps for removal in reverse order to install the new assembly.


Related Ford Ranger Parts
 Ford Ranger Blend Door Actuator
 Ford Ranger Cabin Air Filter
 Ford Ranger Heater Core
 Ford Ranger Blower Motor
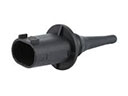 Ford Ranger Ambient Temperature Sensor
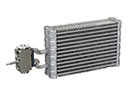 Ford Ranger Evaporator
 Ford Ranger A/C Compressor Cut-Out Switches
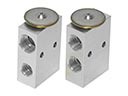 Ford Ranger A/C Expansion Valve
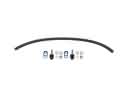 Ford Ranger A/C Hose
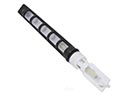 Ford Ranger A/C Orifice Tube
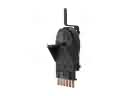 Ford Ranger Blower Control Switches
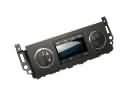 Ford Ranger HVAC Control Module