FordParts
My Garage
My Account
Cart
OEM Ford Thunderbird Wheel Hub
Wheel Axle Hub- Select Vehicle by Model
- Select Vehicle by VIN
Select Vehicle by Model
orMake
Model
Year
Select Vehicle by VIN
For the most accurate results, select vehicle by your VIN (Vehicle Identification Number).
15 Wheel Hubs found


Ford Thunderbird Knuckle Assembly, Passenger Side Part Number: 2W4Z-5B715-AA
$1216.64 MSRP: $1683.10You Save: $466.46 (28%)Ships in 1-2 Business DaysFord Thunderbird Knuckle Assembly, Driver Side Part Number: 2W4Z-5B716-AA
$1196.75 MSRP: $1655.58You Save: $458.83 (28%)Ships in 1-2 Business Days
Ford Thunderbird Knuckle, Driver Side Part Number: F3SZ-5A969-B


Ford Thunderbird Hub Assembly, Front Part Number: 5W4Z-1104-BA

Ford Thunderbird Hub & Drum, Rear Part Number: YF1Z-1V126-BA

Ford Thunderbird Front Hub & Bearing Part Number: F6SZ-1104-BA

Ford Thunderbird Hub Assembly Part Number: XW4Z-1109-AA

Ford Thunderbird Knuckle, Driver Side Part Number: F3SZ-5A969-A
Ford Thunderbird Knuckle, Passenger Side Part Number: F3SZ-5A968-B
Ford Thunderbird Knuckle, Passenger Side Part Number: F3SZ-5A968-A

Ford Thunderbird Hub & Bearing Part Number: F3SZ-1109-A

Ford Thunderbird Hub Part Number: E9SZ-1104-B
Ford Thunderbird Hub Part Number: E9SZ-1104-A

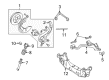
Ford Thunderbird Wheel Hub
OEM Wheel Hub boasts unmatched quality. Each part goes through full quality checks. They adhere to Ford's official factory standards. These steps remove flaws and inconsistencies. So you can get Wheel Hub with long life and a perfect fit. Come to our website and find genuine Ford Thunderbird parts. We keep a wide inventory of OEM Thunderbird parts at the highly affordable prices. It's easy to search, compare, and pick what you need. You'll love the clear info and simple checkout. We offer top-rated customer service, and we reply fast. We also ship promptly to ensure your order arrives on time.
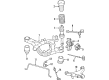
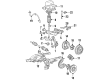
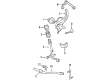
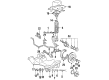
Housing considerable parts such as wheel bearings, sensors, and brake parts besides joining the wheel to the vehicle is referred to as the Wheel Hub of Ford Thunderbird vehicles. The following are the types of Wheel Hubs: Unit assemblies with bearings that have bearings already built in the unit; the non-driven axle Hubs with replaceable tapered roller bearings which do not have bearings but are designed with a slot to accommodate the Tapered roller bearings. It is appropriate that wheel bearings like any other parts in vehicles should be given proper care and attention since when they get worn it produce noise and vibration and the worse is that the wheel can fall off. Some parts of the wheel hub could be easily replaced with the other; however the repair of the wheel hub could involve very sensitive processes and needs a variety of tools to enable proper alignment and setting for proper working of vehicles. The wheel hub is a wheel bearing that enables the tires to spin freely while keeping it in place, comes in two styles for drive and non-drive wheels to enhance vehicle performance and durability.
Ford Thunderbird Wheel Hub Parts and Q&A
- Q: How to service and repair the front wheel hub on Ford Thunderbird?A:The repair process for front wheel hubs begins by selecting neutral drive position followed by placing the vehicle on a hoist. Service on the upper arm requires beginning with Shock Absorber and spring assembly removal. The hex holding feature should be used to stop the stud from turning during nut removal from ball joints and stabilizer bar links while following the removal order shown in illustrations and tables. The Brake Caliper should never hang from the hose during removal of pads and anchor plate since this could cause damage to the components. The method for upper arm-to-body nut removal requires discarding the nut and moving the Power Steering Reservoir alongside disconnecting both the fluid level sensor connector and the Brake Master Cylinder main pressure transducer electrical connector if the vehicle has this system. Access the master cylinder bolt by backing out the reservoir bolt then remove the two brake master cylinder nuts and place the brake master cylinder to the side. It is necessary to start lower arm-to-frame bolt removal by removing screws and pushpins and shield for access followed by removing bolts and nuts to set the steering gear aside before removing the lower arm bolt. Prior to installing the lower arm you should check and align the front end as needed. Install the lower arm-to-frame nuts and upper arm-to-body nuts only after reaching installation completion and making sure vehicle weight rests on wheel tires. Your installation of the wheel bearing hub assembly requires lubrication of bearing and knuckle mating surfaces with a thin coating of lubricant.

Related Ford Thunderbird Parts
 Ford Thunderbird Backing Plate
 Ford Thunderbird Brake Caliper
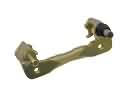 Ford Thunderbird Brake Caliper Bracket
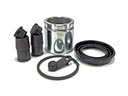 Ford Thunderbird Brake Caliper Repair Kit
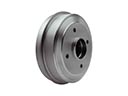 Ford Thunderbird Brake Drum
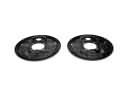 Ford Thunderbird Brake Dust Shields
 Ford Thunderbird Brake Fluid Pump
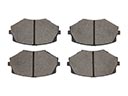 Ford Thunderbird Brake Pads
 Ford Thunderbird Brake Rotor
 Ford Thunderbird Brake Shoe Set
 Ford Thunderbird Spindle Nut
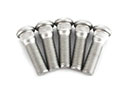 Ford Thunderbird Wheel Stud