FordParts
My Garage
My Account
Cart
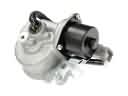
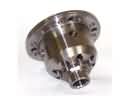
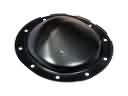
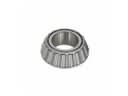
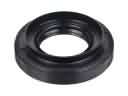
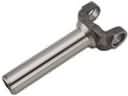
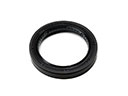
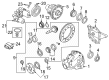
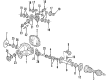
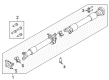
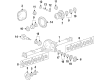
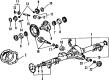
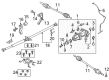
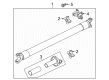
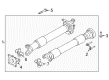
OEM Lincoln CV Joint Companion Flange
CV Joint Drive Flange- Select Vehicle by Model
- Select Vehicle by VIN
Select Vehicle by Model
orMake
Model
Year
Select Vehicle by VIN
For the most accurate results, select vehicle by your VIN (Vehicle Identification Number).
38 CV Joint Companion Flanges found


Lincoln Companion Flange Part Number: EB5Z-7B214-A
$141.48 MSRP: $218.33You Save: $76.85 (36%)Ships in 1-2 Business DaysProduct Specifications- Other Name: Flange
- Manufacturer Note: Rear Output


Lincoln Flex Coupling Part Number: HL3Z-4782-A
$74.94 MSRP: $109.08You Save: $34.14 (32%)Ships in 1-3 Business DaysProduct Specifications- Other Name: Yoke - Driveshaft Coupling Flange; Drive Shaft Flex Joint, Rear; Flange; Coupling
- Manufacturer Note: 1350
- Replaces: 9L3Z-4782-A


Lincoln Companion Flange, Rear Part Number: FL3Z-4851-A
$90.05 MSRP: $131.08You Save: $41.03 (32%)Ships in 1 Business DayProduct Specifications- Other Name: Flange; Drive Shaft Pinion Yoke, Rear
- Position: Rear
- Replaces: FL3Z-4851-B


Lincoln Companion Flange, Rear Part Number: 4L5Z-4866-AA
$94.21 MSRP: $137.13You Save: $42.92 (32%)Product Specifications- Other Name: Yoke - Driveshaft Coupling Flange; Drive Shaft Pinion Yoke, Rear; Yoke; Flange
- Position: Rear
- Replaces: E9TZ-4866-B


Lincoln Companion Flange Part Number: E9SZ-4851-A
$102.40 MSRP: $149.05You Save: $46.65 (32%)Ships in 1-2 Business DaysProduct Specifications- Other Name: Flange


Lincoln Flex Coupling, Rear Part Number: DL3Z-4782-A
$128.47 MSRP: $187.00You Save: $58.53 (32%)Ships in 1-2 Business DaysProduct Specifications- Other Name: Yoke - Driveshaft Coupling Flange; Drive Shaft Flex Joint, Rear; Drive Shaft Slip Yoke, Rear; Flange; Coupling
- Position: Rear
- Replaces: 9L3Z-4782-B, F65Z-4782-AA, AL3Z-4782-A


Lincoln Companion Flange Part Number: DL3Z-4851-A
$44.15 MSRP: $63.17You Save: $19.02 (31%)Ships in 1 Business DayProduct Specifications- Other Name: Flange
- Replaces: E9TZ-4851-A


Lincoln Slip Yoke Part Number: 6W1Z-4841-A
$172.55 MSRP: $251.17You Save: $78.62 (32%)Product Specifications- Other Name: Flange - Coupling; Double Cardan CV Centering Yoke; Driveshaft Yokes
- Replaces: F7UZ-4841-BA

Lincoln Companion Flange Part Number: AL1Z-4851-A
$60.63 MSRP: $93.13You Save: $32.50 (35%)Product Specifications- Other Name: Flange
- Replaces: 7L1Z-4851-A

Lincoln Yoke Part Number: 7L1Z-4841-B
$159.16 MSRP: $231.67You Save: $72.51 (32%)Ships in 1-3 Business DaysProduct Specifications- Other Name: Flange - Coupling; Drive Shaft Flange Yoke, Rear; Flange

Lincoln Flange, Center Part Number: 9L1Z-4868-A
$166.25 MSRP: $242.00You Save: $75.75 (32%)Ships in 1-3 Business DaysProduct Specifications- Other Name: Joint Assembly - Universal
- Manufacturer Note: Slip yoke
- Position: Center

Lincoln Companion Flange, Rear Part Number: DP5Z-4851-A
$179.77 MSRP: $261.67You Save: $81.90 (32%)Ships in 1-2 Business DaysProduct Specifications- Other Name: Flange; Drive Shaft Pinion Yoke, Rear
- Position: Rear

Lincoln Companion Flange, Rear Part Number: YC3Z-4851-AB
$216.79 MSRP: $318.33You Save: $101.54 (32%)Product Specifications- Other Name: Flange; Drive Shaft Pinion Yoke, Rear
- Position: Rear
- Replaces: YC3Z-4851-AA


Lincoln Slip Yoke, Front Part Number: 8L3Z-4841-B
$109.35 MSRP: $159.17You Save: $49.82 (32%)Product Specifications- Other Name: Flange - Coupling; Double Cardan CV Centering Yoke; Driveshaft Yokes
- Position: Front


Lincoln Slip Yoke, Rear Part Number: 7L3Z-4841-A
$170.61 MSRP: $248.33You Save: $77.72 (32%)Product Specifications- Other Name: Flange - Coupling; Drive Shaft Flange Yoke, Rear; Double Cardan CV Centering Yoke; Driveshaft Yokes; Flange
- Position: Rear
- Replaces: 4L3Z-4841-AC


Lincoln Slip Yoke Part Number: F8VZ-4841-AA
Product Specifications- Other Name: Flange - Coupling; Double Cardan CV Centering Yoke; Driveshaft Yokes

Lincoln Universal Joints, Rear Part Number: BU2Z-4635-A
Product Specifications- Other Name: Kit - Universal Joint Repair; Drive Shaft Slip Yoke, Rear; CV Joint; U Joint; Flange; Coupling
- Position: Rear
- Replaces: 4L3Z-4782-AB


Lincoln Slip Yoke, Rear Part Number: 4L3Z-4841-DC
Product Specifications- Other Name: Flange - Coupling; Drive Shaft Flange Yoke, Rear; Double Cardan CV Centering Yoke; Driveshaft Yokes; Flange
- Position: Rear

Lincoln Slip Yoke, Rear Part Number: 4L3Z-4841-CE
Product Specifications- Other Name: Flange - Coupling; Drive Shaft Flange Yoke, Rear; Double Cardan CV Centering Yoke; Driveshaft Yokes; Flange
- Position: Rear
Lincoln Flex Coupling, Rear Part Number: BR3Z-4782-A
$63.43 MSRP: $92.33You Save: $28.90 (32%)Product Specifications- Other Name: Yoke - Driveshaft Coupling Flange; Drive Shaft Flex Joint, Rear; Flange; Coupling
- Position: Rear
| Page 1 of 2 |Next >
1-20 of 38 Results
Lincoln CV Joint Companion Flange
If you own Lincoln and want to keep it in top shape, choosing OEM CV Joint Companion Flange is a smart move. They are precisely engineered and follow strict factory standards. They are made in advanced facilities that use cutting edge technology. Each part goes through thorough testing to confirm strength and safety, so you can trust it. FordPartsDeal.com gives you genuine Lincoln CV Joint Companion Flange at some of the affordable online prices without cutting quality. Every OEM Lincoln part includes the manufacturer's warranty, easy returns, and super-fast delivery. So why wait? Shop now and get your vehicle back to peak condition.
The Lincoln CV Joint Companion Flange connects the constant velocity joint to the gearbox output, ensuring true torque flow and preventing seal damage. Owners of a Lincoln crave quiet, and the cabins are outfitted with triple door seals, laminated glass and active noise control that kills the road roar before it can get to the ears. Quiet Flight ensures whisper-quiet operation, even on the highway. Lincoln enhances each model with Co-Pilot360, which adds lane keeping, blind spot alerts, auto beams and self-parking aids that ease travel. ActiveGlide on select trims enables you to lift your hands on the highway as cameras monitor the lane. The cockpit combines soft leather and wood with a glass ceiling that transforms it into a lounge, while info is served up on clear displays. If a CV Joint Companion Flange begins to leak, warnings occur long before vibration starts. The feedback received is evaluated and responds by delivering over-the-air updates. Prepared to replace the CV Joint Companion Flange on your Lincoln? Put wedges to the wheels, raise the car and place it on stands. Detach the wheel and axle nut to pull out the half shaft. Remove the old flange, clean the spines and face, and assess the sealant groove. To install the joint, you'll need to align the new CV Joint Companion Flange with the marks on the shaft and push it home. The last thing to do is torque the retainer to spec. Reinstall the axle and tighten bolts in a crisscross pattern with a dab of threadlocker. Spin the hub to confirm it moves freely before lowering the vehicle. Drive a block then check for a leak and play.