FordParts
My Garage
My Account
Cart
OEM Lincoln Door Check
Front Door Check Strap- Select Vehicle by Model
- Select Vehicle by VIN
Select Vehicle by Model
orMake
Model
Year
Select Vehicle by VIN
For the most accurate results, select vehicle by your VIN (Vehicle Identification Number).
38 Door Checks found


Lincoln Door Check, Front Driver Side Part Number: 6E5Z-5423552-B
$65.54 MSRP: $95.40You Save: $29.86 (32%)Ships in 1-3 Business DaysProduct Specifications- Other Name: Check Assembly - Door; Door Check, Front Left
- Position: Driver Side


Lincoln Check Arm, Front Part Number: 6L3Z-1522886-AA
$35.96 MSRP: $51.45You Save: $15.49 (31%)Ships in 1-2 Business DaysProduct Specifications- Other Name: Check Assembly - Door; Door Check, Front; Door Check
- Manufacturer Note: RH/LH
- Position: Front
- Replaces: 4L3Z-1522886-AA


Lincoln Door Check Part Number: EJ7Z-7827204-A
$38.45 MSRP: $55.00You Save: $16.55 (31%)Ships in 1-2 Business DaysProduct Specifications- Other Name: Check Assembly - Door
- Manufacturer Note: RH/LH


Lincoln Door Check, Front Part Number: 7L1Z-7823552-A
$38.08 MSRP: $54.48You Save: $16.40 (31%)Ships in 1-2 Business DaysProduct Specifications- Other Name: Check Assembly - Door; Door Check, Front, Rear; Check Arm
- Manufacturer Note: RH/LH
- Position: Front
- Replaces: 2L1Z-7822886-AA


Lincoln Door Check, Front Part Number: 6W4Z-5423552-A
$40.84 MSRP: $58.43You Save: $17.59 (31%)Product Specifications- Other Name: Check Assembly - Door; Door Check, Front
- Manufacturer Note: RH/LH
- Position: Front
- Replaces: XW4Z-5422886-AA


Lincoln Door Check, Front Part Number: AT4Z-7823552-A
$45.53 MSRP: $65.13You Save: $19.60 (31%)Ships in 1 Business DayProduct Specifications- Other Name: Check Assembly - Door; Door Check, Front
- Position: Front
- Replaces: 7T4Z-7823552-B, 7T4Z-7823552-A


Lincoln Door Check Part Number: AE9Z-7427204-A
$49.12 MSRP: $70.27You Save: $21.15 (31%)Ships in 1-3 Business DaysProduct Specifications- Other Name: Check Assembly - Door
- Manufacturer Note: RH/LH


Lincoln Door Check, Front Part Number: 4L2Z-7823552-AA
$194.85 MSRP: $269.55You Save: $74.70 (28%)Ships in 1-2 Business DaysProduct Specifications- Other Name: Check Assembly - Door; Door Check, Front
- Manufacturer Note: RH/LH
- Position: Front
- Replaces: 1L2Z-7823552-AA

Lincoln Door Check Part Number: LJ7Z-7827204-A
$25.41 MSRP: $36.98You Save: $11.57 (32%)Ships in 1-2 Business DaysProduct Specifications- Other Name: Check Assembly - Door

Lincoln Door Check, Rear Part Number: JL1Z-7827204-A
$29.03 MSRP: $41.18You Save: $12.15 (30%)Ships in 1-3 Business DaysProduct Specifications- Other Name: Check Assembly - Door; Door Check, Rear
- Manufacturer Note: RH/LH
- Position: Rear

Lincoln Door Check, Front Part Number: EJ7Z-7823552-A
$38.24 MSRP: $55.67You Save: $17.43 (32%)Ships in 1-2 Business DaysProduct Specifications- Other Name: Check Assembly - Door; Door Check, Front
- Manufacturer Note: RH/LH
- Position: Front

Lincoln Check Assembly - Door Part Number: DP5Z-5423552-C
$71.15 MSRP: $103.57You Save: $32.42 (32%)Ships in 1-3 Business DaysProduct Specifications- Other Name: SEAL - DUST
- Replaces: DP5Z-5423552-A, DP5Z-5423552-B

Lincoln Door Check Part Number: DP5Z-5427204-B
$71.96 MSRP: $104.75You Save: $32.79 (32%)Ships in 1-3 Business DaysProduct Specifications- Other Name: Check Assembly - Door
- Replaces: DP5Z-5427204-A


Lincoln Door Check, Rear Driver Side Part Number: 6E5Z-5427204-B
$30.22 MSRP: $42.87You Save: $12.65 (30%)Product Specifications- Other Name: Check Assembly - Door; Door Check, Rear Left
- Position: Driver Side


Lincoln Door Check, Rear Passenger Side Part Number: 6E5Z-5427204-AA
$34.13 MSRP: $48.42You Save: $14.29 (30%)Product Specifications- Other Name: Check Assembly - Door; Door Check, Rear Right
- Position: Passenger Side


Lincoln Door Check, Front Part Number: BE5Z-5423552-A
$42.03 MSRP: $60.13You Save: $18.10 (31%)Product Specifications- Other Name: Check Assembly - Door; Door Check, Front
- Manufacturer Note: RH/LH
- Position: Front


Lincoln Door Check, Front Passenger Side Part Number: 6E5Z-5423552-AA
$55.78 MSRP: $81.20You Save: $25.42 (32%)Product Specifications- Other Name: Check Assembly - Door; Door Check, Front Right
- Position: Passenger Side


Lincoln Check Strap Part Number: F5AZ-5406102-AH
Product Specifications- Other Name: Check Assembly - Door; Check
- Manufacturer Note: FROM 11/94
- Replaces: F5AZ-5406102-A


Lincoln Door Check, Rear Part Number: 4L3Z-1627204-AA
Product Specifications- Other Name: Check Assembly - Door; Door Check, Rear
- Manufacturer Note: RH/LH
- Position: Rear

Lincoln Door Check, Rear Part Number: BE5Z-5427204-A
$42.27 MSRP: $60.47You Save: $18.20 (31%)Product Specifications- Other Name: Check Assembly - Door; Door Check, Rear, Rear Left, Rear Right
- Manufacturer Note: RH/LH
- Position: Rear
| Page 1 of 2 |Next >
1-20 of 38 Results
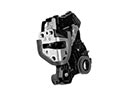
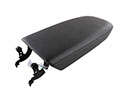
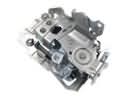
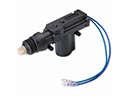
Lincoln Door Check
If you own Lincoln and want to keep it in top shape, choosing OEM Door Check is a smart move. They are precisely engineered and follow strict factory standards. They are made in advanced facilities that use cutting edge technology. Each part goes through thorough testing to confirm strength and safety, so you can trust it. FordPartsDeal.com gives you genuine Lincoln Door Check at some of the affordable online prices without cutting quality. Every OEM Lincoln part includes the manufacturer's warranty, easy returns, and super-fast delivery. So why wait? Shop now and get your vehicle back to peak condition.
Lincoln Door Check conquers door swing, prevents slams and holds openings at the desired spot. Lincoln constructs cabins with such silence that you can hear your heartbeat, with layered glass, door seals, heavy insulation and active noise wiping, and Co-Pilot360 suite monitors the lanes, lights, blind spots and narrow parking spots. Lincoln makes tech a quiet friend, provides wide screen displays, natural voice, wireless updates and the hands free ActiveGlide highway system, which leaves more work to the car, allowing the driver to relax. Lincoln tops the experience with plush leather, open-pore wood, soft metal switches and thick carpets that make even a quick errand seem first class flights. Lincoln hears the drivers, shapes their responses into each renewal, supports it with respectful personnel and maintains optimization as an uphill climb and not a downhill one. The Door Check involves a notched arm of steel, a high-strength spring and a viscous damper to measure the movement and thus the door stops at predetermined detents; it never exploded into unsuspecting shins. When the car is tipped by a hill, the Door Check closes tighter, and the heavy door is held in place by the grips because the wind or gravity cannot cause it to open its jaws. The owners like the fact that the Door Check is silent, never squeaks and lasts through thousands of cycles due to the corrosion resistant coating that mocks road salt. The replacement of old hinges or folded fenders costs actual money, and the Door Check avoids those inconveniences with the help of simple yet long-lived control.
Lincoln Door Check Parts and Q&A
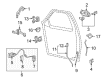
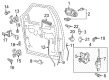
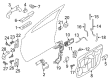
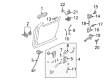
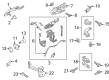
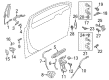
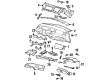
- Q: How to Service and Repair the Front Door Check on Lincoln Navigator?A:The service procedure for the front door check requires you to first remove the lower cowl trim panel together with the door scuff plate. The left side requires removal of the parking brake control assembly which should be put aside for the procedure. The next step requires removal of the lower cowl panel weather shield. The process proceeds by disconnecting the 2 door check arm-to-door bolts with subsequent untightening of 2 door check arm nuts. The left side example is shown but the right side procedure is equivalent. Afterward, remove the door check arm from the door opening of the lower cowl panel. Finishing the setup requires doing the opposite steps that were used for removal.
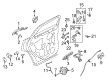
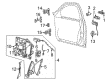
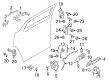
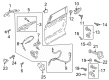
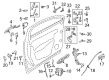
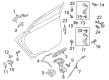
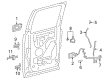
- Q: How to Service and Repair the Front Door Check on Lincoln LS?A:The first step to fix or service the front door check demands that you remove the door trim panel. After the screws, you should remove the speaker along with them. It is crucial not to shut the door once check strap screws have been taken out. Proceed with screw removal of the door check strap. The removal process for the rear door starts with unfastening its protective cover. The first step requires removing all door nuts followed by the door check straps from each door. The installation process can be finalized through executing the opposite steps of removal.