FordParts
My Garage
My Account
Cart
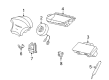
OEM Lincoln LS Clock Spring
Spiral Cable Clock Spring- Select Vehicle by Model
- Select Vehicle by VIN
Select Vehicle by Model
orMake
Model
Year
Select Vehicle by VIN
For the most accurate results, select vehicle by your VIN (Vehicle Identification Number).
2 Clock Springs found


Lincoln LS Clockspring Part Number: XW4Z-14A664-AA
$181.12 MSRP: $263.63You Save: $82.51 (32%)
Lincoln LS Clockspring Part Number: 3W4Z-14A664-AA
Lincoln LS Clock Spring
OEM Clock Spring boasts unmatched quality. Each part goes through full quality checks. They adhere to Lincoln's official factory standards. These steps remove flaws and inconsistencies. So you can get Clock Spring with long life and a perfect fit. Come to our website and find genuine Lincoln LS parts. We keep a wide inventory of OEM LS parts at the highly affordable prices. It's easy to search, compare, and pick what you need. You'll love the clear info and simple checkout. We offer top-rated customer service, and we reply fast. We also ship promptly to ensure your order arrives on time.
The Lincoln LS Clock Spring works as a vital part of the Lincoln LS Supplemental Restraint System (SRS) to keep the airbag module electrically connected to the vehicle system. The connection allows airbags to deploy efficiently during crashes thus transforming into a safety advantage for passengers. A spiral layout in the Lincoln LS Clock Spring functions to store energy during wheel rotation thus delivering steady operating efficiency. The Clock Spring operates across all Lincoln LS vehicles between 1999 and 2006 to protect both safety operations and efficiency throughout the vehicle. The market recognizes this component because of its durable construction combined with its advanced design which establishes it as a dependable automotive part. The Lincoln LS Clock Spring operates by using flat multicore cables or spring-loaded brushes which connect to concentric slip rings to ensure the reliability of airbag system operations. The Lincoln LS received top safety ratings that made it a leader among cars from its generation because of its dependable construction. Due to its leather seating along with advanced climate control and HID headlamp availability the the automaker model defines luxury through performance but relies on the essential Clock Spring functionality. The car Clock Spring presents itself as an essential component which combines functional purposes with safety features to enhance the driving experience for every passenger.
Lincoln LS Clock Spring Parts and Q&A
- Q: What Precautions Should Be Taken When Servicing the Clock Spring on Lincoln LS?A:A person servicing the air bag sliding contact should wear safety glasses for protection against accidental deployment injuries. The live air bag module should handle as a module with the trim cover and air bag pointed opposite your body at all times without setting it down with the trim cover facing downward. Rinsing your hands with water combined with soap stands as the recommended method to clear sodium hydroxide residue which could cause skin irritation. The air bag module should not receive probing techniques around its connectors because it might result in accidental deployment. Use new air bag modules and replace the discolored or damaged trim covers instead of performing any repainting. Inspect the mounting bracket and wiring pigtail of the air bag SRS system to check for deformities after collisions and replace components which display damage whether the air bag activated or not. Wipe out back up power supply by disconnecting the battery ground cable and observe one-minute continuous operation followed by disconnecting any accessory batteries and power supplies that exist. Start the removal sequence by disconnecting the battery ground cable followed by unclipping both driver air bag module and Steering Wheel components while steering wheels must be placed into a straight-ahead position. Two strips of masking tape should be placed on the air bag sliding contact to stop it from rotating by accident. Access the electrical connector through the lower steering column opening finish panel after removing its two screws then disconnect the connectors. Proceed with the removal of the lower steering column shroud before taking off the ignition switch finish panel and the headlight switch finish panel while disconnecting any power connectors when required. You have to remove the screws which separate the hood release assembly from the steering column opening reinforcement before unscrewing the heater duct. Placing the carpet out of the way is necessary to access the driver-side instrument panel tunnel brace bolts following their loosening. You can lower the steering column by first removing retaining screws and then taking off the two retaining nuts and gently pivoting the column with the loose nuts. Separate the instrument cluster finish panel to reach the automatic temperature control sensor assembly and disconnect both the microphone connector as well as steering column position sensor. There are four steps to remove the air bag sliding contact electrical connector including disconnecting three electrical connectors and releasing four connector retaining clips. To finish the process detach the clips which let you remove the air bag sliding contact from the multi-function switch before cutting the tie strap and disconnecting the electrical connector. Reverse the uninstallation steps to install while making sure the driver-side instrument panel tunnel brace bolts remain tight against the steering column cover reinforcement before performing air bag system proof.

Related Lincoln LS Parts
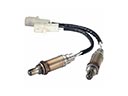 Lincoln LS Oxygen Sensor
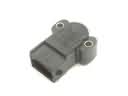 Lincoln LS Throttle Position Sensor
 Lincoln LS Air Bag Control Module
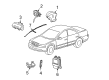
 Lincoln LS Air Bag Sensor
 Lincoln LS Airbag
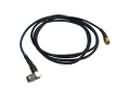 Lincoln LS Antenna Cable
 Lincoln LS Coolant Temperature Sensor
 Lincoln LS Headlight Switch
 Lincoln LS Parking Assist Sensor
 Lincoln LS Seat Switch
 Lincoln LS Speedometer
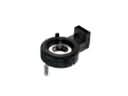 Lincoln LS Steering Angle Sensor