FordParts
My Garage
My Account
Cart
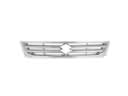
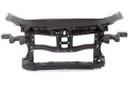
OEM Lincoln LS Front Cross-Member
Front Engine Cross Member- Select Vehicle by Model
- Select Vehicle by VIN
Select Vehicle by Model
orMake
Model
Year
Select Vehicle by VIN
For the most accurate results, select vehicle by your VIN (Vehicle Identification Number).
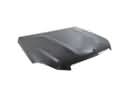
4 Front Cross-Members found


Lincoln LS Crossmember Part Number: XW4Z-5025-AA
$111.51 MSRP: $154.26You Save: $42.75 (28%)Ships in 1-2 Business Days
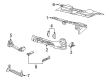
Lincoln LS Front Crossmember Part Number: XW4Z-5019-AA
Lincoln LS Front Crossmember Part Number: 6W4Z-5019-AA
Lincoln LS Front Crossmember Part Number: 3W4Z-5019-AA
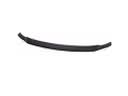
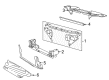
Lincoln LS Front Cross-Member
OEM Front Cross-Member boasts unmatched quality. Each part goes through full quality checks. They adhere to Lincoln's official factory standards. These steps remove flaws and inconsistencies. So you can get Front Cross-Member with long life and a perfect fit. Come to our website and find genuine Lincoln LS parts. We keep a wide inventory of OEM LS parts at the highly affordable prices. It's easy to search, compare, and pick what you need. You'll love the clear info and simple checkout. We offer top-rated customer service, and we reply fast. We also ship promptly to ensure your order arrives on time.
Lincoln LS Front Cross-Member Parts and Q&A
- Q: How to service and repair the front cross-member on Lincoln LS?A:The service and repair process for the front cross-member starts with separating the upper radiator sight shield followed by supporting the radiator to the upper radiator support. Begin by putting in the three-bar engine support before taking away both front wheel assemblies together with their attached tires. Remove first the two clips and set the front anti-lock brake sensors aside before uninstalling four bolts to position and support the front Brake Calipers. You should grasp the tie rod external hex while removing its two nuts for separation between tie rod ends and front spindles. To remove stabilizer bar links from the lower Control Arm, grasp their external hex portions and separate the links by removing and discarding the two nuts. The separation process starts with holding the ball joint external hex to remove and discard the nuts that separates the upper ball joint from the spindle. Unbolt the underbody splash shields while loosening the A/C and power steering line bracket nut above the front part of the radiator support crossmember by two turns before extracting the bolt to place the water control valve out of the way. In 3.9L vehicles you should take out the block heater harness retainer. First detach the power steering gear bolts before setting it aside for support. Next discard the Engine Mount nuts followed by disposal of the lower front strut mount bolts. Fasten the front crossmembers on the lift table while marking down the body positions of both crossmembers. To perform the installation, position the lifting table under both crossmembers then remove the assembly of engine crossmembers and radiator supports by taking out their total eight bolts. You must take off the control arm nuts along with bolts before removing them. The radiator support crossmember removal requires tooling and momentary removal of the bolts from the water control valve bracket along with bolt discarding before placing the stabilizer bar out of the way. First install new bolts to the stabilizer bar before placing the water control valve bracket into position while installing its accompanying bolts. Install the new control arm cam bolts and nuts in loose manner and put together the radiator support with engine crossmembers while checking the marked alignment and preventing engine weight from touching the crossmember before final bolt tightening. Begin by installing the four engine crossmember bolts before moving to the four radiator support crossmember bolts. Finally, install the engine mount nuts together with the new lower front strut mount bolts. Guiding the external hex of the ball joints allows correct spindle placement before new nuts are tightened. Position the lower control arms while gripping the external hex of stabilizer bar links and secure new nuts to install. Attach the power steering gear using its bolts and keep the external hex of the tie rods steady while guiding the two tie rod ends into the spindles and tightening new nuts. First install the front brake caliper bolts then position its two components before installing the front anti-lock brake sensors with their clips. All block heater harnesses should be installed into 3.9L vehicles. Place the water control valve properly before tightening its nut followed by installing bolts to the A/C and power steering brackets. Installation of underbody splash shields and front wheel and tire assemblies will complete the process while the three-bar engine support must be removed followed by separation of support from radiator before installing the upper radiator sight shield before front suspension alignment.