FordParts
My Garage
My Account
Cart
OEM Lincoln MKX Motor And Transmission Mount
Motor and Trans Mount- Select Vehicle by Model
- Select Vehicle by VIN
Select Vehicle by Model
orMake
Model
Year
Select Vehicle by VIN
For the most accurate results, select vehicle by your VIN (Vehicle Identification Number).
18 Motor And Transmission Mounts found


Lincoln MKX Transmission Mount, Driver Side Part Number: 7A1Z-6038-AA
$89.65 MSRP: $130.50You Save: $40.85 (32%)Ships in 1-2 Business Days


Lincoln MKX Motor Mount, Passenger Side Part Number: 8T4Z-6038-A
$128.24 MSRP: $186.67You Save: $58.43 (32%)


Lincoln MKX Mount Bracket, Front Passenger Side Part Number: 8M8Z-6038-A
$113.72 MSRP: $175.00You Save: $61.28 (36%)Ships in 1-2 Business Days

Lincoln MKX Transmission Mount Part Number: DT4Z-6068-A
$64.81 MSRP: $94.33You Save: $29.52 (32%)Ships in 1-3 Business Days


Lincoln MKX Transmission Mount Bracket, Driver Side Part Number: DT4Z-6031-A
$62.85 MSRP: $91.48You Save: $28.63 (32%)

Lincoln MKX Transmission Mount Part Number: BT4Z-6068-A
$62.85 MSRP: $91.48You Save: $28.63 (32%)


Lincoln MKX Transmission Mount, Lower Part Number: F2GZ-6068-A
$99.50 MSRP: $144.83You Save: $45.33 (32%)Ships in 1-3 Business Days


Lincoln MKX Transmission Mount, Lower Part Number: DP5Z-6068-H
$113.72 MSRP: $175.00You Save: $61.28 (36%)


Lincoln MKX Motor Mount, Front Part Number: DP5Z-6038-B
$167.17 MSRP: $243.33You Save: $76.16 (32%)

Lincoln MKX Transmission Mount Part Number: 8T4Z-6068-A
$56.45 MSRP: $82.17You Save: $25.72 (32%)Ships in 1-2 Business Days
Lincoln MKX Motor Mount Part Number: F2GZ-6038-A
$201.27 MSRP: $313.50You Save: $112.23 (36%)
Lincoln MKX Bracket Part Number: F2GZ-6038-C
$46.65 MSRP: $69.85You Save: $23.20 (34%)Ships in 1-3 Business Days
Lincoln MKX Support Bracket Part Number: DP5Z-6F055-A
$30.35 MSRP: $44.18You Save: $13.83 (32%)Ships in 1-2 Business Days
Lincoln MKX Engine Bracket, Driver Side Part Number: 8T4Z-6031-B
$62.85 MSRP: $91.48You Save: $28.63 (32%)Ships in 1-3 Business Days
Lincoln MKX Transmission Mount, Upper Part Number: DP5Z-6068-C
$108.29 MSRP: $166.65You Save: $58.36 (36%)Ships in 1-2 Business Days
Lincoln MKX Transmission Mount, Upper Part Number: GD9Z-6068-H
$101.33 MSRP: $147.50You Save: $46.17 (32%)

Lincoln MKX Upper Arm Part Number: F2GZ-6068-B
$104.77 MSRP: $152.50You Save: $47.73 (32%)

Lincoln MKX Transmission Mount Part Number: 8T4Z-6068-B
$56.45 MSRP: $82.17You Save: $25.72 (32%)
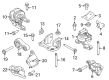
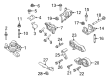
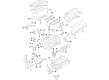
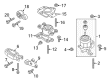
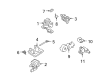
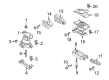
Lincoln MKX Motor And Transmission Mount
OEM Motor And Transmission Mount boasts unmatched quality. Each part goes through full quality checks. They adhere to Lincoln's official factory standards. These steps remove flaws and inconsistencies. So you can get Motor And Transmission Mount with long life and a perfect fit. Come to our website and find genuine Lincoln MKX parts. We keep a wide inventory of OEM MKX parts at the highly affordable prices. It's easy to search, compare, and pick what you need. You'll love the clear info and simple checkout. We offer top-rated customer service, and we reply fast. We also ship promptly to ensure your order arrives on time.
Motor And Transmission Mount is an important component in Lincoln MKX automobiles because it helps to fixed the position of the transmission unit while at the same time protecting it from vibrations produced by the engine. This component is very important to keep the vehicle's drivetrain steady and running to its optimal level. As with most automobiles the exact nomenclature of the Lincoln MKX can have one or more Motor And Transmission Mounts depending on the make. Various types of Motor And Transmission Mounts might be used in different Lincoln MKX models and the purpose of the used Mounts is to control the position of the transmission and to reduce the vibrations. A principal difference between these types can be observed in the structure and the number of mounts, as it may affect the vehicle's performance and the comfort of the ride. In general, the Motor And Transmission Mount is among the critical parts that contribute to the functionality of Lincoln MKX and sustains the driving exposure.
Lincoln MKX Motor And Transmission Mount Parts and Q&A
- Q: How to Service and Repair the 6F50 Motor And Transmission Mount on Lincoln MKX?A:A hoist in neutral position allows the technician to proceed with servicing and repairing the 6F50 transmission mount. The service requires first loosening the clamp on the exhaust flexible pipe before unhanging both exhaust hangers and removing a four-nut assembly with exhaust flexible pipe and Y-pipe along with discarding the nuts and gasket. Begin service by taking away the two nuts from the roll restrictor heat shield then move to unfasten the roll restrictor-to-subframe through bolt before removing bolts from the roll restrictor bracket. After detaching the roll restrictor-to-transaxle through bolt it is possible to remove the roll restrictor. The next work step involves uninstalling three bolts along with the roll restrictor bracket. The Mass Air Flow Sensor electrical connector and wiring harness fastener must be removed from the air cleaner assembly together with separate disconnects of the brake booster vacuum hose and the engine breather. First remove the ACL assembly bracket bolt then loosen the ACL outlet pipe clamp at the Throttle Body before taking out the ACL with its outlet pipe assembly. First disconnect all wiring harness fasteners then remove the three bolts before extracting the battery together with the battery tray. Correct positioning of the oil pan holding fixture against the oil pan mounting bosses ensures prevention of any damage to those areas. A floor jack together with the oil pan holding fixture should elevate the engine to release pressure from the transaxle support insulator. Start by removing the transaxle support insulator through bolt and flagnut and then proceed to disconnect the three nuts and remove the bolt and bracket from the insulator. Lower the jack while ensuring the transmission fluid cooler tube passes beyond the lower transmission support insulator bolts followed by unbolted battery tray support bracket fasteners and detached top and bottom transaxle support insulator fasteners. When installing the bottom transaxle support insulator bolts apply a torque of 55 Nm (41 lb-ft) before moving to top bolts that should also have 55 Nm (41 lb-ft) torque. The installation requires tightening the battery tray support bracket bolts to 10 Nm (89 lb-in). Lift the transaxle into position using the jack and oil pan holding fixture followed by installation of the transaxle support insulator bracket with bolt and nuts and tightening the nuts to 63 Nm (46 lb-ft) while the bolt requires 80 Nm (59 lb-ft). Fasten the transaxle support insulator through bolt by tightening it with a torque of 175 Nm (129 lb-ft) while using a flagnut. Before restoration of service, reinstall the battery tray along with three bolts tightened at 10 Nm (89 lb-in) torque. Then connect all wiring harness fasteners. After placing the battery in its position you should install the ACL assembly while tightening the bolt to 11 Nm (97 lb-in). Attach the engine breather and brake booster vacuum hoses onto the ACL assembly while tightening the MAF sensor electrical connector and wiring harness fastening. Keep the ACL outlet pipe clamp at the TB fastened to 5 Nm (44 lb-in). Screw in and tighten three bolts on the roll restrictor bracket that sits on the transaxle until they reach 90 Nm (66 lb-ft). Position the roll restrictor bracket onto the transaxle before installing three bolts which should be tightened to 90 Nm (66 lb-ft) and the roll restrictor-to-transaxle through bolt to 115 Nm (85 lb-ft). Install the roll restrictor-to-subframe through bolt and tighten it to 103 Nm (76 lb-ft). Then attach the roll restrictor heat shield by securing its two nuts to 11 Nm (97 lb-in). The final task requires you to mount the exhaust Y-pipe with its new gasket and four new nuts at 40 Nm (30 lb-ft), reinstall exhaust hangers and secure the exhaust clamp to 40 Nm (30 lb-ft), after which you should validate the transmission fluid level while making necessary fluid additions with clean fluid.

Related Lincoln MKX Parts
 Lincoln MKX Camshaft Seal
 Lincoln MKX Crankshaft
 Lincoln MKX Cylinder Head
 Lincoln MKX Engine Mount Bracket
 Lincoln MKX Exhaust Valve
 Lincoln MKX Oil Drain Plug Gasket
 Lincoln MKX Oil Pan Gasket
 Lincoln MKX Oil Pump Gasket
 Lincoln MKX Piston
 Lincoln MKX Timing Chain Tensioner
 Lincoln MKX Valve Cover Gasket
 Lincoln MKX Variable Timing Sprocket
Browse Lincoln MKX Motor And Transmission Mount by Years
2018
2017
2016
2015
2014
2013
2012
2011
2010
2009
2008
2007