FordParts
My Garage
My Account
Cart
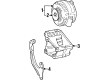
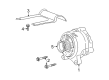
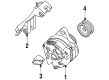
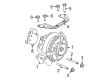
OEM Mercury Alternator Bracket
Alternator Mount- Select Vehicle by Model
- Select Vehicle by VIN
Select Vehicle by Model
orMake
Model
Year
Select Vehicle by VIN
For the most accurate results, select vehicle by your VIN (Vehicle Identification Number).
7 Alternator Brackets found

Mercury Mount Bracket Part Number: 1F2Z-10A313-AA
$55.74 MSRP: $77.12You Save: $21.38 (28%)Ships in 1-2 Business DaysProduct Specifications- Other Name: Bracket - Alternator; Alternator Bracket
- Manufacturer Note: #1F2E 10039,AA; bracket , alternator
- Replaces: XF2Z-10A313-AA


Mercury Mount Bracket Part Number: 9W7Z-10153-A
Product Specifications- Other Name: Bracket; Alternator Bracket
- Replaces: 5W7Z-10153-BA
Mercury Mount Bracket Part Number: 1W7Z-10153-CA
Product Specifications- Other Name: Bracket; Alternator Bracket; Alternator Mount Bracket

Mercury Alternator Brace Part Number: F5RZ-10B315-A
Product Specifications- Other Name: Reinforcement
- Manufacturer Note: DOHC


Mercury Mount Bracket Part Number: 6L2Z-10153-AA
Product Specifications- Other Name: Bracket; Alternator Adjusting Bracket; Alternator Bracket

Mercury Mount Bracket Part Number: 4L2Z-10153-AA
Product Specifications- Other Name: Bracket; Alternator Bracket
Mercury Mount Bracket Part Number: 2L2Z-10153-BA
Product Specifications- Other Name: Bracket; Alternator Bracket
Mercury Alternator Bracket
If you own Mercury and want to keep it in top shape, choosing OEM Alternator Bracket is a smart move. They are precisely engineered and follow strict factory standards. They are made in advanced facilities that use cutting edge technology. Each part goes through thorough testing to confirm strength and safety, so you can trust it. FordPartsDeal.com gives you genuine Mercury Alternator Bracket at some of the affordable online prices without cutting quality. Every OEM Mercury part includes the manufacturer's warranty, easy returns, and super-fast delivery. So why wait? Shop now and get your vehicle back to peak condition.
Mercury Alternator Bracket serves to align the alternator to engine pulley to reduce the possibility of slipping the belt and guard output. It is made of alloy and therefore it does not corrode easily. Since its debut in 1939, Mercury was popular due to its smooth ride, spacious cabins, crisp-looking stylistically, and unexpected acceleration power and responsiveness in steering, which made the long road trips enjoyable. Named after the Roman messenger, Mercury models such as the Cougar and Grand Marquis were comfort-friendly and cost-effective, with sleeker suspensions and less sound to reduce road noise and driver fatigue, and sported new amenities such as power components and a better sound system and new safety measures. Although the production ceased in 2011, Mercury continues to represent a mid sized formula of cars that combine ease to control with solid practicality and collectors admire its construction, seats and the highway feel that applied to entice families all over America. Start by parking the Mercury in a flat area and uncovering the battery to avoid harming electronics. Loose the belt tightener, slide the belt off, and unbolster the current Alternator Bracket. Clean the block surface and install the new Alternator Bracket then finger start each bolt to have thread seating in place. Install the alternator into the Alternator Bracket, making sure that the faces of the pulleys match, and finally by increasing the torque on bolts in rings to achieve uniform tightening. Install the belt once more, reestablish the correct belt tension, rotate the pulleys manually to confirm clearance, reconnect the battery, start the engine and listen to smooth, smooth running.
Related Mercury Parts
 Mercury Starter Solenoid
 Mercury Starter
 Mercury Alternator
 Mercury Voltage Regulator
 Mercury Car Battery
 Mercury Alternator Brush
 Mercury Alternator Pulley
 Mercury Armature
 Mercury Battery Cable
 Mercury Battery Tray
 Mercury Starter Brush