FordParts
My Garage
My Account
Cart
OEM Mercury Milan Cam Gear
Camshaft Gear- Select Vehicle by Model
- Select Vehicle by VIN
Select Vehicle by Model
orMake
Model
Year
Select Vehicle by VIN
For the most accurate results, select vehicle by your VIN (Vehicle Identification Number).
5 Cam Gears found


Mercury Milan Actuator Part Number: 9L8Z-6256-A
$225.77 MSRP: $351.67You Save: $125.90 (36%)


Mercury Milan Camshaft Gear Part Number: 1S7Z-6256-AA
$19.69 MSRP: $28.67You Save: $8.98 (32%)Ships in 1-2 Business Days


Mercury Milan Camshaft Gear Part Number: 3L8Z-6256-AA
$30.23 MSRP: $44.00You Save: $13.77 (32%)Ships in 1-3 Business Days


Mercury Milan Actuator Part Number: 6M8Z-6C525-D
$168.32 MSRP: $245.00You Save: $76.68 (32%)Ships in 1-3 Business Days


Mercury Milan Actuator Part Number: 3M4Z-6256-BA
$164.88 MSRP: $240.00You Save: $75.12 (32%)
Mercury Milan Cam Gear
OEM Cam Gear boasts unmatched quality. Each part goes through full quality checks. They adhere to Mercury's official factory standards. These steps remove flaws and inconsistencies. So you can get Cam Gear with long life and a perfect fit. Come to our website and find genuine Mercury Milan parts. We keep a wide inventory of OEM Milan parts at the highly affordable prices. It's easy to search, compare, and pick what you need. You'll love the clear info and simple checkout. We offer top-rated customer service, and we reply fast. We also ship promptly to ensure your order arrives on time.
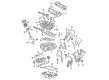
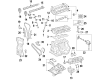
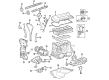
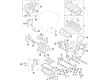
The Cam Gear is considered as an important part that can help to improve the quality and performance of the Mercury Milan cars to a very great extent. This highly detailed Cam Gear is interconnected with the camshaft and is used to fine-tune the valve timing which in turn controls the torque and horsepower of the vehicle. The Cam Gear allows the timing to be advanced or retarded in order to enhance the performance of the vehicle engine with requisite and relevant power delivery for the different driving moods. It is now available for compatibility with all the models of Mercury Milan built between 2006 and 2011 to improve the engine performance and safety. Cam Gears in particular have strong structural characteristics and are used in the construction of the Mercury Milan. Because of the features that enhances the engine characteristics, Cam Gear demonstrates in the automotive market high quality indicator considering enhanced fuel efficiency and total driving experience. Also, by engaging the Cam Gear, the specific vehicle is adequately safe since it enhances proper functioning of the engine hence minimizing the occurrence of mechanical malfunctions. In all, the Cam Gear is the epitome of Mercury's philosophy of durability and effectiveness, making it a necessity for Mercurian Milan who would wish to improve on their car apparatus.
Mercury Milan Cam Gear Parts and Q&A
- Q: How to Remove and Replace the Cam Gear on Mercury Milan?A:The first step involves putting a hoisted vehicle in neutral before proceeding with Camshaft removal and replacement. The first step is to remove the accessory Drive Belt along with the underbody cover if present by unfastening 7 screws. Follow the procedure by removing the Variable Camshaft Timing (VCT) solenoid and verify all valve clearances. The crankshaft pulley bolt requires clockwise rotation until the pulley hole reaches the 6 o'clock mark to correctly position the No. 1 piston at Top Dead Center. Place the Camshaft Alignment Plate within slots on both camshafts after which automatic transaxle vehicles must lose their 2 halfshaft carrier bracket bolts and extract the right halfshaft from the transmission. Attach the Crankshaft TDC Timing Peg through the engine plug bolt to stop the crankshaft motion beyond TDC. A standard 6 mm x 18 mm bolt should receive hand-tightening as it passes through the crankshaft pulley until inserted into the front cover. Next, extract both lower and upper timing hole plugs from the engine front cover. The Camshaft Alignment Plate needs installation in the rear position of the intake camshaft alone. Through the lower front cover timing hole a small tool will release the ratcheting mechanism in the time chain tensioner. An assistant should rotate the exhaust camshaft clockwise to collapse the timing chain tensioner plunger. Place an M6 x 30 mm bolt in the upper front cover timing hole to keep the tensioner arm extended before removing the bolt along with its corresponding exhaust camshaft drive gear to avoid camshaft rotation. Before proceeding extract the Camshaft Alignment Plate and the timing chain from the intake camshaft drive gear alongside making notes about the lobe positions relative to the No. 1 cylinder. You should loosen the intake camshaft bearing cap bolts starting from the specified sequence to free all tension before removing the bolts and bearing caps when extracting the intake camshaft. First identify the installation references for the camshaft phaser and sprocket and the camshaft before putting the camshaft in a soft-jawed vise to uninstall the camshaft phaser and sprocket bolt. During new part installation keep reference marks from disassembly and apply them to the replacement components. Mount the camshaft in a soft-jawed vise followed by camshaft phaser and sprocket installation along with bolt tightening to 72 Nm (53 lb-ft). The intake camshaft gets installed when the Camshaft Alignment Plate slots face each other and the No. 1 cylinder lobes hold their original position from disassembly. The intake camshaft journals and bearing caps require engine oil lubrication before installing both components while the bolts need sequential tightening at three stages starting from finger tight up to 7 Nm (62 lb-in) and finishing at 16 Nm (142 lb-in). Before installing the timing chain onto the intake camshaft drive gear you need to add the Camshaft Alignment Plate. Place the exhaust camshaft drive gear into the timing chain then fasten it onto the exhaust camshaft using hand torques on the bolt. Release the tensioner arm by removing the M6 x 30 mm bolt before tightening the exhaust camshaft drive gear bolt to 72 Nm (53 lb-ft) without letting the camshaft rotate. First uninstall the Camshaft Alignment Plate together with the 6 mm x 18 mm bolt and the Crankshaft TDC Timing Peg. Apply silicone gasket and sealant to the lower timing hole plug threads before installing it and achieving 12 Nm (106 lb-in) torque. The engine plug bolt needs installation followed by torquing to 20 Nm (177 lb-in). Automatic transaxle vehicles need the RH halfshaft along with its respective two halfshaft carrier bearing bracket bolts to be tightened to 40 Nm (30 lb-ft). After installing the underbody cover with its seven screws users should proceed to add the accessory drive belt before fitting the VCT solenoid.

Related Mercury Milan Parts
 Mercury Milan Crankshaft
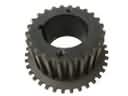 Mercury Milan Crankshaft Gear
 Mercury Milan Crankshaft Seal
 Mercury Milan Crankshaft Thrust Washer
 Mercury Milan Dipstick Tube
 Mercury Milan Engine Mount Torque Strut
 Mercury Milan Exhaust Valve
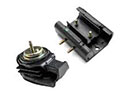 Mercury Milan Motor And Transmission Mount
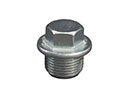 Mercury Milan Oil Drain Plug
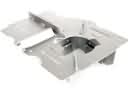 Mercury Milan Oil Pan Baffle
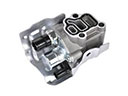 Mercury Milan Spool Valve
 Mercury Milan Timing Chain