FordParts
My Garage
My Account
Cart
OEM Mercury Milan Intake Manifold
Engine Intake Manifold- Select Vehicle by Model
- Select Vehicle by VIN
Select Vehicle by Model
orMake
Model
Year
Select Vehicle by VIN
For the most accurate results, select vehicle by your VIN (Vehicle Identification Number).
5 Intake Manifolds found


Mercury Milan Intake Manifold Part Number: 9E5Z-9424-C
$141.98 MSRP: $206.67You Save: $64.69 (32%)


Mercury Milan Intake Manifold, Upper Part Number: 9L8Z-9424-A
$105.11 MSRP: $153.00You Save: $47.89 (32%)


Mercury Milan Intake Manifold Part Number: 3S4Z-9424-AM


Mercury Milan Intake Manifold, Lower Part Number: 3F1Z-9424-AC

Mercury Milan Intake Manifold, Lower Part Number: 9L8Z-9424-C
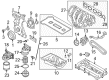
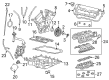
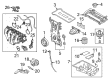
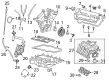
Mercury Milan Intake Manifold
OEM Intake Manifold boasts unmatched quality. Each part goes through full quality checks. They adhere to Mercury's official factory standards. These steps remove flaws and inconsistencies. So you can get Intake Manifold with long life and a perfect fit. Come to our website and find genuine Mercury Milan parts. We keep a wide inventory of OEM Milan parts at the highly affordable prices. It's easy to search, compare, and pick what you need. You'll love the clear info and simple checkout. We offer top-rated customer service, and we reply fast. We also ship promptly to ensure your order arrives on time.
Mercury Milan intake manifold is among the prime parts that help to improve the functioning of Mercury Milan cars and their durability. At the crankcase and well-known for its smooth performance, the Intake Manifold is instrumental in delivering the air or the air/fuel combination to each cylinder and therefore has a direct bearing on the engine power and acceleration. Constructed from the composite plastics the Mercury Milan Intake Manifold offers less augments weight which in turn makes it to be more effective in heat dissipation as compared to the traditions types hence enhancing the operation of the Mercury Milan. Its compatibility covers different model of Mercury Milan manufactured between 2006 and 2011, and that makes it ideal for both the professional and the casual user. Some of sophisticated features like Variable Length Intake Manifold (VLIM) enables changes in the intake tract length depending on the engine load hence improving flow, combustion efficiency and safety. This new design brings out high performance output while at the same time enhancing better fuel consumption hence making Mercury Milan a car of great returns for those who need powerful cars. Another impressive creation for the Mercury Milan, this Intake Manifold also marks the car manufacturer's competitive edge in the marketplace: reliability, advanced engineering and versatility of the Intake Manifold making sure the clients drive with thrill and excitement. All in all, the Mercury Milan Intake Manifold gives a perfect idea what it means to get Mercury vehicle that would impress with its quality and performance; thus cementing its place in automotive industry.
Mercury Milan Intake Manifold Parts and Q&A
- Q: How to service the intake manifold on Mercury Milan?A:The service procedure for the intake manifold begins with hoisting the vehicle in neutral mode while disconnecting the battery ground cable. The procedure starts with removing the air cleaner outlet pipe followed by disassembly of the two nuts and bolt from the generator air inlet duct which needs a torque of 6 Nm (53 lb-inch) for reinstalling. Use the locking ring depressors to disconnect both brake booster vacuum tube and evaporative emissions (EVAP) tube from their intake manifold connections. Remove the fuel rail insulator from the engine compartment by first disconnecting both swirl control valve electrical connectors and detaching the two wiring harness pin-type retainers. Detach the electrical connector pin-type retainer along with removing seven screws that secure the underbody cover when installed. Manual transaxle vehicles need two bolts removed to position the Clutch Slave Cylinder aside and the bolts get tightened at 22 Nm (16 lb-ft) when reinstalled. Before installing the air pump return to service, vehicles with air need users to disconnect their electrical connector first then detach three securing bolts before setting the pump aside with a torque of 30 Nm (22 lb-ft). After disconnecting the vacuum hose from the intake manifold remove the radiator hose retaining clip followed by the intake manifold lower bolt installation with a torque of 18 Nm (13 lb-ft). You need to separate and remove the manifold absolute pressure (MAP) sensor wiring harness pin-type retainer along with engine oil pressure (EOP) switch electrical connector and intake manifold runner control (IMRC) actuator from their respective plugs. Position the wiring harness to the side. During reinstallation of the Starter connect the S-terminal wire along with the nut which requires a torque of 12 Nm (9 lb-ft). Proceed by disconnecting the Throttle Body electrical connector then discard the gasket before removing its four bolts for placement aside and ensure proper torque of 10 Nm during reinstallation. First detach both pin-type retainers from the intake manifold by observing its different bolt sizes for future installation. Next remove the seven bolts to set the intake manifold aside so you can reach and tighten the crankcase vent hose clamp and EGR Tube to 18 Nm (13 lb-ft). The crankcase vent hose requires release of the clamp to begin the disconnection process after which you should detach the Knock Sensor electrical connector pin-type retainer along with removing the EGR tube. Reinstallation should be executed with a torque of 55 Nm (41 lb-ft). To complete the task remove the intake manifold before discarding both gaskets then reinstall everything in reverse order while using new gaskets for the TB and intake manifold.

Related Mercury Milan Parts
 Mercury Milan Air Filter
 Mercury Milan Air Duct
 Mercury Milan Air Filter Box
 Mercury Milan Air Intake Coupling
 Mercury Milan Fuel Filler Neck
 Mercury Milan Fuel Pump Gasket
 Mercury Milan Fuel Pump Tank Seal
 Mercury Milan Fuel Tank
 Mercury Milan Intake Manifold Gasket
 Mercury Milan Mass Air Flow Sensor
 Mercury Milan Throttle Body
 Mercury Milan Throttle Body Gasket