FordParts
My Garage
My Account
Cart
OEM Mercury Montego Timing Cover
Engine Timing Cover- Select Vehicle by Model
- Select Vehicle by VIN
Select Vehicle by Model
orMake
Model
Year
Select Vehicle by VIN
For the most accurate results, select vehicle by your VIN (Vehicle Identification Number).
1 Timing Cover found

Mercury Montego Timing Cover, Front Part Number: 5F9Z-6019-BA
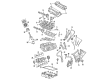
Mercury Montego Timing Cover
OEM Timing Cover boasts unmatched quality. Each part goes through full quality checks. They adhere to Mercury's official factory standards. These steps remove flaws and inconsistencies. So you can get Timing Cover with long life and a perfect fit. Come to our website and find genuine Mercury Montego parts. We keep a wide inventory of OEM Montego parts at the highly affordable prices. It's easy to search, compare, and pick what you need. You'll love the clear info and simple checkout. We offer top-rated customer service, and we reply fast. We also ship promptly to ensure your order arrives on time.
Another Mercury Montego part which is critical to the dependability and value of Mercury Montego cars is the Timing Cover. Intended for the protection of the engine's timing mechanism which could be a timing belt, timing chain or cam belt, the Timing Cover is made of powerful materials which may include aluminum, plastic, or steel. This strong design helps to overcome the possibilities of debris to critically affect other sensitive parts of the Mercury Montego engine, hence increasing its efficiency and safety. Given that this Timing Cover is compatible with a range of Montego models, unprecedented customized satisfaction for each model is made available for the late 1960 Montego and the subsequent designs up to 2007. A significant number of Timing Covers are fitted with gaskets which give an extra layer of protection for the timing belt and therefore making them so reliable. It is an exceptionally robust unit, but it is optimal changed on time to prevent untimely failure that may be hazardous to the vehicle's operation. The Mercury Montego has instant appeal in the automotive market especially when it comes to features like the metallic satin finish and impressive luxury interiors as well as it amply proves that safety is not an option as it provides standard airbags and has recorded impressive scores on the crash tests. The Timing Cover hence is not mere cover; it is a component of the Montego's design that affects its functioning, reliability and durability and hence it is an important feature for the Mercury Montego owner.
Mercury Montego Timing Cover Parts and Q&A
- Q: How to Service and Repair the Engine Front Timing Cover on Mercury Montego?A:Prior to servicing or repairing the engine front cover you must maintain cleaning procedures to stop engine failure from foreign materials. The first step requires placing the vehicle on a hoist with the neutral position selected while disconnecting the battery ground cable. The crankshaft front seal requires removal with the LH and RH valve covers together with the bolt and accessory drive belt tensioner and power steering pump nuts. The power steering pump and fluid reservoir should then be set aside. The first step includes disconnecting the buttons of the crankshaft position (CKP) sensor and camshaft position (CMP) sensor then scientists proceed to remove the two generator-to-engine front cover stud nuts and studs followed by the three pin-type retainers and the radiator splash shield. The procedure starts with removing the two A/C compressor bolts and two nuts while using mechanic's wire to support the A/C compressor. Then detach the ground wire from the engine front cover stud bolt and take out the two oil pan-to-front cover bolts. Discard the gaskets while you remove the fifteen bolts, stud bolt, together with the engine front cover. The installation process requires cleaning all seal surfaces with silicone gasket remover and plastic scrape tools that must protect the oil pan gasket from damage. The installation requires three new gaskets in the front cover with a 6 mm (0.23 inch) diameter application of silicone gasket and sealer as joint dots. The proper sequence to bolt and tighten the fifteen bolts and stud bolt to 25 Nm (18 ft. lbs.) must be followed after positioning the engine front cover. The next operations include attaching two front cover to oil pan bolts at 25 Nm torque (18 ft. lbs.) before removing engine oil through the oil pan plug followed by reinstallation and torquing to 26 Nm (19 ft. lbs.). Fasten the ground wire to the stud bolt of the engine front cover while tightening its connecting nut to 20 Nm (15 ft. lbs.). To complete this part secure the accessory drive belt tensioner adjacent to its bolt which should be torqued to 45 Nm (33 ft. lbs.). Then apply 25 Nm (18 ft. lbs.) torque to the two bolts that attach the A/C compressor bracket to the engine front cover. Position the A/C compressor and apply two bolts and two nuts while tightening to 25 Nm (18 ft. lbs.). Afterward, replace the radiator splash shield by inserting its three pin-type retainers. Secure both generator-to-engine front cover studs at 8 Nm (71 inch lbs.) before tightening the two generator-to-engine front cover stud nuts to 48 Nm (35 ft. lbs.). Reconnect the camshaft position (CMP) sensor and crankshaft position (CKP) sensor electrical connectors before positioning the power steering pump along with its fluid reservoir. Then install three power steering pump nuts by tightly torquing them to 25 Nm (18 ft. lbs.). Fitting the accessory drive belt tensioner, bolt and tightening it to 48 Nm (35 ft. lbs.) marks the first step before installing the left-hand and right-hand valve covers and crankshaft front seal and engine filling with new engine oil and battery ground cable reconnection.

Related Mercury Montego Parts
 Mercury Montego Camshaft
 Mercury Montego Crankshaft Pulley
 Mercury Montego Cylinder Head
 Mercury Montego Engine Mount
 Mercury Montego Exhaust Valve
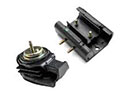 Mercury Montego Motor And Transmission Mount
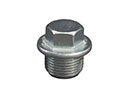 Mercury Montego Oil Drain Plug
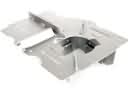 Mercury Montego Oil Pan Baffle
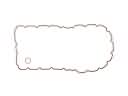 Mercury Montego Oil Pan Gasket
 Mercury Montego Rocker Arm
 Mercury Montego Timing Chain
 Mercury Montego Valve Stem Seal