FordParts
My Garage
My Account
Cart
OEM Mercury Monterey Air Bag Control Module
SRS Airbag Module- Select Vehicle by Model
- Select Vehicle by VIN
Select Vehicle by Model
orMake
Model
Year
Select Vehicle by VIN
For the most accurate results, select vehicle by your VIN (Vehicle Identification Number).
6 Air Bag Control Modules found

Mercury Monterey Control Module Part Number: 6F2Z-14B321-AA
$148.97 MSRP: $206.09You Save: $57.12 (28%)Ships in 1-2 Business Days
Mercury Monterey Control Module Part Number: 5F2Z-14B321-AA
Mercury Monterey Control Module Part Number: 6F2Z-14B321-BA
Mercury Monterey Control Module Part Number: 5F2Z-14B321-BA

Mercury Monterey Control Module Part Number: 4F2Z-14B321-BA
Mercury Monterey Control Module Part Number: 4F2Z-14B321-AA
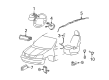
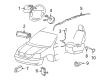
Mercury Monterey Air Bag Control Module
OEM Air Bag Control Module boasts unmatched quality. Each part goes through full quality checks. They adhere to Mercury's official factory standards. These steps remove flaws and inconsistencies. So you can get Air Bag Control Module with long life and a perfect fit. Come to our website and find genuine Mercury Monterey parts. We keep a wide inventory of OEM Monterey parts at the highly affordable prices. It's easy to search, compare, and pick what you need. You'll love the clear info and simple checkout. We offer top-rated customer service, and we reply fast. We also ship promptly to ensure your order arrives on time.
Mercury Monterey Air Bag Control Module Parts and Q&A
- Q: What precautions should be taken when servicing the air bag control module on Mercury Monterey?A:Safety glasses should always be worn when servicing the air bag control module to prevent possible injuries during accidental deployment. Changing or handling the original horizontal position of the restraints control module (RCM) with ignition ON creates a risk of safety canopy deployment. Check the orientation of the RCM before starting SRS operation while performing a check of the RCM for any mounting or bracket deformation when the vehicle experiences center tunnel damage irrespective of air bag deployment. Vehicle sensor orientation needs close examination because inspection of the sensor mounting bracket along with the wiring pigtail should check for damage after any collision and replace all damaged SRS components. Using memory saver devices creates a risk of personal injury so they should be avoided. The 40-pin connector of the RCM needs verification before installation because it shows differences between vehicles with safety canopies or side air bags. Compulsory insertion of the connector will negatively affect both the RCM and connector system. The electronic system is quite sensitive to static discharges since these can trigger damaging effects. The RCM fuse removal results in the air bag warning lamp illumination during the ignition ON stage which represents a normal condition with no SRS fault indication. Full operation and fault-free status of the SRS must be confirmed before the vehicle is handed over to the customer. The repair starts with installing fresh components but you should reinstall the original part if the problem keeps happening and then retest again. The process to remove RCM starts with system depowering then removing the four utility compartment scrivets before disconnecting electrical connectors followed by removing the utility compartment itself. Cable the large RCM electrical connector free by sliding the thumb tab and rotating the connector position assurance lever backward followed by removing the connector. First disconnect the small RCM electrical connector before extracting the RCM bracket bolts to remove the RCM bracket together with the RCM from the system. To install situate RCM bracket and RCM within the vehicle then fasten the four RCM bracket bolts to 12 Nm (9 lb-ft) to ensure system functionality. Before connecting the large RCM electrical connector fully release its position assurance lever while avoiding any angle on the connector to prevent connection problems and component destruction. Slightly insert the large RCM connector until it clicks audibly afterward use the connector position assurance lever to lock the connector secure by making sure the thumb tab activates. Link the small RCM electrical connector before replacing the utility compartment with its four scrivets while restarting the system power.

Related Mercury Monterey Parts
 Mercury Monterey Air Bag Sensor
 Mercury Monterey Airbag
 Mercury Monterey Antenna Cable
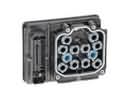 Mercury Monterey Brake Controller
 Mercury Monterey Clock Spring
 Mercury Monterey Dimmer Switch
 Mercury Monterey Horn
 Mercury Monterey Horn Relay
 Mercury Monterey Ignition Coil
 Mercury Monterey Speed Sensor
 Mercury Monterey Temperature Sender
 Mercury Monterey Wiper Motor