FordParts
My Garage
My Account
Cart
OEM 2001 Lincoln Continental Evaporator
A/C Evaporator Core- Select Vehicle by Model
- Select Vehicle by VIN
Select Vehicle by Model
orMake
Model
Year
Select Vehicle by VIN
For the most accurate results, select vehicle by your VIN (Vehicle Identification Number).
1 Evaporator found


2001 Lincoln Continental Lower Case Part Number: 1F1Z-19850-A
Product Specifications- Other Name: Evaporator Assembly; A/C Evaporator Core Case & Repair Kit.; Evaporator Core; Evaporator Case; Housing Assembly; Case Assembly
- Replaces: 1F1Z-19850-CA, YF3Z-19850-BA, YF1Z-19850-DB, XF3Z-19850-CB
- Item Weight: 18.90 Pounds
- Condition: New
- Fitment Type: Direct Replacement
- SKU: 1F1Z-19850-A
- Warranty: This genuine part is guaranteed by Ford's factory warranty.
2001 Lincoln Continental Evaporator
If you're seeking quality and affordability, look no further than our extensive inventory of genuine 2001 Lincoln Continental Evaporator available at FordPartsDeal.com. You can confidently purchase our OEM 2001 Lincoln Continental Evaporator as they are supported by the manufacturer's warranty and our hassle-free return policy, alongside the benefit of our fast delivery service.
2001 Lincoln Continental Evaporator Parts Q&A
- Q: How is the evaporator core serviced as a core and housing assembly on 2001 Lincoln Continental?A: The evaporator core service involves working with both the core unit and housing that comprises the evaporator core along with its internal doors and seals along with door linkage. Start the service by taking out both the rear seat airflow duct and instrument panel. Remove radiator coolant to a level below the heater core before you execute the refrigerant discharging and recovery procedure. You must disconnect the powertrain control module (PCM) electrical connector followed by disconnection of the heater water hoses from the heater core then the vacuum supply hose. Remove the spring lock couplings of A/C evaporator core by detaching the condenser to evaporator tube and the evaporator to accumulator tube. The first step involves disconnecting the evaporator housing electrical connectors before removing both cowl panel nuts and washers along with the A/C evaporator housing and metal cover together with the A/C electronic blend door actuator. Take care when extracting the A/C damper door shaft from the air temperature control door shaft because the brittle element may bend. Remove the A/C air intake damper assist spring first. Take out the A/C evaporator case outlet door shaft and the A/C tube dash panel seal regarding its attachment to the A/C evaporator drain tube seal. During installation apply the correct amount of PAG refrigerant compressor oil as lubrication to the new evaporator core while also putting in place the A/C tube dash panel seal along with the A/C evaporator drain tube seal. After installing the metal cover wait to proceed with the A/C evaporator housing and the screws and finally connect the nuts and washers at the cowl panel. The evaporator housing electrical connectors together with condenser to evaporator tube and evaporator to accumulator tube spring lock couplings must be connected with the vacuum supply hose. Hook the heater water hoses together while performing cleaning and Merpol(R) lubrication of the components as required. The electrical connector should be reconnected to the PCM after which you can install the instrument panel followed by the rear seat airflow duct. To complete the procedure you must fill the engine cooling system before proceeding to evacuate and charge the A/C system.
Related 2001 Lincoln Continental Parts
 2001 Lincoln Continental Cabin Air Filter
 2001 Lincoln Continental A/C Accumulator
 2001 Lincoln Continental A/C Clutch
 2001 Lincoln Continental A/C Compressor
 2001 Lincoln Continental A/C Hose
 2001 Lincoln Continental A/C Switch
 2001 Lincoln Continental A/C System Valve Core
 2001 Lincoln Continental Blend Door Actuator
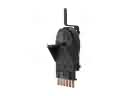 2001 Lincoln Continental Blower Control Switches
 2001 Lincoln Continental Blower Motor Resistor
 2001 Lincoln Continental Heater Core
 2001 Lincoln Continental HVAC Pressure Switch