FordParts
My Garage
My Account
Cart
OEM 2001 Lincoln LS A/C Condenser
Air Conditioning Condenser- Select Vehicle by Model
- Select Vehicle by VIN
Select Vehicle by Model
orMake
Model
Year
Select Vehicle by VIN
For the most accurate results, select vehicle by your VIN (Vehicle Identification Number).
1 A/C Condenser found


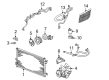
2001 Lincoln LS Condenser Part Number: 6W4Z-19712-A
Product Specifications- Other Name: Condenser Assembly; A/C Condenser; Condenser A/C
- Replaces: XW4Z-19712-AA
- Base No.: 19712
- Item Weight: 9.20 Pounds
- Item Dimensions: 6.1 x 33.9 x 21.8 inches
- Condition: New
- Fitment Type: Direct Replacement
- SKU: 6W4Z-19712-A
- Warranty: This genuine part is guaranteed by Ford's factory warranty.
2001 Lincoln LS A/C Condenser
If you're seeking quality and affordability, look no further than our extensive inventory of genuine 2001 Lincoln LS A/C Condenser available at FordPartsDeal.com. You can confidently purchase our OEM 2001 Lincoln LS A/C Condenser as they are supported by the manufacturer's warranty and our hassle-free return policy, alongside the benefit of our fast delivery service.
2001 Lincoln LS A/C Condenser Parts Q&A
- Q: How to Service and Repair the A/C Condenser on 2001 Lincoln LS?A: Start the HVAC condenser servicing process by disconnecting the battery followed by conducting the Refrigerant Discharging and Recovery Procedure. A leak test of the A/C condenser core must happen before it gets removed. Disconnect the air outlet tube from its position and detach the peanut fitting from the A/C compressor discharge line through the removal of the discharge line nut. Start by lifting the vehicle before removing screws that detach both the LH sight shield and the air deflector through side-clip retainer and push-pin removal. Complete the A/C receiver drier inlet line disconnection by untightening the nut first along with the LH bolt second. The condenser core gets supported before removal of both RH and LH bolts to lower the condenser core. Partial installation instructions entail a step-by-step reverse of removal operations while properly oiling the new A/C condenser core with PAG Refrigerant Compressor Oil (R-134a Systems) F7AZ-19589-DA (Motorcraft YN-12-C) or its equivalent aqueous form which adheres to Ford standard WSH-M1C231-B. O-ring seals require an application of the same PAG Refrigerant Compressor Oil during installation. When changing an A/C condenser core it is essential to install a fresh receiver drier to stop system contamination.
Related 2001 Lincoln LS Parts
 2001 Lincoln LS Cabin Air Filter
 2001 Lincoln LS Heater Core
 2001 Lincoln LS Blend Door Actuator
 2001 Lincoln LS A/C Accumulator
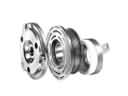 2001 Lincoln LS A/C Clutch
 2001 Lincoln LS A/C Compressor
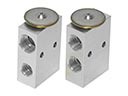 2001 Lincoln LS A/C Expansion Valve
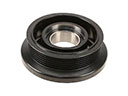 2001 Lincoln LS A/C Idler Pulley
 2001 Lincoln LS A/C System Valve Core
 2001 Lincoln LS Blower Motor Resistor
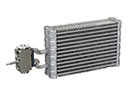 2001 Lincoln LS Evaporator
 2001 Lincoln LS HVAC Pressure Switch