FordParts
My Garage
My Account
Cart
OEM 2002 Ford Thunderbird Air Duct
Air Hose- Select Vehicle by Model
- Select Vehicle by VIN
Select Vehicle by Model
orMake
Model
Year
Select Vehicle by VIN
For the most accurate results, select vehicle by your VIN (Vehicle Identification Number).
2 Air Ducts found


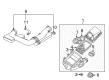
2002 Ford Thunderbird Air Outlet Tube Part Number: 2W4Z-9B659-A
Product Specifications- Other Name: Hose - Air; Engine Air Intake Hose
- Replaces: 2W4Z-9B659-BA
- Base No.: 9B659
- Item Weight: 7.40 Pounds
- Item Dimensions: 37.4 x 21.8 x 6.2 inches
- Condition: New
- Fitment Type: Direct Replacement
- SKU: 2W4Z-9B659-A
- Warranty: This genuine part is guaranteed by Ford's factory warranty.

2002 Ford Thunderbird Inlet Duct, Front Part Number: XW4Z-9A624-AA
Product Specifications- Other Name: Tube Assembly; Engine Air Intake Hose, Front
- Position: Front
- Base No.: 9A624
- Item Weight: 1.00 Pounds
- Condition: New
- Fitment Type: Direct Replacement
- SKU: XW4Z-9A624-AA
- Warranty: This genuine part is guaranteed by Ford's factory warranty.
2002 Ford Thunderbird Air Duct
If you're seeking quality and affordability, look no further than our extensive inventory of genuine 2002 Ford Thunderbird Air Duct available at FordPartsDeal.com. You can confidently purchase our OEM 2002 Ford Thunderbird Air Duct as they are supported by the manufacturer's warranty and our hassle-free return policy, alongside the benefit of our fast delivery service.
2002 Ford Thunderbird Air Duct Parts Q&A
- Q: How to service and repair the air duct on 2002 Ford Thunderbird?A: Service and repair the air duct through these steps: use a flat blade tool to push the inboard side tab on the left-hand and right-hand panel registers; pull back the register while also pushing in the outboard tab until complete removal. The right-hand panel is similar to the left-hand operation. First detach the plenum chamber then loosen the screws which secure the defroster duct. Take off the driver side support brace by removing its screws before moving on to position the driver side panel duct away from the driver side demister duct screw. The driver side demister duct screw must be removed first with its accompanying duct then the passenger side demister duct screw and its duct must be taken out. Remove the passenger side panel duct inner screw first followed by the outer screw and lastly detach the center panel duct together with the driver side panel duct through screw removal steps. Pull out the panel duct by rotating it through the opening position located at the instrument panel side. The correct procedure for reassembly requires executing the reverse steps of disassembly.
Related 2002 Ford Thunderbird Parts
 2002 Ford Thunderbird Fuel Tank
 2002 Ford Thunderbird Air Filter Box
 2002 Ford Thunderbird Air Intake Coupling
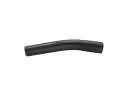 2002 Ford Thunderbird Fuel Filler Hose
 2002 Ford Thunderbird Fuel Filler Neck
 2002 Ford Thunderbird Fuel Pump
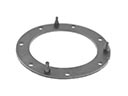 2002 Ford Thunderbird Fuel Pump Gasket
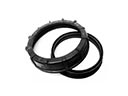 2002 Ford Thunderbird Fuel Pump Seal
 2002 Ford Thunderbird Fuel Tank Sending Unit
 2002 Ford Thunderbird Idle Control Valve
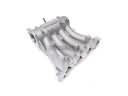 2002 Ford Thunderbird Intake Manifold
 2002 Ford Thunderbird Mass Air Flow Sensor