FordParts
My Garage
My Account
Cart
OEM 2003 Ford F-150 Seat Switch
Seat Adjust Switch- Select Vehicle by Model
- Select Vehicle by VIN
Select Vehicle by Model
orMake
Model
Year
Select Vehicle by VIN
For the most accurate results, select vehicle by your VIN (Vehicle Identification Number).
1 Seat Switch found


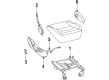
2003 Ford F-150 Control Switch, Front Part Number: F65Z-14A701-AA
Product Specifications- Other Name: Switch Assembly; Power Seat Switch, Front; Seat Switch; Switch; Power Seat Switch
- Position: Front
- Replaces: F3UZ-14A701-A, E6DZ-14A701-A, F7UZ-14A701-AA
- Base No.: 14A701
- Item Weight: 1.50 Pounds
- Item Dimensions: 10.1 x 8.3 x 6.3 inches
- Condition: New
- Fitment Type: Direct Replacement
- SKU: F65Z-14A701-AA
- Warranty: This genuine part is guaranteed by Ford's factory warranty.
2003 Ford F-150 Seat Switch
If you're seeking quality and affordability, look no further than our extensive inventory of genuine 2003 Ford F-150 Seat Switch available at FordPartsDeal.com. You can confidently purchase our OEM 2003 Ford F-150 Seat Switch as they are supported by the manufacturer's warranty and our hassle-free return policy, alongside the benefit of our fast delivery service.
2003 Ford F-150 Seat Switch Parts Q&A
- Q: How should you service and repair the power seat switch integrated with the supplemental restraint system (SRS) on 2003 Ford F-150?A: Always wear protective safety glasses when changing or repairing the power seat switch which is part of the supplemental restraint system (SRS) to prevent potential air bag-related injuries. Thorough hand cleaning is needed after deployment service to eliminate sodium hydroxide residue affecting the hands. Begin seat repair work only after breaking the battery cable ground connection and waiting one minute to empty back up power while removing any secondary batteries from the circuit. Always follow all SRS warning procedures before switching off the system. The first step involves removing the seat adjuster control knobs along with their covers and screws from the side trim panel followed by detachment of the seat recliner handle screw and handle before pulling out the lumbar control knob. Separately remove the three screws which secure the seat side trim panel after disconnecting the two screws that maintain the lumbar adjuster control to the seat track riser by pushing the adjuster control inward. The side shield rear retainer release allows you to access the side trim cover which then enables disconnecting the seat control switch electrical connector before removing the two screws and extracting the power seat adjuster control from the trim panel. The installation requires positioning of the seat control switch before attaching screws to secure it and reconnecting the electrical connector and reinstalling the side shield rear retainer. Position the lumbar adjuster control before mounting its screws then reinstall all seat adjuster control knobs together with covers followed by the screws for the seat side trim panel including the lumbar control knob and seat recliner handle. The SRS requires reactivation which must be performed in the right way while all diagnostic tools for restraint systems must leave the vehicle prior to road use to prevent accidents and regulatory violations. Active restraint operation must be checked for correctness after all implementation steps are complete.
Related 2003 Ford F-150 Parts
 2003 Ford F-150 Glove Box
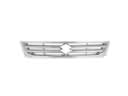 2003 Ford F-150 Grille
 2003 Ford F-150 Car Mirror
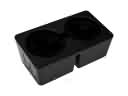 2003 Ford F-150 Cup Holder
 2003 Ford F-150 Door Check
 2003 Ford F-150 Door Handle
 2003 Ford F-150 Door Hinge
 2003 Ford F-150 Door Lock Actuator Motor
 2003 Ford F-150 Door Lock Actuators
 2003 Ford F-150 Door Lock Cylinder
 2003 Ford F-150 Hood Cable
 2003 Ford F-150 Window Crank Handles