FordParts
My Garage
My Account
Cart
OEM 2003 Ford Ranger Exhaust Manifold
Engine Exhaust Manifold- Select Vehicle by Model
- Select Vehicle by VIN
Select Vehicle by Model
orMake
Model
Year
Select Vehicle by VIN
For the most accurate results, select vehicle by your VIN (Vehicle Identification Number).
7 Exhaust Manifolds found


2003 Ford Ranger Exhaust Manifold, Passenger Side Part Number: 1L2Z-9430-CB
$322.05 MSRP: $445.52You Save: $123.47 (28%)Ships in 1-2 Business DaysProduct Specifications- Other Name: Manifold Assembly - Exhaust; Exhaust Manifold, Right; Manifold
- Position: Passenger Side
- Replaces: 1L2Z-9430-CA
- Base No.: 9430
- Item Weight: 14.60 Pounds
- Item Dimensions: 24.6 x 10.2 x 6.9 inches
- Condition: New
- Fitment Type: Direct Replacement
- SKU: 1L2Z-9430-CB
- Warranty: This genuine part is guaranteed by Ford's factory warranty.


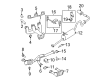
2003 Ford Ranger Exhaust Manifold, Driver Side Part Number: 2L5Z-9431-AA
$61.92 MSRP: $85.67You Save: $23.75 (28%)Ships in 1-2 Business DaysProduct Specifications- Other Name: Manifold Assembly - Exhaust; Exhaust Manifold, Left; Manifold
- Position: Driver Side
- Base No.: 9430A
- Item Weight: 9.60 Pounds
- Item Dimensions: 17.2 x 8.8 x 5.5 inches
- Condition: New
- Fitment Type: Direct Replacement
- SKU: 2L5Z-9431-AA
- Warranty: This genuine part is guaranteed by Ford's factory warranty.
2003 Ford Ranger Exhaust Manifold, Driver Side Part Number: 1L5Z-9431-AA
$45.30 MSRP: $62.67You Save: $17.37 (28%)Ships in 1-2 Business DaysProduct Specifications- Other Name: Manifold Assembly - Exhaust; Exhaust Manifold, Left; Manifold
- Manufacturer Note: LH, Unleaded fuel
- Position: Driver Side
- Base No.: 9430A
- Item Weight: 9.80 Pounds
- Item Dimensions: 17.9 x 8.7 x 5.5 inches
- Condition: New
- Fitment Type: Direct Replacement
- SKU: 1L5Z-9431-AA
- Warranty: This genuine part is guaranteed by Ford's factory warranty.

 Product Specifications
- Other Name: Manifold Assembly - Exhaust; Exhaust Manifold, Left; Manifold
- Position: Driver Side
- Replaces: 1L2Z-9431-CA
- Base No.: 9430B
- Item Weight: 10.40 Pounds
- Item Dimensions: 19.8 x 11.2 x 5.3 inches
- Condition: New
- Fitment Type: Direct Replacement
- SKU: 1L2Z-9431-CB
- Warranty: This genuine part is guaranteed by Ford's factory warranty.


2003 Ford Ranger Exhaust Manifold Part Number: 1L5Z-9430-BA
Product Specifications- Other Name: Manifold Assembly - Exhaust; Manifold
- Manufacturer Note: Attaching Nut W703662,S309, Stud W704474,S309. use with 1l5g,9448,aa gasket, BEFORE 6/6/2002
- Base No.: 9430
- Item Weight: 18.90 Pounds
- Item Dimensions: 18.8 x 9.5 x 5.6 inches
- Condition: New
- Fitment Type: Direct Replacement
- SKU: 1L5Z-9430-BA
- Warranty: This genuine part is guaranteed by Ford's factory warranty.

 Product Specifications
- Other Name: Manifold Assembly - Exhaust; Exhaust Manifold, Right; Manifold
- Manufacturer Note: RH, Unleaded fuel
- Position: Passenger Side
- Base No.: 9430
- Item Weight: 11.10 Pounds
- Item Dimensions: 19.4 x 9.8 x 5.5 inches
- Condition: New
- Fitment Type: Direct Replacement
- SKU: 1L5Z-9430-CA
- Warranty: This genuine part is guaranteed by Ford's factory warranty.
2003 Ford Ranger Exhaust Manifold Part Number: 1L5Z-9430-BF
$105.45 MSRP: $153.50You Save: $48.05 (32%)Product Specifications- Other Name: Manifold Assembly - Exhaust; Manifold
- Manufacturer Note: use with 1l5g-9448-ab gasket, FROM 6/6/2002
- Base No.: 9430
- Item Weight: 17.10 Pounds
- Item Dimensions: 22.5 x 11.5 x 5.3 inches
- Condition: New
- Fitment Type: Direct Replacement
- SKU: 1L5Z-9430-BF
- Warranty: This genuine part is guaranteed by Ford's factory warranty.
2003 Ford Ranger Exhaust Manifold
If you're seeking quality and affordability, look no further than our extensive inventory of genuine 2003 Ford Ranger Exhaust Manifold available at FordPartsDeal.com. You can confidently purchase our OEM 2003 Ford Ranger Exhaust Manifold as they are supported by the manufacturer's warranty and our hassle-free return policy, alongside the benefit of our fast delivery service.
2003 Ford Ranger Exhaust Manifold Parts Q&A
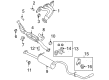
- Q: How to service and repair the exhaust manifold on 2003 Ford Ranger?A: The procedure for exhaust manifold maintenance should start with disconnecting the battery ground cable before putting the vehicle on a hoist. Lower the vehicle by removing the exhaust flange nuts then remove the drive belt. First remove the engine fluid then detach the upper radiator hose and the engine reservoir hose before uninstalling the A/C compressor. Start by removing the heater water hose before you remove successively the oil indicator and the upper bolt for the tube assembly followed by the lower bolt for the oil indicator tube assembly. Proceed to remove the bolts that maintain both the front radiator tube before raising the vehicle to the needed height. Begin by unscrewing pushpins then move the right inner fender splash shield. Disconnect alternator electrical connectors while lowering the vehicle with the unbolted lower FEAD mounting bolts. The procedure involves removing the upper bolt followed by the FEAD assembly before taking out the two nuts to push the coolant tube out of the path. Begin by uninstalling nuts then exhaust manifold before removing the exhaust manifold gasket. Begin by placing the new gasket on the exhaust manifold before installing the exhaust manifold and its attaching nuts. Position the coolant tube first while installing the nuts the vehicle will need occasional lifting to reach the bolts. Proceed with installing the FEAD bracket while tightening its bolts first at finger tight tension followed by a torque of 47 Nm (35 ft. lbs.). After connecting the alternator electrical connectors you should place the right inner splash shield and install the pushpins before lowering the vehicle. Stare by positioning the upper radiator tube and bolts before moving to the lower bolt of the oil indicator tube assembly and its upper bolt for the oil indicator. The heater water hose should be connected while the A/C compressor should be installed with the upper radiator hose and engine reservoir hose. Then fill the cooling system and install the serpentine drive belt. Driver should once again lift the vehicle to fasten the exhaust flange nuts, before lowering the vehicle to complete the procedure by reconnecting the battery ground cable.
Related 2003 Ford Ranger Parts
 2003 Ford Ranger Catalytic Converter
 2003 Ford Ranger Exhaust Pipe
 2003 Ford Ranger Muffler
 2003 Ford Ranger PCV Valve
 2003 Ford Ranger Canister Purge Valve
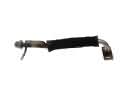 2003 Ford Ranger EGR Tube
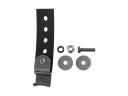 2003 Ford Ranger Exhaust Hanger
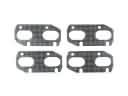 2003 Ford Ranger Exhaust Manifold Gasket
 2003 Ford Ranger PCV Hose
 2003 Ford Ranger Catalytic Converter Gasket
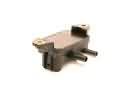 2003 Ford Ranger EGR Valve Position Sensor
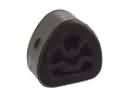 2003 Ford Ranger Muffler Hanger Straps