FordParts
My Garage
My Account
Cart
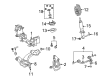
OEM 2006 Lincoln Town Car Control Arm
Suspension Arm- Select Vehicle by Model
- Select Vehicle by VIN
Select Vehicle by Model
orMake
Model
Year
Select Vehicle by VIN
For the most accurate results, select vehicle by your VIN (Vehicle Identification Number).
10 Control Arms found


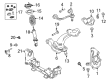
2006 Lincoln Town Car Upper Control Arm, Front Driver Side Part Number: 6W1Z-3085-B
$92.93 MSRP: $152.91You Save: $59.98 (40%)Ships in 1 Business DayProduct Specifications- Other Name: Arm Assembly - Front Suspension; Front Left Upper Control Arm and Ball Joint Assembly.; Control Arm
- Manufacturer Note: L.H., Upper Control Arm only, stamped., FROM 12/05/05
- Position: Front Upper Driver Side
- Replaces: 6W1Z-3085-AA
- Base No.: 3084
- Item Weight: 6.10 Pounds
- Item Dimensions: 4.2 x 11.6 x 13.4 inches
- Condition: New
- Fitment Type: Direct Replacement
- SKU: 6W1Z-3085-B
- Warranty: This genuine part is guaranteed by Ford's factory warranty.

2006 Lincoln Town Car Upper Control Arm, Front Passenger Side Part Number: 6W1Z-3084-B
$92.93 MSRP: $152.91You Save: $59.98 (40%)Ships in 1-2 Business DaysProduct Specifications- Other Name: Arm Assembly - Front Suspension; Front Right Upper Control Arm and Ball Joint Assembly.; Control Arm
- Manufacturer Note: R.H., Upper Control Arm only, stamped., FROM 12/05/05
- Position: Front Upper Passenger Side
- Replaces: 6W1Z-3084-AA
- Base No.: 3084
- Item Weight: 5.50 Pounds
- Item Dimensions: 4.1 x 11.7 x 13.7 inches
- Condition: New
- Fitment Type: Direct Replacement
- SKU: 6W1Z-3084-B
- Warranty: This genuine part is guaranteed by Ford's factory warranty.

2006 Lincoln Town Car Lower Control Arm, Front Driver Side Part Number: 9W1Z-3079-B
$439.76 MSRP: $608.37You Save: $168.61 (28%)Ships in 1-2 Business DaysProduct Specifications- Other Name: Arm Assembly - Front Suspension; Suspension Control Arm and Ball Joint Assembly; Control Arm Assembly; Control Arm
- Position: Front Driver Side
- Replaces: 4W1Z-3079-BA, 6W1Z-3079-BA, MCSOE-147
- Base No.: 3078
- Item Weight: 25.30 Pounds
- Item Dimensions: 5.2 x 18.7 x 22.3 inches
- Condition: New
- Fitment Type: Direct Replacement
- SKU: 9W1Z-3079-B
- Warranty: This genuine part is guaranteed by Ford's factory warranty.
2006 Lincoln Town Car Lower Control Arm, Front Passenger Side Part Number: 9W1Z-3078-B
$439.76 MSRP: $608.37You Save: $168.61 (28%)Ships in 1-2 Business DaysProduct Specifications- Other Name: Arm Assembly - Front Suspension; Suspension Control Arm and Ball Joint Assembly; Control Arm Assembly; Control Arm
- Position: Front Passenger Side
- Replaces: 4W1Z-3078-BA, 6W1Z-3078-BA, MCSOE-113
- Base No.: 3078
- Item Weight: 23.40 Pounds
- Item Dimensions: 4.9 x 18.7 x 21.9 inches
- Condition: New
- Fitment Type: Direct Replacement
- SKU: 9W1Z-3078-B
- Warranty: This genuine part is guaranteed by Ford's factory warranty.
2006 Lincoln Town Car Upper Control Arm, Front Passenger Side Part Number: 6W1Z-3084-U
$89.73 MSRP: $147.64You Save: $57.91 (40%)Ships in 1-3 Business DaysProduct Specifications- Other Name: Arm Assembly - Front Suspension; Suspension Control Arm, Front Right Upper; Control Arm
- Position: Front Upper Passenger Side
- Replaces: 6W1Z-3084-R, 6W1Z-3084-T, 6W1Z-3084-S, MCSOE-35, 4W1Z-3084-RH, 5W1Z-3084-AA
- Item Weight: 8.20 Pounds
- Item Dimensions: 5.2 x 15.7 x 13.7 inches
- Condition: New
- Fitment Type: Direct Replacement
- SKU: 6W1Z-3084-U
- Warranty: This genuine part is guaranteed by Ford's factory warranty.
2006 Lincoln Town Car Upper Control Arm, Front Driver Side Part Number: 6W1Z-3085-N
$95.03 MSRP: $156.36You Save: $61.33 (40%)Ships in 1-3 Business DaysProduct Specifications- Other Name: Arm Assembly - Front Suspension; Suspension Control Arm, Front Left Upper; Control Arm
- Position: Front Upper Driver Side
- Replaces: 6W1Z-3085-L, 6W1Z-3085-M
- Item Weight: 8.60 Pounds
- Item Dimensions: 5.4 x 13.5 x 12.9 inches
- Condition: New
- Fitment Type: Direct Replacement
- SKU: 6W1Z-3085-N
- Warranty: This genuine part is guaranteed by Ford's factory warranty.

2006 Lincoln Town Car Lower Control Arm, Front Driver Side Part Number: 6W1Z-3079-AA
$439.76 MSRP: $608.37You Save: $168.61 (28%)Ships in 1-2 Business DaysProduct Specifications- Other Name: Arm Assembly - Front Suspension; Front Left Lower Control Arm and Ball Joint Assembly.; Control Arm
- Manufacturer Note: L.H., standard suspension, without special packages, FROM 08/03/05 TO 12/05/05
- Position: Front Lower Driver Side
- Replaces: 5W1Z-3079-AA
- Base No.: 3078
- Item Weight: 21.80 Pounds
- Item Dimensions: 5.1 x 18.9 x 22.1 inches
- Condition: New
- Fitment Type: Direct Replacement
- SKU: 6W1Z-3079-AA
- Warranty: This genuine part is guaranteed by Ford's factory warranty.
2006 Lincoln Town Car Lower Control Arm, Front Passenger Side Part Number: 6W1Z-3078-D
$262.79 MSRP: $341.82You Save: $79.03 (24%)Ships in 1-2 Business DaysProduct Specifications- Other Name: Arm Assembly - Front Suspension; Front Right Lower Control Arm and Ball Joint Assembly; Control Arm
- Manufacturer Note: R.H., standard suspension, without special packages, FROM 12/05/05
- Position: Front Lower Passenger Side
- Base No.: 3078
- Item Weight: 27.60 Pounds
- Item Dimensions: 5.2 x 15.6 x 26.3 inches
- Condition: New
- Fitment Type: Direct Replacement
- SKU: 6W1Z-3078-D
- Warranty: This genuine part is guaranteed by Ford's factory warranty.
 Product Specifications
- Other Name: Arm Assembly - Front Suspension; Front Right Lower Control Arm and Ball Joint Assembly; Control Arm
- Manufacturer Note: R.H., standard suspension, without special packages, FROM 08/03/05 TO 12/05/05
- Position: Front Lower Passenger Side
- Replaces: 5W1Z-3078-AA
- Base No.: 3078
- Item Weight: 23.90 Pounds
- Item Dimensions: 5.0 x 18.9 x 22.3 inches
- Condition: New
- Fitment Type: Direct Replacement
- SKU: 6W1Z-3078-AA
- Warranty: This genuine part is guaranteed by Ford's factory warranty.
- Product Specifications
- Other Name: Arm Assembly - Front Suspension; Front Left Lower Control Arm and Ball Joint Assembly.; Control Arm
- Manufacturer Note: L.H., standard suspension, without special packages, FROM 12/05/05
- Position: Front Lower Driver Side
- Base No.: 3078
- Item Weight: 26.30 Pounds
- Item Dimensions: 6.1 x 15.6 x 25.8 inches
- Condition: New
- Fitment Type: Direct Replacement
- SKU: 6W1Z-3079-D
- Warranty: This genuine part is guaranteed by Ford's factory warranty.
2006 Lincoln Town Car Control Arm
If you're seeking quality and affordability, look no further than our extensive inventory of genuine 2006 Lincoln Town Car Control Arm available at FordPartsDeal.com. You can confidently purchase our OEM 2006 Lincoln Town Car Control Arm as they are supported by the manufacturer's warranty and our hassle-free return policy, alongside the benefit of our fast delivery service.
2006 Lincoln Town Car Control Arm Parts Q&A
- Q: How to Service and Repair a Control Arm on 2006 Lincoln Town Car?A: Before servicing or repairing the lower control arm ensure you cut off the electrical power to the air suspension system to avoid unexpected air springs deflation that may result in vehicle shift while working. The vehicle should rest in neutral position while installed on a hoist. Replace the lower ball joint nut with a new one then fasten it to 150 Nm (111 ft. lbs.). After discarding the old shock absorber lower nut and flag bolt you should install new ones which require a torque setting of 225 Nm (166 ft. lbs.). The lower control arm cam bolt nut requires replacement with a new nut then torquing it to 225 Nm (166 ft. lbs.). The correct replacement order for lower arm bushing bracket bolts includes installation of new parts which should be torqued to 90 Nm (66 ft. lbs). The installation requires new steering rack gear nuts after discarding the existing ones and applying a torque of 103 Nm (76 ft-lbs) to these new nuts. Position the steering gear upward after removing its two studs to reach the cam bolt and then take out both components and the lower arm. Preferrably position the lower arm cam nuts along with bolts, the rear bushing nut, shock absorber lower flag bolt but refrain from final tightening until complete installation and the vehicle weight rests on wheel assembly. The installation of a new lower control arm requires tightening the bushing nut to 200 Nm (148 ft. lbs.) when using cast aluminum while using stamped steel requires 175 Nm (128 ft. lbs.). In the final step check the front end alignment as needed.
Related 2006 Lincoln Town Car Parts
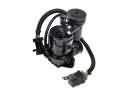 2006 Lincoln Town Car Air Suspension Compressor
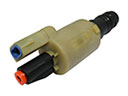 2006 Lincoln Town Car Air Suspension Solenoid
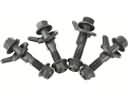 2006 Lincoln Town Car Alignment Bolt
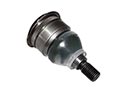 2006 Lincoln Town Car Ball Joint
 2006 Lincoln Town Car Coil Springs
 2006 Lincoln Town Car Shock And Strut Mount
 2006 Lincoln Town Car Steering Knuckle
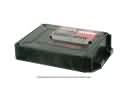 2006 Lincoln Town Car Suspension Control Module
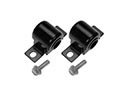 2006 Lincoln Town Car Sway Bar Bushing
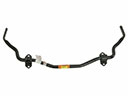 2006 Lincoln Town Car Sway Bar Kit
 2006 Lincoln Town Car Sway Bar Link Bushing
 2006 Lincoln Town Car Track Bar