FordParts
My Garage
My Account
Cart
OEM 2006 Mercury Mariner Blend Door Actuator
Air Blend Door Actuator- Select Vehicle by Model
- Select Vehicle by VIN
Select Vehicle by Model
orMake
Model
Year
Select Vehicle by VIN
For the most accurate results, select vehicle by your VIN (Vehicle Identification Number).
1 Blend Door Actuator found


2006 Mercury Mariner Motor Part Number: 8L8Z-19E616-E
$29.31 MSRP: $46.55You Save: $17.24 (38%)Ships in 1 Business DayProduct Specifications- Other Name: Motor Assembly; HVAC Air Inlet Door Actuator; HVAC Heater Blend Door Actuator
- Manufacturer Note: Pin #5 Is Not Used (No Connection)
- Replaced by: AL8Z-19E616-F
- Base No.: 19E616
- Item Weight: 0.50 Pounds
- Item Dimensions: 8.2 x 6.2 x 1.1 inches
- Condition: New
- Fitment Type: Direct Replacement
- SKU: 8L8Z-19E616-E
- Warranty: This genuine part is guaranteed by Ford's factory warranty.
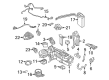
2006 Mercury Mariner Blend Door Actuator
If you're seeking quality and affordability, look no further than our extensive inventory of genuine 2006 Mercury Mariner Blend Door Actuator available at FordPartsDeal.com. You can confidently purchase our OEM 2006 Mercury Mariner Blend Door Actuator as they are supported by the manufacturer's warranty and our hassle-free return policy, alongside the benefit of our fast delivery service.
2006 Mercury Mariner Blend Door Actuator Parts Q&A
- Q: How to service and repair the auxiliary temperature blend door actuator and auxiliary mode door actuator on 2006 Mercury Mariner?A: Start the repair process of auxiliary temperature blend door actuator and auxiliary mode door actuator by placing the vehicle in neutral position on a hoist. The process requires removal of two auxiliary line floorpan bracket nuts with final tightening torque set to 6 Nm (53 lb-in). The LH D-pillar trim panel removal will occur while its bracket stays firmly attached to the vehicle. The sealing duct requires you to tighten high voltage traction battery screws first before installation. First detach the battery airflow duct assembly by eliminating its four screws, one pin-type retainer along with its screw, and tighten each screw to 12 Nm (18 lb-in) before installation. The installation should include tightening the two auxiliary climate control fresh air inlet duct nuts to 7 Nm (62 lb-in). Unfasten the two auxiliary climate control housing bolts by torqueing them to 7 Nm (62 lb-in) on the installation step. To remove the D-pillar bracket first detach the pin-type retainer and then unfasten the upper retainer with bolt. Position the auxiliary climate control housing slightly out of the way to expose the screws which are attached to the auxiliary airflow mode door actuator. Remove the electrical connector of this actuator before gaining access to the screws. When installing the auxiliary airflow mode door actuator remove the screws and disconnect the rod which should be tightened to 2 Nm (18 lb-in) during this process. When handling the auxiliary airflow mode door actuator for removal ensure the auxiliary climate control housing will go behind the lower D-pillar bracket section with the mounting bolt inserted into the bracket first. The installation of D-pillar trim panel and LH quarter trim panel must follow a verification step where the TBCM self-test examines the auxiliary mode door actuator operation and its visual function. Conclusion of the operation demands a return of all steps in the opposite order for complete reinstallation.
Related 2006 Mercury Mariner Parts
 2006 Mercury Mariner Cabin Air Filter
 2006 Mercury Mariner Blower Motor Resistor
 2006 Mercury Mariner A/C Accumulator
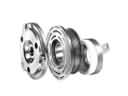 2006 Mercury Mariner A/C Clutch
 2006 Mercury Mariner A/C Compressor Cut-Out Switches
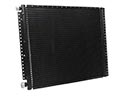 2006 Mercury Mariner A/C Condenser
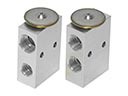 2006 Mercury Mariner A/C Expansion Valve
 2006 Mercury Mariner A/C Idler Pulley
 2006 Mercury Mariner A/C System Valve Core
 2006 Mercury Mariner Evaporator
 2006 Mercury Mariner Heater Core
 2006 Mercury Mariner HVAC Pressure Switch