FordParts
My Garage
My Account
Cart
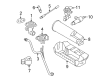
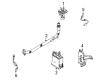
OEM 2007 Ford Focus Vapor Canister
Fuel Vapor Canister- Select Vehicle by Model
- Select Vehicle by VIN
Select Vehicle by Model
orMake
Model
Year
Select Vehicle by VIN
For the most accurate results, select vehicle by your VIN (Vehicle Identification Number).
4 Vapor Canisters found


2007 Ford Focus Vapor Canister Part Number: F87Z-9D653-CA
Product Specifications- Other Name: Reservoir Assembly; Vapor Canister Purge Solenoid
- Base No.: 9D653
- Item Weight: 3.10 Pounds
- Item Dimensions: 6.7 x 5.5 x 12.7 inches
- Condition: New
- Fitment Type: Direct Replacement
- SKU: F87Z-9D653-CA
- Warranty: This genuine part is guaranteed by Ford's factory warranty.

2007 Ford Focus Vapor Canister Part Number: 3S4Z-9D653-BA
Product Specifications- Other Name: Cannister - Fuel Vapour; Vapor Canister Purge Solenoid; Cannister - Fuel Vapour Store
- Manufacturer Note: This is a complete assembly-includes filter, canister, bracket, solenoid, hose, spring and clip. Located under vehicle. No serviceable components. For buffer canister, refer to 9G479., PZEV, 3DR/5DR
- Base No.: 9D653
- Item Weight: 4.80 Pounds
- Item Dimensions: 7.8 x 11.7 x 16.3 inches
- Condition: New
- Fitment Type: Direct Replacement
- SKU: 3S4Z-9D653-BA
- Warranty: This genuine part is guaranteed by Ford's factory warranty.
2007 Ford Focus Vapor Canister Part Number: 7S4Z-9D653-A
$349.58 MSRP: $560.00You Save: $210.42 (38%)Product Specifications- Other Name: Cannister - Fuel Vapour Storage; Vapor Canister Purge Solenoid; Cannister - Fuel Vapour Store
- Replaces: 5S4Z-9D653-CA, 6S4Z-9D653-AA
- Base No.: 9D653A
- Item Weight: 6.50 Pounds
- Item Dimensions: 11.5 x 8.1 x 16.8 inches
- Condition: New
- Fitment Type: Direct Replacement
- SKU: 7S4Z-9D653-A
- Warranty: This genuine part is guaranteed by Ford's factory warranty.
2007 Ford Focus Vapor Canister Part Number: 7S4Z-9D653-B
Product Specifications- Other Name: Cannister - Fuel Vapour Storage; Cannister - Fuel Vapour Store
- Replaces: 6S4Z-9D653-BA
- Base No.: 9D653A
- Item Weight: 7.80 Pounds
- Item Dimensions: 8.5 x 14.6 x 19.0 inches
- Condition: New
- Fitment Type: Direct Replacement
- SKU: 7S4Z-9D653-B
- Warranty: This genuine part is guaranteed by Ford's factory warranty.
2007 Ford Focus Vapor Canister
If you're seeking quality and affordability, look no further than our extensive inventory of genuine 2007 Ford Focus Vapor Canister available at FordPartsDeal.com. You can confidently purchase our OEM 2007 Ford Focus Vapor Canister as they are supported by the manufacturer's warranty and our hassle-free return policy, alongside the benefit of our fast delivery service.
2007 Ford Focus Vapor Canister Parts Q&A
- Q: What Are the Critical Steps for Servicing and Repairing the Vapor Canister in 3-Door and 5-Door on 2007 Ford Focus?A: Several essential procedures are involved in servicing and repairing the evaporative emission control canister for models with both 3-door and 5-door configurations. The first step requires disconnecting the battery ground cable because it prevents explosions or fires from happening due to fuel vapor. The first step involves tank fuel removal and uses suitable under-hoist stands to support the rear subframe. The next step requires removing two lower shock absorber retaining bolts but requires re-tightening them to 103 Nm (76 lb-ft) when reinstalling. The next step requires the removal of six rear subframe bolts while following installation procedures by tightening them to 103 Nm (76 lb-ft). The four rear trailing arm bolts need loosening until you can achieve 115 Nm (85 lb-ft) torque when installing them back into position. The 76 mm (3 in) modification of the subframe below the specified level allows technicians to reach the EVAP canister. You must disconnect both EVAP tube components: beginning with the pin-type retainer then proceeding to remove the quick connect from the canister system. Complete the restoration process by taking out the three EVAP canister securing nuts but install these nuts tight to 5 Nm (44 lb-in). The installation process needs an evaporative emission system leak test for validating results through an evaporative emission repair verification drive cycle.
Related 2007 Ford Focus Parts
 2007 Ford Focus Canister Purge Valve
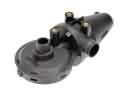 2007 Ford Focus PCV Valve
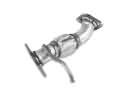 2007 Ford Focus Exhaust Pipe
 2007 Ford Focus EGR Valve
 2007 Ford Focus Exhaust Heat Shield
 2007 Ford Focus Exhaust Manifold
 2007 Ford Focus Exhaust Manifold Gasket
 2007 Ford Focus Tail Pipe
 2007 Ford Focus EGR Valve Gasket
 2007 Ford Focus EGR Valve Position Sensor
 2007 Ford Focus Exhaust Flange Gasket
 2007 Ford Focus Muffler Hanger Straps