FordParts
My Garage
My Account
Cart
OEM 2007 Ford Freestar Oil Pan
Oil Drain Pan- Select Vehicle by Model
- Select Vehicle by VIN
Select Vehicle by Model
orMake
Model
Year
Select Vehicle by VIN
For the most accurate results, select vehicle by your VIN (Vehicle Identification Number).
1 Oil Pan found


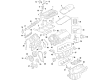
2007 Ford Freestar Oil Pan Part Number: 1F2Z-6675-BA
Product Specifications- Other Name: Pan Assembly - Engine Oil; Engine Oil Pan
- Manufacturer Note: Use RTV Silicone Sealer In Place Of Gasket For This Application. Refer To Workshop Manual For Specification
- Replaces: 1F2Z-6675-AA, 5F2Z-6675-A
- Base No.: 6675
- Item Weight: 9.70 Pounds
- Item Dimensions: 9.8 x 19.2 x 13.5 inches
- Condition: New
- Fitment Type: Direct Replacement
- SKU: 1F2Z-6675-BA
- Warranty: This genuine part is guaranteed by Ford's factory warranty.
2007 Ford Freestar Oil Pan
If you're seeking quality and affordability, look no further than our extensive inventory of genuine 2007 Ford Freestar Oil Pan available at FordPartsDeal.com. You can confidently purchase our OEM 2007 Ford Freestar Oil Pan as they are supported by the manufacturer's warranty and our hassle-free return policy, alongside the benefit of our fast delivery service.
2007 Ford Freestar Oil Pan Parts Q&A
- Q: How to service and repair the oil pan on 2007 Ford Freestar?A: Cleaning operations must precede any work on an oil pan to stop contaminants from accessing and destroying oil or coolant passages. Engine failure could result from this contamination. The service starts with removal of the starter and subsequent removal of the dual converter Y-pipe. You should drain your engine oil using the drain plug before removing its accompanying gasket. Start by removing the inspection cover after taking out the pin-type retainer with bolt first then pulling out the oil pan-to-transaxle bolts and seventeen oil pan bolts to detach the oil pan. Clean the mating surfaces of the oil pan rear seal through use of a metal surface cleaner before discarding the seal. A new application of sealer must occur if the oil pan installation exceeds four minutes. After cleaning the oil pan sealing areas, apply sealant to them before installing the new rear oil pan seal. The mating surface requires a bead of silicone gasket and sealer. Repeat the oil pan installation while starting all bolts and tightening each one to 10 Nm (89 inch lbs) according to the specified order. After installing the three oil pan-to-transaxle bolts apply force of 45 Nm (33 ft. lbs). Reinstall the oil pan drain plug along with its gasket by tightening it to 26 Nm (19 ft. lbs). The last steps include installing the starter and dual converter Y-pipe while adding new clean engine oil to the vehicle.
Related 2007 Ford Freestar Parts
 2007 Ford Freestar Cam Gear
 2007 Ford Freestar Camshaft
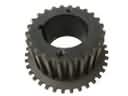 2007 Ford Freestar Crankshaft Gear
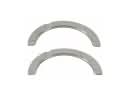 2007 Ford Freestar Crankshaft Thrust Washer Set
 2007 Ford Freestar Cylinder Head
 2007 Ford Freestar Dipstick Tube
 2007 Ford Freestar Engine Mount
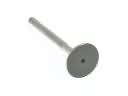 2007 Ford Freestar Exhaust Valve
 2007 Ford Freestar Motor And Transmission Mount
 2007 Ford Freestar Oil Filter
 2007 Ford Freestar Timing Belt
 2007 Ford Freestar Timing Cover Gasket