FordParts
My Garage
My Account
Cart
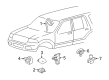
OEM 2007 Lincoln Navigator Clock Spring
Spiral Cable Clock Spring- Select Vehicle by Model
- Select Vehicle by VIN
Select Vehicle by Model
orMake
Model
Year
Select Vehicle by VIN
For the most accurate results, select vehicle by your VIN (Vehicle Identification Number).
1 Clock Spring found


2007 Lincoln Navigator Clockspring Part Number: 8L1Z-14A664-A
$167.80 MSRP: $244.25You Save: $76.45 (32%)Product Specifications- Other Name: Cover And Contact Plate Assembly; Air Bag Clockspring
- Replaces: 7L1Z-14A664-A
- Base No.: 14A664
- Item Weight: 1.20 Pounds
- Item Dimensions: 6.1 x 6.1 x 4.5 inches
- Condition: New
- Fitment Type: Direct Replacement
- SKU: 8L1Z-14A664-A
- Warranty: This genuine part is guaranteed by Ford's factory warranty.
2007 Lincoln Navigator Clock Spring
If you're seeking quality and affordability, look no further than our extensive inventory of genuine 2007 Lincoln Navigator Clock Spring available at FordPartsDeal.com. You can confidently purchase our OEM 2007 Lincoln Navigator Clock Spring as they are supported by the manufacturer's warranty and our hassle-free return policy, alongside the benefit of our fast delivery service.
2007 Lincoln Navigator Clock Spring Parts Q&A
- Q: How Can Safety and Functionality Be Ensured When Servicing the Clock Spring Assembly on 2007 Lincoln Navigator?A: Safety glasses must be worn during Clock Spring assembly servicing to prevent injuries from the air bag deploying accidentally and memory saver devices usage should be avoided to protect from personal harm. When the ignition key is ON the air bag warning lamp should illuminate because the restraints control module (RCM) fuse has been removed but this condition does not represent a fault. Return the vehicle to the customer only when the SRS passes the operational assessment without faults. The repair process requires new part installation but if the issue remains use the original part to redo the diagnostic test sequence. Start your process by setting the tilt-steering column to center position and disconnect the system power before uninstalling the driver air bag module. The technician first must put road wheels into a straight-ahead position before starting any Clock Spring electrical connector removal procedure. You need to remove the two screws in order to extract the Clock Spring from its place. When installing the new Clock Spring place it correctly while securing it using two screws followed by reattaching the electrical connector. It is essential to centralize the Clock Spring correctly before reuse of this component because inaccurate centralization may cause premature failure; repeat centralizing if uncertain about the process. For Clock Spring centering maintain the outer housing still while turning the rotor counterclockwise until ribbon wire resistance is detected then continue clockwise rotation by two turns until rotor wiring and connector reach the 12 o'clock mark without movement. A technician needs to recalibrate the centralizing procedure when exiting the vehicle for any period without supervision. The installation process ends by placing the steering wheel together with the driver air bag module and restarting the system power.
Related 2007 Lincoln Navigator Parts
 2007 Lincoln Navigator Instrument Cluster
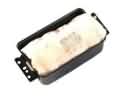 2007 Lincoln Navigator Air Bag
 2007 Lincoln Navigator Air Bag Control Module
 2007 Lincoln Navigator Air Bag Sensor
 2007 Lincoln Navigator Headlight Switch
 2007 Lincoln Navigator Mass Air Flow Sensor
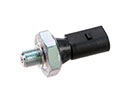 2007 Lincoln Navigator Oil Pressure Switch
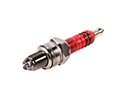 2007 Lincoln Navigator Spark Plug
 2007 Lincoln Navigator Transmitter
 2007 Lincoln Navigator Turn Signal Flasher
 2007 Lincoln Navigator Washer Pump
 2007 Lincoln Navigator Window Switch