FordParts
My Garage
My Account
Cart
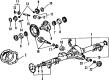
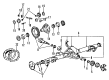
OEM Ford Crown Victoria Axle Shaft
Car Axle Shaft- Select Vehicle by Model
- Select Vehicle by VIN
Select Vehicle by Model
orMake
Model
Year
Select Vehicle by VIN
For the most accurate results, select vehicle by your VIN (Vehicle Identification Number).
6 Axle Shafts found


Ford Crown Victoria Axle Shaft, Rear Part Number: 6W1Z-4234-A
Ford Crown Victoria Axle Shaft Part Number: F8AZ-4234-DA
Ford Crown Victoria Axle Shaft Part Number: F8AZ-4234-CA
Ford Crown Victoria Axle Shaft, Rear Part Number: F2AZ-4234-C
Ford Crown Victoria Axle Shaft, Rear Part Number: F2AZ-4234-B
Ford Crown Victoria Axle Shaft, Rear Part Number: 3W1Z-4234-A
Ford Crown Victoria Axle Shaft
OEM Axle Shaft boasts unmatched quality. Each part goes through full quality checks. They adhere to Ford's official factory standards. These steps remove flaws and inconsistencies. So you can get Axle Shaft with long life and a perfect fit. Come to our website and find genuine Ford Crown Victoria parts. We keep a wide inventory of OEM Crown Victoria parts at the highly affordable prices. It's easy to search, compare, and pick what you need. You'll love the clear info and simple checkout. We offer top-rated customer service, and we reply fast. We also ship promptly to ensure your order arrives on time.
The Axle Shaft of Ford Crown Victoria vehicles is one of the most strategic parts, which transmits power from the differential to the drive wheels thus enable them to rotate independently in a manner that improves grip. These steel shafts come in different forms and these are: truck and pre-RWD car solid axles, and halfshafts where there is independent suspension. The transit axle is also solid, containing the differential and axle, with half shafts to take power from the transaxle to the wheels. Axle shafts get worn out due to rubbing against obstacles and this leads to such problems as noise and vibration while the seals get worn out, thus causing leakages of lubricants and contamination of the brakes. In summary, Axle Shaft contributes to the support of vehicles' weight, transfer of force, and special wheel positioning, particularly in Ford Crown Victoria cars.
Ford Crown Victoria Axle Shaft Parts and Q&A
- Q: What steps should be taken to safely remove and reinstall the differential pinion shaft and axle shaft in a system equipped with rear air springs on Ford Crown Victoria?A:Before hoisting or jacking or towing the vehicle users must shut off electrical power to the air suspension system through the air suspension switch within the left-hand side of the luggage compartment to avoid unexpected air spring movement. You should begin your repair by disconnecting the rear Brake Caliper along with the brake disc then support the caliper using mechanics wire and place the rear brake anti-lock sensor aside after unbolted its sensor. Remove the 10 housing bolts from the Differential Cover to start and drain out the lubricant from the axle housing. The differential pinion shaft removal needs extra care because rotating the differential case or turning an axle shaft might cause differential pinion gears to come loose thus creating potential damage. You should remove the differential pinion shaft lock bolt followed by the shaft itself then carefully push the axle shaft inboard to remove the washer without damaging the U-ring which resides in the washer groove. Secure the lock bolt with a finger-tight application after inserting the differential pinion shaft toward the outside of the axle. When placing the axle shaft ensure both to protect the wheel bearing oil seal from harm and treat its lip with Premium Long-Life Grease XG-1-C or equivalent product that satisfies the Ford specification ESA-M1C75-B. Next place the axle shaft with U-washer on its button end and extenuate outward motion to insert the U-washer into the side gear. To secure the installation position correctly fit the hole in the differential pinion shaft to the lock bolt hole after which insert the lock bolt. To conclude the differential housing cover installation add the rear brake anti-lock sensor followed by the brake disc.
- Q: How to service and repair the axle shaft on Ford Crown Victoria?A:A repair or servicing of the axle shaft starts with the loosening of lug nuts and removal of center caps. The wheel maintenance requires you to continue loosening the lug nuts until the vehicle weight remains on its wheels. Rear air spring vehicles need the air suspension control in the right-hand kick panel area deactivated before hoisting or jacking or towing to avoid startled air spring changes. First raise the vehicle to a suitable height and then take off the lug nuts to release the rear wheel with its tire. To access the differential housing cover begin by loosening the 10 bolts then emptying the back axle lubricant from inside. Unplug the rear brake anti-lock sensor before separating the Brake Caliper and brake disc. Extra attention should be dedicated to differential pinion shaft removal since rotating the differential case or axle shaft can result in differential pinion gears failing out and causing destruction. Begin by taking out both the differential pinion shaft lock bolt and shaft from the assembly before extracting the U-washer with care toward the rubber O-ring. Secure the differential pinion shaft by pushing the axle shaft into its outer position and tighten the lock bolt finger-rigorous. Prudent step when removing the axle shaft is to avoid damaging its wheel bearing oil seal. To install the wheel bearing oil seal apply Premium Long-Life Grease XG-1-C from Ford specification ESA-M1C75-B. Rerepeat the differential pinion shaft removal process but keep the wheel bearing oil seal free of damage. Set the U-washer to the button side of the axle shaft then pull it outwards into position for correct seating. Reinstall the differential pinion shaft by placing it into position with the lock bolt hole while securing it into place. Complete this operation by mounting the brake components followed by the rear brake anti-lock sensor and differential housing cover and liquid installation according to the specified lubricant. First remove all corrosion and foreign material and dust from wheel mounting points to secure metal-to-metal fastening and stop lug nuts from becoming loose. End your task by installing the wheel and tire assembly and the center cap and by activating air suspension system before performing a vehicle lower.

Related Ford Crown Victoria Parts
 Ford Crown Victoria Bump Stop
 Ford Crown Victoria Coil Springs
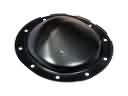 Ford Crown Victoria Differential Cover
 Ford Crown Victoria Radius Arm Bushing
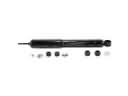 Ford Crown Victoria Shock Absorber
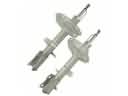 Ford Crown Victoria Strut Housing
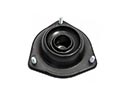 Ford Crown Victoria Strut Mounts
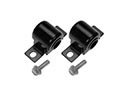 Ford Crown Victoria Sway Bar Bushing
 Ford Crown Victoria Sway Bar Link
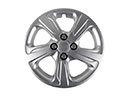 Ford Crown Victoria Wheel Cover
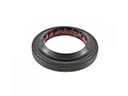 Ford Crown Victoria Wheel Seal
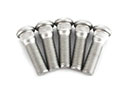 Ford Crown Victoria Wheel Stud
Browse Ford Crown Victoria Axle Shaft by Years
2011
2010
2009
2008
2007
2006
2005
2004
2003
2002
2001
2000
1999
1998
1997
1996
1995
1994
1993
1992