FordParts
My Garage
My Account
Cart
OEM Ford F-150 Spindle
Axle Spindle- Select Vehicle by Model
- Select Vehicle by VIN
Select Vehicle by Model
orMake
Model
Year
Select Vehicle by VIN
For the most accurate results, select vehicle by your VIN (Vehicle Identification Number).
5 Spindles found


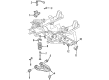
Ford F-150 Knuckle, Front Driver Side Part Number: 2L3Z-3106-AA

Ford F-150 Knuckle, Front Passenger Side Part Number: 2L3Z-3105-AA

Ford F-150 Spindle Part Number: F3TZ-3105-D

Ford F-150 Knuckle, Front Driver Side Part Number: 7L3Z-3106-A
Ford F-150 Knuckle, Front Passenger Side Part Number: 7L3Z-3105-A
Ford F-150 Spindle
OEM Spindle boasts unmatched quality. Each part goes through full quality checks. They adhere to Ford's official factory standards. These steps remove flaws and inconsistencies. So you can get Spindle with long life and a perfect fit. Come to our website and find genuine Ford F-150 parts. We keep a wide inventory of OEM F-150 parts at the highly affordable prices. It's easy to search, compare, and pick what you need. You'll love the clear info and simple checkout. We offer top-rated customer service, and we reply fast. We also ship promptly to ensure your order arrives on time.
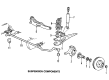
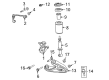
Throughout different F-150 versions the Ford F-150 Spindle emerges as an essential suspension component because of its proven reliability when steering and handling the vehicle. Steering knuckles join with wheel assembly through this essential component to enable exact vertical and horizontal wheel adjustments that ensure efficient steering capabilities. The Ford F-150 Spindle operates with either rear-wheel drive or all-wheel drive capabilities thus demonstrating versatility. The spindle in rear-wheel drive vehicles joins with the knuckle hence the knit assembly but all-wheel drive models work with a hollow element to support the drive axle as well. The Ford F-150 Spindle needs regular inspection due to safety risks when damage occurs or bearing failures happen, thus requiring spindle replacement. The Ford F-150 earns its reputation for durability through the design quality of its spindles that operates to improve the efficiency and safety performance of the vehicle. The special capabilities of Ford F-150 Spindle stand out in automotive markets because it performs well under tough road settings and operates with multiple car vehicle models. The Ford model has endured more than seven decades as an emblem of strength through its dependable spindle components which sustain vital performance and safety characteristics drivers like in this legendary pickup vehicle.
Ford F-150 Spindle Parts and Q&A
- Q: How to Ensure Proper Spindle Maintenance on a Ford F-150?A:A spindle service and repair starts by hoisting the vehicle then taking off the tire assembly followed by the brake disc shield. A suitable jack should be used to support the front suspension lower arm before separating the upper Ball Joint castellated nut by removing the cotter pin followed by the nut. Use a Pitman Arm Puller on the ball joint to separate it from the front wheel spindle before removing both the upper Shock Absorber nut along with its two lower shock absorber nuts. The process begins with removing the Tie Rod castellated nut followed by its cotter pin removal and another Pitman Arm Puller application for separating the tie rod end ([3A] 30) from the front wheel spindle. Apply a Coil Spring Compressor to compress the coil spring while using the Pitman Arm Puller to disconnect the lower ball joint from the front wheel spindle when both lower ball joint castellated nut and castellated nut have lost their cotter pin and castellated nut before finally taking off the front wheel spindle. The installation process requires staff to fit the lower ball joint castellated nut and new cotter pin first then move onto the upper ball joint castellated nut and second new cotter pin. After removing the Coil Spring Compressor you should install the tie rod castellated nut by adding a new cotter pin. Fitting the front shock absorber must begin with installing the two lower nuts before placing the upper shock absorber nut and brake disc shield and completing with the tire and wheel assembly. Check and readjust the front end alignment as the last step.
- Q: How to service and repair the spindle on Ford F-150?A:Start spindle service and repair by hoisting the vehicle and taking off the wheel assembly including tire and brake disc shield. Use a suitable jack to support the lower arm of the front suspension before removing the upper Ball Joint castellated nut by first taking off the cotter pin and then the nut. The ball joint must be pulled away from the front wheel spindle using a Pitman Arm Puller before both lower Shock Absorber nuts can be removed to take out the upper shock absorber nut and front shock absorber. The next step is to disconnect the Tie Rod from the front wheel spindle by removing its castellated nut after the cotter pin and using a Pitman Arm Puller on the tie rod end. Start by placing the lower ball joint castellated nut under the Coil Spring Compressor to compress the spring. Afterwards separate the lower ball joint from the front wheel spindle by removing the cotter pin followed by the nut before attaching the Pitman Arm Puller. The last task involves removing the front wheel spindle. Installation begins with placing a new lower ball joint castellated nut through the assembly after adding a fresh cotter pin then continues with the upper ball joint castellated nut accompanied by another new cotter pin. First discard the Coil Spring Compressor after which you should put the tie rod castellated nut along with a new cotter pin in its place. Secure the upper shock absorber nut and reinstall the front shock absorber together with its two lower nuts. End the installation by connecting the brake disc shield followed by tire and wheel assembly then conclude using front end alignment inspection and adjustment.


Related Ford F-150 Parts
 Ford F-150 Axle Shaft
 Ford F-150 Coil Spring Insulator
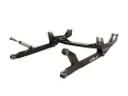 Ford F-150 Radius Arm
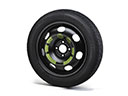 Ford F-150 Spare Wheel
 Ford F-150 Steering Knuckle
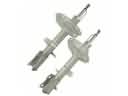 Ford F-150 Strut Housing
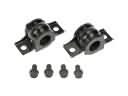 Ford F-150 Sway Bar Bracket
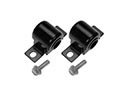 Ford F-150 Sway Bar Bushing
 Ford F-150 Sway Bar Link
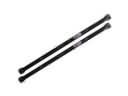 Ford F-150 Torsion Bar
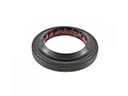 Ford F-150 Wheel Seal
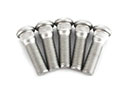 Ford F-150 Wheel Stud