FordParts
My Garage
My Account
Cart
OEM Ford F-250 Super Duty Drag Link
Center Link- Select Vehicle by Model
- Select Vehicle by VIN
Select Vehicle by Model
orMake
Model
Year
Select Vehicle by VIN
For the most accurate results, select vehicle by your VIN (Vehicle Identification Number).
14 Drag Links found

Ford F-250 Super Duty Center Link Part Number: LC3Z-3304-G
$242.89 MSRP: $412.73You Save: $169.84 (42%)Ships in 1-2 Business Days
Ford F-250 Super Duty Drag Link Part Number: LC3Z-3304-F
$249.31 MSRP: $423.64You Save: $174.33 (42%)Ships in 1-2 Business Days
Ford F-250 Super Duty Center Link, Passenger Side Part Number: LC3Z-3304-B
$169.56 MSRP: $285.45You Save: $115.89 (41%)Ships in 1-2 Business Days

Ford F-250 Super Duty Drag Link Part Number: PC3Z-3304-E
$170.64 MSRP: $287.27You Save: $116.63 (41%)Ships in 1-2 Business Days
Ford F-250 Super Duty Drag Link Part Number: LC3Z-3304-C
$73.15 MSRP: $120.36You Save: $47.21 (40%)Ships in 1-2 Business Days
Ford F-250 Super Duty Drag Link Part Number: LC3Z-3304-A
$121.55 MSRP: $200.00You Save: $78.45 (40%)
Ford F-250 Super Duty Sleeve Part Number: PC3Z-3281-B
$186.15 MSRP: $309.09You Save: $122.94 (40%)Ships in 1-2 Business Days
Ford F-250 Super Duty Drag Link Part Number: PC3Z-3304-B
$190.53 MSRP: $316.36You Save: $125.83 (40%)Ships in 1-2 Business Days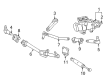
Ford F-250 Super Duty Drag Link Part Number: LC3Z-3304-H
$213.53 MSRP: $354.55You Save: $141.02 (40%)Ships in 1-2 Business Days
Ford F-250 Super Duty Drag Link Part Number: LC3Z-3304-E
$178.07 MSRP: $287.27You Save: $109.20 (39%)
Ford F-250 Super Duty Center Link Part Number: LC3Z-3304-D
$197.10 MSRP: $327.27You Save: $130.17 (40%)Ships in 1-2 Business Days

Ford F-250 Super Duty END - SPINDLE ROD CONNECTING Part Number: SU2Z-3304-C
$161.33 MSRP: $265.45You Save: $104.12 (40%)Ships in 1-2 Business Days


Ford F-250 Super Duty Drag Link Part Number: HC3Z-3304-C
$168.32 MSRP: $267.27You Save: $98.95 (38%)

Ford F-250 Super Duty Drag Link Part Number: HC3Z-3304-A
$177.48 MSRP: $281.82You Save: $104.34 (38%)
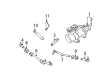
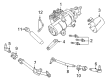
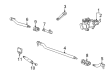
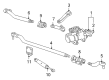
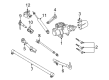
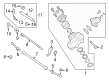
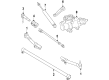
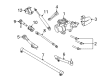
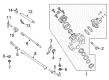
Ford F-250 Super Duty Drag Link
OEM Drag Link boasts unmatched quality. Each part goes through full quality checks. They adhere to Ford's official factory standards. These steps remove flaws and inconsistencies. So you can get Drag Link with long life and a perfect fit. Come to our website and find genuine Ford F-250 Super Duty parts. We keep a wide inventory of OEM F-250 Super Duty parts at the highly affordable prices. It's easy to search, compare, and pick what you need. You'll love the clear info and simple checkout. We offer top-rated customer service, and we reply fast. We also ship promptly to ensure your order arrives on time.
The Ford F-250 Super Duty Drag Link is an important part of the steering and is well known for their durability and quality across to different F-250 Super Duty models. This critical part links the steering wheel to the front wheels in order to change the rotary motion from the steering box into the steering arm thus improving on the maneuverability of the car. The Ford F-250 Super Duty model is equipped with the Drag Link that is claimed to maintain toughness in the ordinary use while enhancing the steering function, which plays a crucial role in the car's effectiveness and security. Problems as basic as steering drift and unbalanced tire wear can always be linked to the drag link and therefore its maintenance is crucial. Coming in both the solid one-piece and adjustable versions, the Ford F-250 Super Duty Drag Link typically employs the end that is either replaceable or rebuildable, thus increasing this link's usability and durability. That flexibility ensures that it fits many F-250 Super Duty models, allowing the drivers to take proper care of their automobiles. This type of Ford F-250 proves to be unique in the line of automotive due to its durability and enhanced functionality in increase of Drag Link control, therefore enhancing safety in the automobile. Focusing on the topic of the Ford F-250 Super Duty Drag Link, it can be stated that this component is truly outstanding due to its engineering and can be considered one of the most important investments for the owners of the car model.
Ford F-250 Super Duty Drag Link Parts and Q&A
- Q: How to service and repair the inner drag link on F-250 and F-350 Rear Wheel Drive on Ford F-250 Super Duty?A:Service and repairs for the inner drag link of F-250 and F-350 RWD vehicles begin with wheel position alignment at straight-ahead and hoist lift placement in neutral gear mode. When installing the outer adjusting sleeve clamp nut tighten it to 55 Nm (41 lb-ft) while loosening it first. First place the steering wheel in straight-ahead position then hoist the vehicle into neutral gear before removing the steering linkage damper-to-drag link bracket nut along with bolt and placing the damper safely aside for reinstallation with a torque of 90 Nm (66 lb-ft). Discard the inner tie-rod end cotter pin before removing its nut retainer and nut and tighten the nut to 175 Nm (129 lb-ft) during replacement. A Steering Arm Remover tool helps disconnect the inner tie-rod end from the inner drag link before placing the tie rod to the side. The installation process of the nut requires a torques setting of 175 Nm (129 lb-ft) after removing the inner drag link cotter pin, nut retainer and nut. Record the number of turns needed to detach the inner drag link and adjusting sleeve before physically separating the inner drag link through the sector shaft arm while removing the assembly of inner drag link with adjusting sleeve. The remaining adjusting sleeve clamp nut requires loosening before you tighten it to a torque specification of 55 Nm (41 lb-ft) for installation. All drag link and tie-rod end retainers must be placed properly on their respective nuts before adding cotter pins to keep steering linkage components from failing prematurely. You must clean all corrosion and dirt off the damper surfaces before you install it to maintain leak prevention. After replacement proceed through the removal steps backwards for installation while using new cotter pins and perform necessary adjustments to the toe.

Related Ford F-250 Super Duty Parts
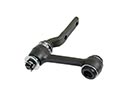 Ford F-250 Super Duty Idler Arm
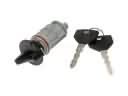 Ford F-250 Super Duty Ignition Lock Assembly
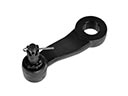 Ford F-250 Super Duty Pitman Arm
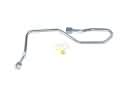 Ford F-250 Super Duty Power Steering Hose
 Ford F-250 Super Duty Power Steering Pump
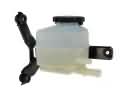 Ford F-250 Super Duty Power Steering Reservoir
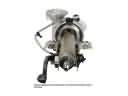 Ford F-250 Super Duty Steering Column
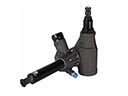 Ford F-250 Super Duty Steering Gear Box
 Ford F-250 Super Duty Steering Shaft
 Ford F-250 Super Duty Steering Wheel
 Ford F-250 Super Duty Tie Rod
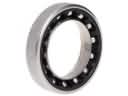 Ford F-250 Super Duty Upper Steering Column Bearing