FordParts
My Garage
My Account
Cart
OEM Ford Five Hundred Shock Absorber
Suspension Shock Absorber- Select Vehicle by Model
- Select Vehicle by VIN
Select Vehicle by Model
orMake
Model
Year
Select Vehicle by VIN
For the most accurate results, select vehicle by your VIN (Vehicle Identification Number).
8 Shock Absorbers found


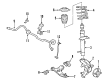
Ford Five Hundred Strut, Front Driver Side Part Number: 7G1Z-18124-AL
$41.90 MSRP: $57.96You Save: $16.06 (28%)Ships in 1-2 Business Days
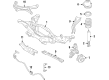
Ford Five Hundred Shock Absorber, Rear Part Number: 8G1Z-18125-B
$106.88 MSRP: $195.67You Save: $88.79 (46%)Ships in 1-2 Business Days
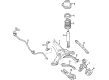
Ford Five Hundred Shock Absorber, Driver Side Part Number: 6G1Z-18125-F
$63.26 MSRP: $87.52You Save: $24.26 (28%)Ships in 1-2 Business Days


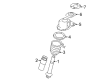
Ford Five Hundred Shock Absorber Part Number: 5G1Z-18125-AA

Ford Five Hundred Strut, Front Driver Side Part Number: 5G1Z-18124-BA
Ford Five Hundred Shock Absorber
OEM Shock Absorber boasts unmatched quality. Each part goes through full quality checks. They adhere to Ford's official factory standards. These steps remove flaws and inconsistencies. So you can get Shock Absorber with long life and a perfect fit. Come to our website and find genuine Ford Five Hundred parts. We keep a wide inventory of OEM Five Hundred parts at the highly affordable prices. It's easy to search, compare, and pick what you need. You'll love the clear info and simple checkout. We offer top-rated customer service, and we reply fast. We also ship promptly to ensure your order arrives on time.
The Ford Five Hundred Shock Absorber is a vital component in the suspension system and is well acclaimed for providing the much needed support to Ford Five Hundred in order to improve the driving experience. Intended to reduce or suppress shock impulses, this Shock Absorber enhances the vehicle's ride and handling characteristics, making it a required component for selected Five Hundred variants manufactured between 2004 and 2007. Ford Five Hundred Shock Absorber uses hydraulic pistons to dissipate energy in the form of heat; thus, minimizing extreme suspension travel on an uneven surface. Its advanced designs such as the twin-tube and the mono-tube are among the features that one is provided with in order to enhance on the durability aspect and also on the heat dissipation aspect as well. For instance, PSD helps to increase Shock Absorber sensibility to positional change on car while accelerating, ASD also makes Shock Absorber sensitive to acceleration - both of which aims to deliver better ride quality. The Ford Five Hundred comes with SIPS side impact protection system, and numerous airbags as well as enhanced Shock Absorber performance the also make a vehicle safer. This Shock Absorber is one of the efficient systems that assist not only in improving the Ford Five Hundred vehicle, but also contribute towards maximum comfortable and smooth driving experience. In the automotive market, reliability is an admirable trait especially when it has incorporated the chances of variability which makes the Ford Five Hundred Shock Absorber to stand out.
Ford Five Hundred Shock Absorber Parts and Q&A
- Q: How to service and repair the shock absorber and spring assembly on a front-wheel-drive on Ford Five Hundred?A:Services and repairs of shock absorber and spring assemblies need a starting point which requires measuring the hub center to fender lip distance from a level parked vehicle. The interior trim requires removal to reach the upper shock absorber nut before discarding the upper shock absorber-to-mount nut. Start by taking out the wheel assembly followed by front suspension support using an appropriate jackstand. You should provide appropriate support to the rear Brake Caliper since it needs to remain stationary during the removal of anchor plate bolts and while placing the caliper to the side. First position a jackstand underneath the wheel knuckle at its attachment point with the Trailing Arm yet raise the knuckle so the toe-link becomes parallel to the ground. To proceed with the removal begin by removing the trailing arm-to-knuckle bolt before manually lowering the jackstand then disposing of the trailing arm-to-subframe bolt. Position a jackstand under the lower shock absorber mount to raise it while compressing the shock absorber and spring after which you should remove the lower arm-to-knuckle bolt and loosen the shock absorber and spring assembly lower bolt before lowering the jackstand. Remove the shock absorber lower bolt then drop the lower arm while gripping the spring assembly to take away the assembly. Place the spring onto the upper rubber spring seat and position them both on the shock absorber before fitting the assembly correctly against the upper mount. Position the lower arm underneath the assembly then secure a new shock absorber lower nut and bolt but do not tight them at this time. Start by lowering the vehicle partially before placing a floor jack under the lower arm and raising it so the shock absorber top reaches the upper mount. Proceed to raise the vehicle together with help until the shock absorber properly seats in place, then install a new shock absorber-to-mount nut and torque it to 83 Nm (61 ft. lbs.). After vehicle elevation install the interior trim before removing the floor jack then elevate the vehicle once more. Clench a jackstand to the wheel knuckle then elevate the wheel hub to reach proper curb height. After tightening the lower arm-to-subframe bolt to 125 Nm (92 ft. lbs.), install the lower arm-to-knuckle bolt while torquing it to 160 Nm (118 ft. lbs.). Loosely attach the bolt between trailing arm and wheel knuckle then raise the jackstand until the trailing arm meets the subframe bushing. Place a new trailing arm-to-subframe bolt first then tighten it to 110 Nm (81 ft. lbs.) while the trailing arm-to-knuckle bolt and shock absorber lower bolt require tightening to 110 Nm (81 ft. lbs.). Lower the wheel and connect the brake caliper anchor plate bolts while torquing them to 100 Nm (74 ft. lbs.).

Related Ford Five Hundred Parts
 Ford Five Hundred Axle Beam
 Ford Five Hundred Coil Springs
 Ford Five Hundred Control Arm Bushing
 Ford Five Hundred Lateral Link
 Ford Five Hundred Radius Arm Bushing
 Ford Five Hundred Steering Knuckle
 Ford Five Hundred Strut Mounts
 Ford Five Hundred Sway Bar Link
 Ford Five Hundred Sway Bars
 Ford Five Hundred Torsion Bar
 Ford Five Hundred Trailing Arm
 Ford Five Hundred Trailing Arm Bushing
Browse Ford Five Hundred Shock Absorber by Years
2007
2006
2005