FordParts
My Garage
My Account
Cart
OEM Ford Taurus Air Bag Sensor
Air Bag Impact Sensor- Select Vehicle by Model
- Select Vehicle by VIN
Select Vehicle by Model
orMake
Model
Year
Select Vehicle by VIN
For the most accurate results, select vehicle by your VIN (Vehicle Identification Number).
21 Air Bag Sensors found


Ford Taurus Front Impact Sensor, Rear Center Part Number: FR3Z-14B004-A
$86.32 MSRP: $144.91You Save: $58.59 (41%)Ships in 1 Business Day

Ford Taurus Front Impact Sensor Part Number: BK2Z-14B004-A
$41.22 MSRP: $65.45You Save: $24.23 (38%)Ships in 1-2 Business Days

Ford Taurus Impact Sensor, Front Part Number: 8C3Z-14B004-A
$45.34 MSRP: $72.00You Save: $26.66 (38%)

Ford Taurus Impact Sensor, Rear Part Number: 9L3Z-14B345-A
$60.80 MSRP: $88.50You Save: $27.70 (32%)Ships in 1-2 Business Days

Ford Taurus Side Impact Sensor, Center Part Number: 8G1Z-14B345-B
$81.84 MSRP: $119.13You Save: $37.29 (32%)Ships in 1-3 Business Days

Ford Taurus Side Impact Sensor, Front Part Number: CT4Z-14B345-A
$40.15 MSRP: $57.43You Save: $17.28 (31%)Ships in 1-2 Business Days

Ford Taurus Pressure Sensor, Center Part Number: ML3Z-14B345-A
$76.24 MSRP: $121.23You Save: $44.99 (38%)
Ford Taurus Front Sensor Part Number: F5DZ14B006A
$42.67 MSRP: $59.03You Save: $16.36 (28%)Ships in 1-2 Business Days
Ford Taurus Side Impact Sensor Part Number: 2F1Z-14B345-AA
$47.98 MSRP: $66.38You Save: $18.40 (28%)Ships in 1-2 Business Days
Ford Taurus Rear Sensor Part Number: F5DZ14B004A
$35.76 MSRP: $49.48You Save: $13.72 (28%)Ships in 1-2 Business DaysFord Taurus Rear Sensor, Front Part Number: F2DZ14B004A
$90.49 MSRP: $123.14You Save: $32.65 (27%)
Ford Taurus Front Sensor Part Number: YF1Z-14B006-AA

Ford Taurus Side Impact Sensor Part Number: YF1Z-14B345-AA
Ford Taurus Front Sensor, Driver Side Part Number: FODZ14B005A
Ford Taurus Front Sensor, Passenger Side Part Number: FODZ14B004A
Ford Taurus Front Sensor, Driver Side Part Number: F6DZ-14B005-AA
Ford Taurus Front Sensor, Passenger Side Part Number: F6DZ-14B004-AA

Ford Taurus Rear Sensor Part Number: F2DZ14B007A

Ford Taurus Front Sensor Part Number: F2DZ14B006A

Ford Taurus Front Impact Sensor Part Number: 6R3Z-14B345-BB
| Page 1 of 2 |Next >
1-20 of 21 Results
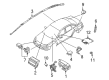
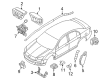
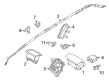
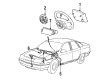
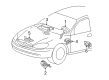
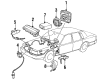
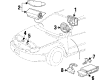
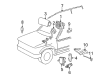
Ford Taurus Air Bag Sensor
OEM Air Bag Sensor boasts unmatched quality. Each part goes through full quality checks. They adhere to Ford's official factory standards. These steps remove flaws and inconsistencies. So you can get Air Bag Sensor with long life and a perfect fit. Come to our website and find genuine Ford Taurus parts. We keep a wide inventory of OEM Taurus parts at the highly affordable prices. It's easy to search, compare, and pick what you need. You'll love the clear info and simple checkout. We offer top-rated customer service, and we reply fast. We also ship promptly to ensure your order arrives on time.
The Air Bag Sensor is an important tool that perfectly captures the Ford Company's mandate of safety and reliability. This sensor is frequently termed as the crash sensor; It is significant in the identification of impacts and triggering of the control unit to inflate the air bags, thus increasing occupant safety during impacts. The Air Bag Sensor is famous for it has the optimal ability to answer to the crash occasions effectively such that the protective actions can be initiated. It supports numerous Ford Taurus generation with the same function regardless of the sector with FWD and AWD. The Ford Taurus model has a history of its production since 1985, and the given Air Bag Sensor is a great example of the Taurus's progress in the safety industry. The special features of the Air Bag Sensor are its durability and dependability for the total protection system of the automobile. Due to the complex technologies involved in the Air Bag Sensor, the car's safety and productivity benefit the auto industry in the current market. Buyers of Air Bag Sensor have found a reliable component that will enhance and protect their safety while on the wheel.
Ford Taurus Air Bag Sensor Parts and Q&A
- Q: How to Service and Repair the Air Bag Sensor in the Second Row, C-Pillar on Ford Taurus?A:The first step before servicing the side impact sensor which resides in the C-pillar of the Taurus and Sable second row is checking if the vehicle was involved in a crash. When a crash is detected the repair technician must examine the restraints control module (RCM) and impact sensor docking sites for deformations and then return both components to their original production shapes. The installation of new RCM sensors becomes mandatory because existing air bag conditions do not matter when preventing deadly injuries in accidents. Disable all features in the Supplemental Restraint System before starting your work. Unfasten the rear seat bolster before removing the side impact sensor electrical connector and later uninstalling the bolt which holds the sensor in place. The installation of the new sensor requires a 12 Nm (106 lb-in) torque on the bolt together with proper torqueing of RCM and impact sensor fasteners to prevent incorrect restraint system behavior. Follow removal steps in reverse order to install the sensor by first cleaning all mating surfaces of the C-pillar and side impact sensor devoid of foreign objects. Completing the service requires powering up the SRS after all other procedures are finished.

Related Ford Taurus Parts
 Ford Taurus Ignition Switch
 Ford Taurus Instrument Cluster
 Ford Taurus MAP Sensor
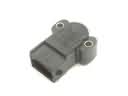 Ford Taurus Throttle Position Sensor
 Ford Taurus Air Bag Control Module
 Ford Taurus Airbag
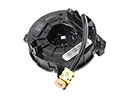 Ford Taurus Clock Spring
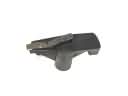 Ford Taurus Distributor Rotor
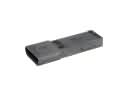 Ford Taurus Ignition Control Module
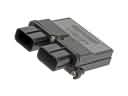 Ford Taurus Occupant Detection Sensor
 Ford Taurus PCV Valve Hose
 Ford Taurus Seat Heater Switch