FordParts
My Garage
My Account
Cart
OEM Ford Taurus Rack And Pinion
Steering Gear- Select Vehicle by Model
- Select Vehicle by VIN
Select Vehicle by Model
orMake
Model
Year
Select Vehicle by VIN
For the most accurate results, select vehicle by your VIN (Vehicle Identification Number).
17 Rack And Pinions found


Ford Taurus Steering Gear Part Number: CA5Z-3504-C
$1345.05 MSRP: $2314.55You Save: $969.50 (42%)Ships in 1-2 Business Days
Ford Taurus Steering Gear Part Number: EG1Z-3504-H
$1601.63 MSRP: $2645.45You Save: $1043.82 (40%)Ships in 1-2 Business Days
Ford Taurus Gear Assembly Part Number: YF1Z-3504-ABRM
$270.65 MSRP: $454.55You Save: $183.90 (41%)Ships in 1-2 Business Days

Ford Taurus Steering Gear Part Number: 8G1Z-3504-FRM
$395.64 MSRP: $649.09You Save: $253.45 (40%)Ships in 1-2 Business Days
Ford Taurus Steering Gear Part Number: MU2Z-3V504-QRM
$900.83 MSRP: $1481.82You Save: $580.99 (40%)
Ford Taurus Steering Gear Part Number: GG1Z-3504-F
$1692.51 MSRP: $2796.36You Save: $1103.85 (40%)Ships in 1-2 Business DaysFord Taurus Steering Gear Part Number: 6F1Z-3504-ARM
$278.48 MSRP: $454.55You Save: $176.07 (39%)Ships in 1-2 Business Days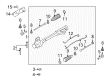
Ford Taurus Steering Gear Part Number: BG1Z-3504-BRM
$349.65 MSRP: $572.73You Save: $223.08 (39%)Ships in 1 Business Day
Ford Taurus Steering Gear Part Number: F8DZ-3504-CCRM
$663.44 MSRP: $1096.36You Save: $432.92 (40%)Ships in 1-3 Business DaysFord Taurus Steering Gear Part Number: DG1Z-3504-G
$1601.63 MSRP: $2645.45You Save: $1043.82 (40%)Ships in 1-2 Business Days
Ford Taurus Steering Gear Part Number: XF1Z-3504-BCRM
$499.19 MSRP: $823.64You Save: $324.45 (40%)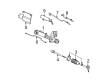
Ford Taurus Steering Gear Part Number: YF1Z-3504-DARM
$287.95 MSRP: $454.55You Save: $166.60 (37%)Ford Taurus Steering Gear Part Number: YF1Z-3504-EARM
Ford Taurus Steering Gear Part Number: XF1Z-3504-ABRM
Ford Taurus Control Valve Part Number: F3DZ-3504-ECRM
Ford Taurus Gear Assembly Part Number: F3DZ-3504-DDRM
Ford Taurus Control Valve Part Number: F3DZ-3504-BCRM
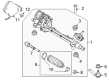
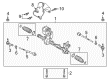
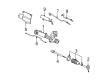
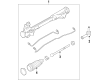
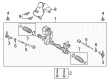
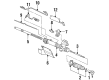
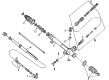
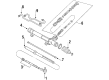
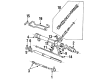
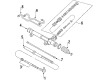
Ford Taurus Rack And Pinion
OEM Rack And Pinion boasts unmatched quality. Each part goes through full quality checks. They adhere to Ford's official factory standards. These steps remove flaws and inconsistencies. So you can get Rack And Pinion with long life and a perfect fit. Come to our website and find genuine Ford Taurus parts. We keep a wide inventory of OEM Taurus parts at the highly affordable prices. It's easy to search, compare, and pick what you need. You'll love the clear info and simple checkout. We offer top-rated customer service, and we reply fast. We also ship promptly to ensure your order arrives on time.
The Ford Taurus Rack And Pinion is one of the vital parts of the car, which enables the conversion of the rotational movement of the steering wheel into linear stray of the front wheels. This mechanism consists of; a rack gear usually housed within a tube made of metal links tie rods which are connected to the steering knuckles. At the tip of the steering column shaft, there is a pinion gear that when meshed with the rack gear inside the tube will turn it to the left or the right thus steering the front tires. Manual rack & pinions have evolved over the years to power assisted types with hydraulic power rack & pinion being the standard of present day. These systems work with high pressure fluid to case power assist which makes the steering easier. But such problems as leakage with rubber seal or with rubber hoses may occur, and in this case they will degrade the quality of the steering. Symptoms such as tightness in the steering wheel or the vehicle drifting especially on the highway can help one decide when it is time to replace the rack and pinion assembly for Ford Taurus vehicles.
Ford Taurus Rack And Pinion Parts and Q&A
- Q: What Are the Crucial Steps to Follow When Repairing the Front Rack and Pinion in the Power Steering System on Ford Taurus?A:Repairing power steering requires preventing foreign material from entering because this will lead to power steering component failure. The Hunter(R) 28-75-1 steering wheel holding device should be utilized first to maintain the wheel in a straight-ahead position. The hex-holding feature will keep the stud from turning as you remove the two tie-rod end nuts and disconnect the tie-rod ends from the wheel knuckles, install them at 115 Nm (85 lb-ft). The pressure line bracket-to-rack and pinion bolt requires removal before installation during which you should tighten it to 23 Nm (17 lb-ft). New O-ring seals must be used during power steering line disconnects to avoid fluid leakage and both seals need proper installation placement. Extract the power steering line clamp plate bolt from its position to rotate the clamp plate while detaching the pressure and return lines from the rack and pinion then discard the two O-ring seals before torquing the clamp plate bolt to 23 Nm (17 lb-ft). When disconnecting the lower shaft keep the steering column shaft from rotating to protect the Clock Spring. Replacement of the Clock Spring is necessary when the shaft has rotated. Safely remove the steering column shaft-to-rack and pinion bolt then throw it away and replace it with a new bolt which needs torquing to 25 Nm (18 lb-ft). During reinstallation you should secure the two new stabilizer bar link upper nuts to 55 Nm (41 lb-ft) while positioning the stabilizer bar and links in an upward direction. To install the roll resistor bracket-to-transaxle nut and bolt on Taurus and Sable All-Wheel Drive vehicles, follow the recommendation to tighten them to 48 Nm (35 lb-ft). Place a suitable jack under the roll resistor-to-transaxle bracket then lift the engine/transaxle approximately 25.4 mm (1 in) maintaining its distance from engine and transaxle components. Install new stabilizer bar bracket bolts on Taurus X vehicles while discarding the old ones and securely tighten them to 50 Nm (37 lb-ft). The last step includes rack and pinion removal through the left side of the vehicle where you should discard the nuts before securely fastening new ones to 117 Nm (86 lb-ft). After reversing the procedure install the system into power steering position while filling the system then check the toe alignment but only if necessary.

Related Ford Taurus Parts
 Ford Taurus Steering Wheel
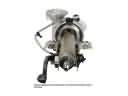 Ford Taurus Steering Column
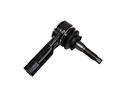 Ford Taurus Tie Rod
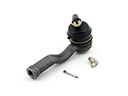 Ford Taurus Tie Rod End
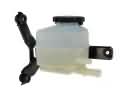 Ford Taurus Power Steering Reservoir
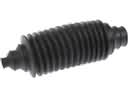 Ford Taurus Rack and Pinion Boot
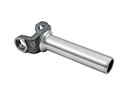 Ford Taurus Slip Yoke
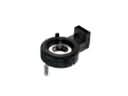 Ford Taurus Steering Angle Sensor
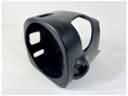 Ford Taurus Steering Column Cover
 Ford Taurus Steering Column Seal
 Ford Taurus Steering Gear Box
 Ford Taurus Steering Shaft