FordParts
My Garage
My Account
Cart
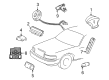
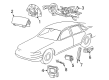
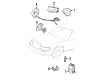
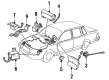
OEM Lincoln Town Car Clock Spring
Spiral Cable Clock Spring- Select Vehicle by Model
- Select Vehicle by VIN
Select Vehicle by Model
orMake
Model
Year
Select Vehicle by VIN
For the most accurate results, select vehicle by your VIN (Vehicle Identification Number).
7 Clock Springs found


Lincoln Town Car Clockspring Part Number: 6W1Z-14A664-A
$97.91 MSRP: $142.52You Save: $44.61 (32%)

Lincoln Town Car Clockspring Part Number: 1W1Z-14A664-AA
$214.42 MSRP: $314.87You Save: $100.45 (32%)
Lincoln Town Car Clockspring Part Number: XW1Z-14A664-AA

Lincoln Town Car Clockspring Part Number: F4AZ-14A664-A

Lincoln Town Car Clockspring Part Number: F3AZ-14A664-A
Lincoln Town Car Clockspring Part Number: F5VY-14A664-A

Lincoln Town Car Clockspring Part Number: F1VY-14A664-D
Lincoln Town Car Clock Spring
OEM Clock Spring boasts unmatched quality. Each part goes through full quality checks. They adhere to Lincoln's official factory standards. These steps remove flaws and inconsistencies. So you can get Clock Spring with long life and a perfect fit. Come to our website and find genuine Lincoln Town Car parts. We keep a wide inventory of OEM Town Car parts at the highly affordable prices. It's easy to search, compare, and pick what you need. You'll love the clear info and simple checkout. We offer top-rated customer service, and we reply fast. We also ship promptly to ensure your order arrives on time.
Lincoln Town Car Clock Spring Parts and Q&A
- Q: How to Ensure Proper Functioning of the Clock Spring in a Lincoln Town Car?A:Start the Clock Spring service by putting on masking tape across the Clock Spring then extracting the Steering Wheel to prevent Clock Spring rotation during maintenance. The tilting steering control must reach its highest position before removing both upper and lower shrouds from the Steering Column. Begin service on the Clock Spring assembly by taking out the tilt column lever and three lower steering column screws. Subsequently remove both shrouds by releasing their retainers. The Clock Spring electrical connector should be disconnected while allowing removal of three retaining clips before extracting the Clock Spring from the steering column. The key used to maintain rotor central positioning should be removed during new Clock Spring installations since rotor turn is prohibited. When recentering the Clock Spring begin by keeping the road wheels pointed forward and rotate the rotor counterclockwise until it stops while feeling the ribbon wire resistance. Start by making the rotor point toward the arrows until they align before performing two full clockwise rotations to establish the center position without allowing the rotor to move from this central point. The Clock Spring should receive tape removal while its movement remains limited to none. The flats on the Clock Spring should align with the steering column before sliding it onto the column for retaining tab deployment. Connect the Clock Spring electrical connector after which you should position the upper steering column shroud and attach the column shift lever boot when present. After securing the lower steering column shroud with three screws it becomes possible to reinstall the tilt column lever and steering wheel. The driver air bag module needs to be installed while repowering the Supplemental Restraint System (SRS).
- Q: What Safety Precautions and Steps Are Involved in Servicing the Clock Spring Assembly on Lincoln Town Car?A:Safety glasses must be used for Clock Spring service to prevent injuries from potential air bag deployment while you must orient live air bag modules with their trim cover pointing away from your body. Hammer the air bag module down and immediately clean your hands after opening because it contains sodium hydroxide residue. Always do not probe the air bag module connectors and immediately replace any trim covers which show signs of discoloration or damage instead of selecting repainting as the repair method. Begin by powering down the system then detach the driver air bag module by unbolt its two screws and pulling out the two Steering Wheel cover plugs while marking the squib enumeration on the electrical connector before disconnecting. Before the wheel removal step, position all vehicle wheels straight ahead then tape the Clock Spring with masking tape to stop it from rotating unintentionally. Upper section of the Steering Column needs adjustment and the tilt wheel hand should be removed first. These steps lead to lower finish panel detachment from its mounting on the steering column opening after unclipping retaining elements and unscrewing components. The maintenance begins with removing five bolts attached to the steering column opening lower reinforcement before proceeding to detach the LH lower instrument panel insulator, courtesy lamp and lower steering column shroud. You must position the Ignition Switch lock cylinder at RUN while removing it ahead of taking out the upper steering column shroud. The voice-activated cellular phone microphone needs removal from vehicles which have this feature. The installation begins by disconnecting both the passive anti-theft system (PATS) transmitter along with key-in-ignition warning indicator switch then separate electrical connectors from the Clock Spring and remove its wire harness. Unmount the Clock Spring after releasing its attaching clips. The first step for installation involves removing the key during rotor centering until it remains stationary. To recenter the rotor maintain outer housing position while turning it counterclockwise until resistance occurs followed by clockwise rotation for 2.75 turns toward the center. Fit the Clock Spring flats to the steering column while inserting it onto the column and routing the wire harness. After connecting the electrical connectors of the Clock Spring you should add the key-in-ignition warning indicator switch and PATS transmitter and voice-activated cellular phone microphone when needed. Safely reposition all mechanical components by uniting the upper and lower steering column shrouds with the ignition switch lock cylinder and lower steering column shroud in their correct seating positions. Place back the tilt wheel handle followed by the LH lower instrument panel insulator and the steering column lower reinforcement and steering column opening lower finish panel. In the last step reinstall the steering wheel while connecting the driver air bag module at its proper electrical ports and fastening the module using bolts before activating the system power.


Related Lincoln Town Car Parts
 Lincoln Town Car Brake Light Switch
 Lincoln Town Car Headlight Switch
 Lincoln Town Car MAP Sensor
 Lincoln Town Car Air Bag Control Module
 Lincoln Town Car Air Bag Sensor
 Lincoln Town Car Airbag
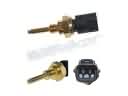 Lincoln Town Car Cylinder Head Temperature Sensor
 Lincoln Town Car Engine Control Module
 Lincoln Town Car Ignition Relay
 Lincoln Town Car Knock Sensor
 Lincoln Town Car Neutral Safety Switch
 Lincoln Town Car Parking Assist Sensor