FordParts
My Garage
My Account
Cart
OEM Lincoln Town Car Timing Chain Tensioner
Engine Timing Chain Tensioner- Select Vehicle by Model
- Select Vehicle by VIN
Select Vehicle by Model
orMake
Model
Year
Select Vehicle by VIN
For the most accurate results, select vehicle by your VIN (Vehicle Identification Number).
6 Timing Chain Tensioners found


Lincoln Town Car Tensioner, Driver Side Part Number: XL1Z-6L266-AA
$43.85 MSRP: $63.83You Save: $19.98 (32%)


Lincoln Town Car Tensioner, Driver Side Part Number: F6AZ-6L266-CA
$48.46 MSRP: $69.33You Save: $20.87 (31%)Ships in 1-3 Business Days


Lincoln Town Car Tensioner, Lower Part Number: 1L2Z-6L266-AA
$20.91 MSRP: $30.43You Save: $9.52 (32%)Ships in 1-2 Business Days


Lincoln Town Car Tensioner, Passenger Side Part Number: F6AZ-6L266-DA
$48.35 MSRP: $69.17You Save: $20.82 (31%)
Lincoln Town Car Tensioner, Passenger Side Part Number: F5AZ-6L266-BA
Lincoln Town Car Tensioner Part Number: F1AZ-6L266-A
Lincoln Town Car Timing Chain Tensioner
OEM Timing Chain Tensioner boasts unmatched quality. Each part goes through full quality checks. They adhere to Lincoln's official factory standards. These steps remove flaws and inconsistencies. So you can get Timing Chain Tensioner with long life and a perfect fit. Come to our website and find genuine Lincoln Town Car parts. We keep a wide inventory of OEM Town Car parts at the highly affordable prices. It's easy to search, compare, and pick what you need. You'll love the clear info and simple checkout. We offer top-rated customer service, and we reply fast. We also ship promptly to ensure your order arrives on time.
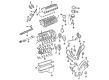
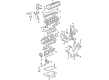
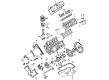
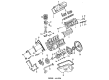
Lincoln Town Car cars are equipped with the so-called Timing Chain Tensioner, which allows for maintaining the required level of tension in the timing chain necessary for maintaining the proper functioning of the engine parts. It incorporates the necessary tension so as to help reduce complications thus making the operation of the engine easy. There may have been more than one style of Timing Chain Tensioners that have been used by Ford in the various models of the Town Car over time with all being capable of providing chain tension. The first one consists of hydraulic or mechanical actions for tensioning and detensing according to the necessary conditions for the proper performance of the timing chain. This versatility is the essence of stable performance and dependability of the engine for Lincoln Town Car operation.
Lincoln Town Car Timing Chain Tensioner Parts and Q&A
- Q: How to service and repair the timing chain tensioner on Lincoln Town Car?A:Before starting to service or repair the timing chain tensioner always position the vehicle in neutral on a hoist. First remove the engine front cover and proceed to detach the crankshaft sensor ring before disconnecting the 8 Ignition Coil electrical connectors. Then uninstall the bolts alongside the ignition coils. Clear away any well debris inside the 8 Spark Plugs by using compressed air during removal. Set the Camshaft lobe to an upper position before inserting the valve spring compressor spacer as a protective shielding for valve stem seals. Start by marking each component for its original position to prevent engine harm before putting the valve spring compressor to work in removing the camshaft roller followers. Set the keyway of the crankshaft at 12 o'clock before removing all parts of the timing chain tensioning system including bolts, tensioners, tensioner arms alongside both timing chains and crankshaft sprocket. Uninstall the timing chain guides through the removal of their bolts and guides. Mount the camshaft position aligner while you detach the camshaft gear bolt. Workers should squeeze each timing chain tensioner plunger into a vise before they hold back the ratchet mechanism with a small screwdriver then lock it using a paper clip. The sealing bead of non-ratcheting tensioners should be checked for integrity before deciding on replacement. Place two hydraulic chain tensioner retaining clips onto the tensioner plungers before compression. The visible colored links should be marked for timing if they become invisible to the eye. You should install camshaft sprockets using new bolts which require a two-step tightening procedure starting at 40 Nm (30 lb-ft) and continuing with an additional 90 degrees rotation. Position the crankshaft using the crankshaft holding tool at top dead center (TDC) before you install the crankshaft sprocket whereas its flange faces forward. Tighten both timing chain guides to 10 Nm (89 lb-in) after proper positioning. Hold the RH camshaft sprocket at 11 o'clock marking as the position while positioning the LH sprocket at the 12 o'clock position. The colored links of the LH timing chain should point toward the timing mark at the crankshaft sprocket before installation of the chain followed by its tensioner arm and tensioner with 25 Nm (18 lb-ft) torque setting. The paper clip on the LH tensioner needs to be extracted. For the RH timing chain follow the same installation procedure with correct alignment before final tightening. Before inserting the valve spring compressor spacer check that the colored chain links match the sprocket dots then direct the camshaft to the up position before attachment. Apply clean engine oil to the camshaft roller followers before placing them correctly and installing the 8 spark plugs which you should tighten to 18 Nm (159 lb-in). Drill the 8 ignition coils into their positions by tightening all bolts to 6 Nm (53 lb-in). After that, reinstall ignition coil electrical connectors and place the crankshaft sensor ring on top of the engine front cover.

Related Lincoln Town Car Parts
 Lincoln Town Car Oil Filter
 Lincoln Town Car Crankshaft
 Lincoln Town Car Crankshaft Pulley
 Lincoln Town Car Crankshaft Seal
 Lincoln Town Car Cylinder Head Bolts
 Lincoln Town Car Engine Mount Torque Strut
 Lincoln Town Car Engine Oil Cooler
 Lincoln Town Car Intake Valve
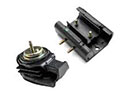 Lincoln Town Car Motor And Transmission Mount
 Lincoln Town Car Oil Drain Plug Gasket
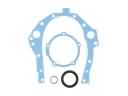 Lincoln Town Car Timing Cover Gasket
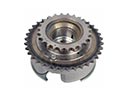 Lincoln Town Car Variable Timing Sprocket