FordParts
My Garage
My Account
Cart
OEM Mercury Fuel Pressure Sensor
Fuel Tank Pressure Sensor- Select Vehicle by Model
- Select Vehicle by VIN
Select Vehicle by Model
orMake
Model
Year
Select Vehicle by VIN
For the most accurate results, select vehicle by your VIN (Vehicle Identification Number).
4 Fuel Pressure Sensors found


Mercury Pressure Sensor Part Number: XS4Z-9C052-AA
$82.99 MSRP: $136.55You Save: $53.56 (40%)Product Specifications- Other Name: Sensor Assembly; Fuel Tank Pressure Sensor; Fuel Pressure Sensor; Sensor
- Replaces: F75Z-9C052-AA, F87Z-9C052-AA, XS4Z-9F479-AA


Mercury Pressure Sensor Part Number: 3F2Z-9G756-AC
$87.96 MSRP: $144.73You Save: $56.77 (40%)Ships in 1 Business DayProduct Specifications- Other Name: Sensor - Fuel Injector Pressure; Fuel Tank Pressure Sensor; Fuel Pressure Damper; Fuel Pressure Sensor; Damper
- Manufacturer Note: Also serviced in 9F792. Mounting screws W705870-S437, 6.8L


Mercury Fuel Pressure Regulator Part Number: 3R3Z-9F972-AB
$110.17 MSRP: $181.27You Save: $71.10 (40%)Ships in 1 Business DayProduct Specifications- Other Name: Sensor - Fuel Injector Pressure; Fuel Tank Pressure Sensor; Fuel Pressure Sensor; Pressure Sensor
- Replaces: 3R3Z-9F972-AA, F8CZ-9F972-BE, XW4Z-9F972-BA


Mercury Vapor Hose Part Number: CL2Z-9C052-A
$143.13 MSRP: $227.27You Save: $84.14 (38%)Ships in 1-3 Business DaysProduct Specifications- Other Name: Sensor Assembly; Evaporative Emissions System Lines
- Replaces: 1L2Z-9E616-AA
Mercury Fuel Pressure Sensor
If you own Mercury and want to keep it in top shape, choosing OEM Fuel Pressure Sensor is a smart move. They are precisely engineered and follow strict factory standards. They are made in advanced facilities that use cutting edge technology. Each part goes through thorough testing to confirm strength and safety, so you can trust it. FordPartsDeal.com gives you genuine Mercury Fuel Pressure Sensor at some of the affordable online prices without cutting quality. Every OEM Mercury part includes the manufacturer's warranty, easy returns, and super-fast delivery. So why wait? Shop now and get your vehicle back to peak condition.
Mercury Fuel Pressure Sensor maintains sharp fuel pressure readings to keep the power and mileage on target. In 1939, Mercury entered the market with cars that were smoother than bare-bones budget cars. The cabins are very spacious, which reduces the sound produced by the road significantly, and body lines are sharp, which made the driveways appear more lively than expected by neighbors. Customers snatched the midsize prices but experienced the comfort ride easily as they created an ideal balance between comfort and price in their daily commutes. This identity was being pushed to the limit as showrooms placed the badge between uninspired economy and uninspired luxury without it sounding pretentious. Throughout decades, Mercury included quieter suspensions, solid seats, and simple gadgets as opposed to gimmicks. Despite the fact that the name is no longer in use since production was discontinued in 2011, the name itself still suggests a certain level of accessibility and affordability instead of spending money out of control. Older models continue to be on the road as a result of the brand delivering practical comfort without losing fun in the process of driving. When the Fuel Pressure Sensor prods the tank and rail in any Mercury, it sends the accurate information that the PCM converts into instant pressure adjustments. The abrupt throttle, steep slope, or blazing summer sun still receives the correct mixture since the Fuel Pressure Sensor can respond within milliseconds. Stalling or skipping symptoms are usually associated with a lazy Fuel Pressure Sensor, which can once again be replaced, and easy starting and idle can be regained. The Fuel Pressure Sensor is also useful in identifying a leak in a Mercury fuel system, which reduces the loss of vapor and prevents dashboard lights from nagging.
Mercury Fuel Pressure Sensor Parts and Q&A
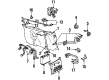
- Q: How to Service the Fuel Pressure Sensor on Mercury Mountaineer?A:The first step for fuel tank pressure sensor service involves disconnecting the battery ground cable as a safety precaution to prevent possible fuel vapor ignition from electrical sparks. Restrict the area from all smoking activities and flame sources. You must first remove the evaporative emission (EVAP) canister together with the fuel tank shield. The service of the fuel tank pressure sensor begins with electrical connector removal from the sensor followed by the removal of three fuel pump module quick connect couplings and vapor vent valves. Disconnect the fuel pressure sensor device with its connecting tube system. Reinstall the new sensor following the reverse order of removal then perform a leak test on the evaporative emission system and execute the evaporative emission repair verification drive cycle for proper operation.
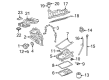
- Q: How to Properly Maintain the Fuel Pressure Sensor in a Mercury Cougar?A:Service of the fuel tank pressure sensor requires removal of the fuel tank as the initial step. After disconnecting the electrical connector from the fuel tank pressure sensor you must remove the sensor. In order to install the component follow the reverse order of the removal process until final assembly is complete.


Related Mercury Parts
 Mercury Gas Cap
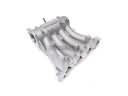 Mercury Intake Manifold
 Mercury Air Duct
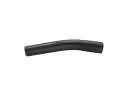 Mercury Fuel Filler Hose
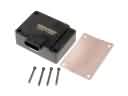 Mercury Fuel Pump Driver Module
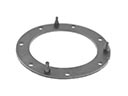 Mercury Fuel Pump Gasket
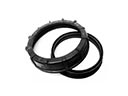 Mercury Fuel Pump Seal
 Mercury Fuel Pump Tank Seal
 Mercury Fuel Tank Lock Ring
 Mercury Fuel Tank Skid Plate
 Mercury Intake Manifold Gasket
 Mercury Throttle Body