FordParts
My Garage
My Account
Cart
OEM Mercury Sable Oil Pan
Oil Drain Pan- Select Vehicle by Model
- Select Vehicle by VIN
Select Vehicle by Model
orMake
Model
Year
Select Vehicle by VIN
For the most accurate results, select vehicle by your VIN (Vehicle Identification Number).
9 Oil Pans found


Mercury Sable Oil Pan Part Number: 7T4Z-6675-A
$130.68 MSRP: $201.67You Save: $70.99 (36%)Ships in 1-3 Business Days
Mercury Sable Oil Pan Part Number: XF2Z-6675-EA
$56.67 MSRP: $78.40You Save: $21.73 (28%)Ships in 1-2 Business Days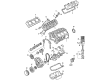
Mercury Sable Oil Pan Part Number: 2F1Z-6675-BA
$199.54 MSRP: $276.04You Save: $76.50 (28%)Ships in 1-2 Business Days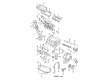
Mercury Sable Oil Pan Part Number: F5DZ-6675-CA
$68.50 MSRP: $93.22You Save: $24.72 (27%)

Mercury Sable Oil Pan Part Number: F33Z-6675-A


Mercury Sable Oil Pan Part Number: 3F1Z-6675-DA
Mercury Sable Oil Pan Part Number: F68Z-6675-AB
Mercury Sable Oil Pan Part Number: F5DZ6675A
Mercury Sable Oil Pan Part Number: E9DZ6675F
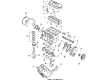
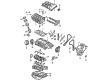
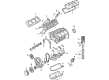
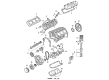
Mercury Sable Oil Pan
OEM Oil Pan boasts unmatched quality. Each part goes through full quality checks. They adhere to Mercury's official factory standards. These steps remove flaws and inconsistencies. So you can get Oil Pan with long life and a perfect fit. Come to our website and find genuine Mercury Sable parts. We keep a wide inventory of OEM Sable parts at the highly affordable prices. It's easy to search, compare, and pick what you need. You'll love the clear info and simple checkout. We offer top-rated customer service, and we reply fast. We also ship promptly to ensure your order arrives on time.
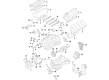
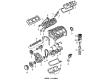
The Oil Pan is one of the Mercury Sable parts that act as a receptacle that speaks volumes of the reliability and performance of all the models of Mercury Sable. As recognized as the storage house of the engine oil, the Oil Pan is among the essential components of the wet sump lubrication system which offers responsibility to keep the engine continually supplied with oil and no leakage. Sitting where it does directly below the engine, the Oil Pan is built to perform based on conditions; it regulates the 'sloshing' of oil during a high-speed turn, for example, helping to both improve fuel efficiency and reduce the risk of spillage. In the earlier times, the Sable Oil Pans were manufactured from stamped steel, but steady development has provided cast aluminum alternatives to give better performance and sturdiness. Standardization of the same to fit a variety of Sable models allows a Oil Pan to meet a variety of demand from different generations of Sable. The Sable, with its stylish and sleek body as well as certain interior technologies, can help from a well designed Oil Pan that complements its performance intentions. Worth to note is that Oil Pan has been designed to enhance the flow of oil to your car engine hence enhancing its cooling and lubricating abilities. This not only aids in improving some of the vehicle characteristics, but also helps add to the security of the individual behind the wheel. The Oil Pan is as reliable, efficient, and exquisite as it can be in the auto market; and it reestablishes the Mercury Sable as one solid, powerful, and dependable car.
Mercury Sable Oil Pan Parts and Q&A
- Q: How to service and repair the oil pan on Mercury Sable?A:The first step for servicing or repairing the oil pan requires placing the vehicle on a hoist with neutral gear selection followed by disconnecting the battery ground cable. Begin by removing the engine roll restrictor bolts then proceed to take off the bolt used for grounding and the attaching nut. You need to remove the nuts installed on the front Exhaust Manifold and then uninstall the bolt from the rear upper manifold. You can disconnect the ground strap electrical connector when you remove the nut securing it. After taking out the ground strap nut move the heat shield to the side by removing its own nut. You should loosen the rear lower exhaust manifold bolt then place the Y-pipe to the side. Position the starter aside after removing all its bolts before removing the bolt holding the engine rear plate in place. Engine oil drainage should start by taking out the oil pan drain plug followed by its reinstallation upon oil draining completion. Next remove the 16 bolts from the oil pan before taking off its gasket. The surfaces where the oil pan will seal require a cleaning with metal surface cleaner. Before installing the oil pan gasket on the pan, check that no more than four minutes pass otherwise the sealant needs removal and the sealing area needs cleaning. Silicone gasket should be applied as a bead to seal each connection between the cylinder block front cover and the rear main bearing cap. Tighten the oil pan bolts to 12 Nm (9 ft. lbs.) with a specified sequence after cleaning and drying all fasteners. Reinstall the engine rear plate followed by its bolt and position the starter with bolts securing it while reattaching the Y-pipe and tightening the rear lower exhaust manifold bolt. Connect the ground strap electrical connector before securing the nut and then restore the heat shield and its retaining nut. Begin installation of the bolt in the rear upper manifold before adding nuts to the front exhaust manifold and finally installing nut and ground strap and bolt. Last steps include reinstallation of engine roll restrictor and its bolts followed by connecting the battery ground cable then adding clean oil before testing the engine while inspecting for oil leaks near the oil pan.
- Q: How to remove the oil pan from the engine on Mercury Sable?A:Engine extraction starts with detaching the motor from the vehicle while cleaning the work area to stop machine breakdown issues. First unfasten the 8 bolts and remove the Flywheel and then the crankshaft sensor ring. Drive engine stand bolts through the cylinder block but exclude the oil pan and implement the engine on a proper stand for support. First remove any heat shield when present after disconnecting the block heater electrical connector then detach all engine block heater harness retainers to take out the harness. Disconnect the PCV hose that connects to the PCV Valve as well as disconnect the Throttle Body electrical connector and the wiring harness retainers on the upper intake manifold. At the beginning of the procedure remove the upper intake manifold support bracket bolt after that take off the fuel tube bracket bolt from the upper intake manifold followed by the 6 bolts securing the upper intake manifold while discarding all used gaskets. Unplug the Power Steering Pressure switch electrical connector along with the fuel efficient power steering system solenoid electrical connector and the Front Wheel Drive RH Catalyst Monitor Sensor electrical connector. The technicians should disconnect the solenoid for RH Variable Camshaft Timing and all 3 RH coil-on-plug connectors and the RH Heated Oxygen Sensor electrical connector. The wiring harness retainers should be detached from the RH valve cover before disconnecting the LH CMS and VCT solenoid electrical connectors and the 3 LH coil-on-plug connectors and the wiring harness retainers from the LH valve cover. Begin the A/C compressor clearance operation by removing six bolts and six coil-on-plugs but keep the A/C compressor affixed to the cylinder block before unfastening the A/C compressor nut and stud. The PSP tube bracket-to-Power Steering Pump bolt needs removal along with the nut and PSP tube bracket from the RH valve cover stud bolt so you can place the power steering pump aside after taking out its 3 bolts. The LH Catalytic Converter needs removal by unattaching 4 nuts together with the gasket and discarding all components while the accessory drive belt tensioner demands bolt removal from its 3 locations. In Front Wheel Drive applications the RH catalytic converter must also be removed by performing the same steps. The cylinder block coolant drain occurs by taking off the RH and LH cylinder block drain plugs. The procedure starts with valve cover gasket discarding of the LH mechanism followed by removing and loosening the cover. The same operation applies to the RH valve cover. The technician must use the VCT Spark Plug Tube Seal Remover and Handle device to remove and inspect damaged VCT solenoid seals plus spark plug tube seals. Begin by using a Strap Wrench to detach the crankshaft bolt with its washer before cutting them off through discarding the bolt but using a 3-Jaw Puller to separate the crankshaft pulley along with an Oil Seal Remover to extract the crankshaft front seal. Remove the engine mount bracket and the 2 engine mount studs by using hand tools alone before proceeding with engine mount bracket bolts. Reverse the engine front cover bolts before inserting six of them into the holes throughout the front cover. Alleviate the seal resistance by tightening the bolts in crisscrossed formation until the front cover can be detached. Use the 16 oil pan bolts to begin until the seal is released and then utilize 2 oil pan bolts to insert into the threaded holes before removing the oil pan. Employ 3M Roloc Bristle Disk (2-in white, part number 07528) at 15,000 rpm to clean the engine front cover and oil pan while washing all foreign items away completely. The exposed engine areas need protection from contamination by clean lint-free shop towels while cleanups of the cylinder block sealing surfaces should start by removing large silicone or gasket material then use silicone gasket remover followed by metal surface prep to eliminate all oil and coolant residue to properly position the 2 locating dowel pins.


Related Mercury Sable Parts
 Mercury Sable Crankshaft Seal
 Mercury Sable Cylinder Head
 Mercury Sable Cylinder Head Bolts
 Mercury Sable Dipstick Tube
 Mercury Sable Oil Filter
 Mercury Sable Oil Pump
 Mercury Sable Pushrod
 Mercury Sable Rocker Arm
 Mercury Sable Timing Belt
 Mercury Sable Timing Cover Gasket
 Mercury Sable Valve Cover Gasket
 Mercury Sable Valve Stem Seal