FordParts
My Garage
My Account
Cart
Power Seats
2008 Ford Explorer Seat Switch
Currently shopping for
2008 Ford Explorer
Change VehicleCategories Close X
Currently selected
Electrical
- ABS Components
- Air Bag Components
- Alarm System
- Antenna & Radio
- Anti-Theft Components
- Cruise Control System
- Electrical Components
- Front Seat Belts
- Heated Seats
- Ignition System
- Instruments & Gauges
- Keyless Entry Components
- Moonroof
- Navigation System
- Parking Aid
- Power Seats
- Rear Seat Belts
- Senders
- Supplemental Restraint System
- Switches
- Tire Pressure Monitoring
- Wipers
Other Categories
A/C & Heating
Air & Fuel Delivery
Belts & Cooling
Body & Hardware
Brakes
Charging & Starting
Driveline & Axles
Emission Control & Exhaust
Engine
Headlights & Lighting
Interior & Exterior Trim
Maintenance & Lubrication
Steering
Suspension
Transmission
How to use OE catalog
3 diagrams found for the vehicle you selected.Select your vehicle options to narrow down results.
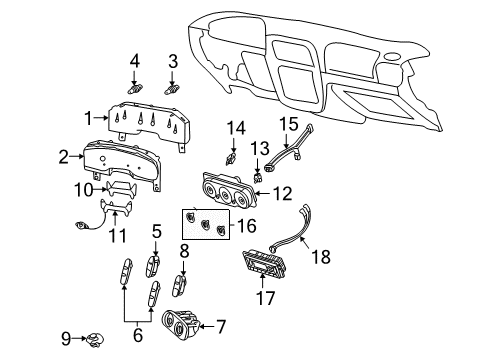
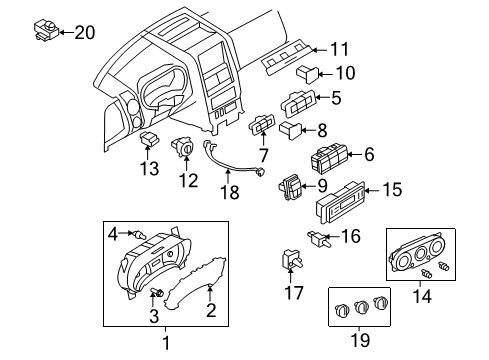
- 1.Instrument Panel - Cluster & Switches
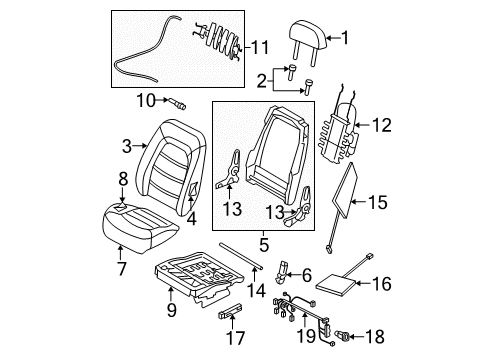
- 2.Seats & Tracks - Front Seat Components
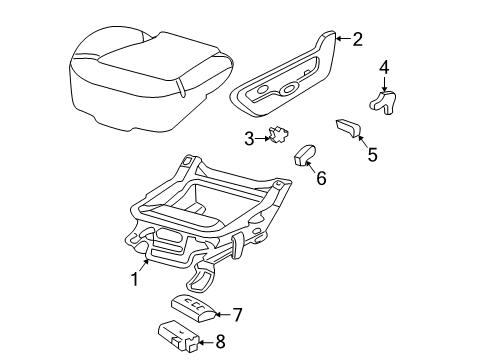
- 3.Seats & Tracks - Tracks & Components
Sort by:
Ref No.
Ref No.
Part No. & Part Description
Price & Qty.
Part No. &
Part Description
Part Description
- 1
 MSRP: $18.87 Your Price: $13.641
 - 1
- 1MSRP: $130.99 Your Price: $94.691
- 1
- 1
- 1
 MSRP: $441.12 Your Price: $331.741
 - 1MSRP: $454.69 Your Price: $341.751
- 1

 MSRP: $1589.75 Your Price: $1073.08
 - 1MSRP: $1217.28 Your Price: $879.921
- 1
- 1
- 1MSRP: $1234.12 Your Price: $833.031
- 2


- 2
- 2


- 2
- 2


- 2
- 2
- 2
- 2

 MSRP: $199.37 Your Price: $136.961
 - 2
 MSRP: $170.60 Your Price: $117.201
 - 2
- 2MSRP: $39.36 Your Price: $28.451
- 2
- 2MSRP: $39.86 Your Price: $29.291
- 2
- 2

- 3

 MSRP: $2.50 Your Price: $1.474
- 3

- 3
- 3
- 3
- 3
- 3
- 3
- 3
- 3
- 3
- 3
- 3
- 4


 MSRP: $5.25 Your Price: $3.701
- 4

 MSRP: $28.17 Your Price: $20.701
 - 4MSRP: $18.75 Your Price: $13.781
- 4MSRP: $18.75 Your Price: $13.781
- 4MSRP: $18.75 Your Price: $13.781
- 4
- 4


- 4

- 5
 MSRP: $9.49 Your Price: $6.861
 - 5MSRP: $13.55 Your Price: $9.801
- 5
 MSRP: $100.50 Your Price: $72.651
 - 5
- 5
- 5

- 6


- 6
- 6
 MSRP: $58.66 Your Price: $42.401
- 7


- 7

- 7
- 7
- 7
- 7
- 7
- 7
- 7
- 7
- 7
- 7
- 7
- 7


- 8


- 8

- 8

- 9

- 9
- 9


 MSRP: $67.16 Your Price: $48.551
- 10

- 10
- 10

- 11


- 11
 MSRP: $40.82 Your Price: $30.001
- 12


 MSRP: $181.82 Your Price: $114.50
 - 12


- 12MSRP: $47.39 Your Price: $34.261
- 12


- 12

- 12MSRP: $33.39 Your Price: $24.141
- 13

 MSRP: $41.67 Your Price: $29.381
- 14

- 14

- 15


- 15

- 16


 MSRP: $84.36 Your Price: $50.341
- 16


- 17


- 17


 MSRP: $181.82 Your Price: $110.501
 - 17


 MSRP: $192.73 Your Price: $117.131
- 18


 MSRP: $6.97 Your Price: $4.911
 - 18
 MSRP: $6.97 Your Price: $4.911
 - 18
 MSRP: $6.97 Your Price: $4.911
- 18

- 18
- 19


 MSRP: $28.86 Your Price: $21.201
- 19

- 19MSRP: $54.53 Your Price: $39.421
- 20


OEM 2008 Ford Explorer Parts for Power Seats
Genuine OEM 2008 Ford Explorer parts are made using the original design, the high standards, in the Ford official factories, and all of these ensure that they always fit perfectly and easily. FordPartsDeal.com is a trusted source for finding these authentic OEM Power Seats parts at very competitive prices. Our professional team is here to help you choose the right 2008 Ford Explorer Seat Switch, and our fast delivery options ensure that your parts are always delivered quickly.
Seat Covers Installation and Repair Tips for 2008 Ford Explorer
- Q: How to Service and Repair a 40 Percent Bench Seat Covers in the Second Row on 2008 Ford Explorer?A: As the second step in order to service the second-row seat cover, the head restraint should be removed. Unscrew the J-clip on the seat backrest, and staples holding the trim cover. Turn the cover inverted to reach the head restraint sleeve and be in line. Very carefully cut the upholstery and strip hook-and-loop, followed by the trim cover. Installation reversal to take place.