FordParts
My Garage
My Account
Cart
OEM 2000 Ford Windstar Shock Absorber
Suspension Shock Absorber- Select Vehicle by Model
- Select Vehicle by VIN
Select Vehicle by Model
orMake
Model
Year
Select Vehicle by VIN
For the most accurate results, select vehicle by your VIN (Vehicle Identification Number).
3 Shock Absorbers found

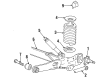
2000 Ford Windstar Shock Absorber, Rear Part Number: 2F2Z-18125-B
$40.24 MSRP: $54.76You Save: $14.52 (27%)Product Specifications- Other Name: Shock Absorber Assembly; Suspension Shock Absorber, Rear; Shock
- Position: Rear
- Replaces: 6F2Z-18125-A, ASH-24577, 2F2Z-18125-A, 3F2Z-18125-AA, 2F2Z-18125-AB, ASH-239, ASH-1121, ASH-52, 6F2Z-18125-AB
- Base No.: 18125
- Item Weight: 4.80 Pounds
- Item Dimensions: 20.9 x 3.5 x 3.5 inches
- Condition: New
- Fitment Type: Direct Replacement
- SKU: 2F2Z-18125-B
- Warranty: This genuine part is guaranteed by Ford's factory warranty.
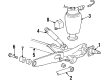
2000 Ford Windstar Shock Absorber Part Number: 2U2Z-18125-GA
Product Specifications- Other Name: Shock Absorber Assembly; Shock
- Manufacturer Note: w/air suspension
- Base No.: 18125
- Item Weight: 4.10 Pounds
- Condition: New
- Fitment Type: Direct Replacement
- Require Quantity: 2
- SKU: 2U2Z-18125-GA
- Warranty: This genuine part is guaranteed by Ford's factory warranty.

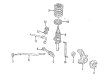
2000 Ford Windstar Strut, Front Part Number: 2F2Z-18124-AA
Product Specifications- Other Name: Shock Absorber Assembly - Front; Complete Suspension Strut and Shock Kit.; Shock Absorber
- Position: Front
- Replaces: XF5Z-18124-AB
- Base No.: 18124
- Item Weight: 11.50 Pounds
- Item Dimensions: 28.8 x 6.7 x 6.7 inches
- Condition: New
- Fitment Type: Direct Replacement
- Require Quantity: 2
- SKU: 2F2Z-18124-AA
- Warranty: This genuine part is guaranteed by Ford's factory warranty.
2000 Ford Windstar Shock Absorber
If you're seeking quality and affordability, look no further than our extensive inventory of genuine 2000 Ford Windstar Shock Absorber available at FordPartsDeal.com. You can confidently purchase our OEM 2000 Ford Windstar Shock Absorber as they are supported by the manufacturer's warranty and our hassle-free return policy, alongside the benefit of our fast delivery service.
2000 Ford Windstar Shock Absorber Parts Q&A
- Q: How to Service and Repair the Front Shock Absorber on 2000 Ford Windstar?A: Start the suspension strut servicing and repair process by unlocking the steering wheel and properly lifting the vehicle. The first step includes discarding the retaining bolts for both the front stabilizer bar link and the strut and spring assembly from their locations. Do not let the halfshaft extend past its limits because over-expanding the tripod CV joint may produce internal part separation which results in halfshaft failure. Drop the front wheel knuckle down to release the strut and spring assembly then maintain support for the knuckle to stop axle movement. Lower the vehicle partially and discard the top strut and spring assembly by taking off its three mounting bracket retaining nuts. Use a proper spring compressor tool before removing the strut assembly top shaft retaining nut with a crows-foot wrench that fits a 10-mm six-point deep well socket while maintaining the strut shaft motionless. Take away the upper washer and strut mounting bracket after that extract the lower washer and spring seat along with the bearing assembly. The jounce bumper and lower spring insulator should be taken off after removing the dust boot, coil spring, and spring compressing tool. When installing the components start by verifying the spring insulator for damage then perform the precise seating of the seat and bearing assembly and lower spring insulator. The installation process starts with the lower spring insulator followed by the jounce bumper until you place the spring compressing tool and coil spring and dust boot. Put the spring seat and bearing assembly in position with its lower washer before putting the strut mounting bracket and upper washer inside. After installing a new retaining top shaft nut users must remove the spring compressing tool and guide the strut and spring assembly into the vehicle to complete new mounting bracket nut installation. Partially lift the vehicle next then align the strut and spring assembly toward the steering knuckle before installing a new pinch bolt. First mount the strut and spring assembly on the vehicle then install the stabilizer link to the assembly using a new nut. Put on the wheel and tire before lowering the vehicle.
Related 2000 Ford Windstar Parts
 2000 Ford Windstar Axle Beam
 2000 Ford Windstar Axle Support Bushings
 2000 Ford Windstar Bump Stop
 2000 Ford Windstar Coil Spring Insulator
 2000 Ford Windstar Coil Springs
 2000 Ford Windstar Control Arm
 2000 Ford Windstar Shock And Strut Mount
 2000 Ford Windstar Spindle
 2000 Ford Windstar Steering Knuckle
 2000 Ford Windstar Sway Bar Bracket
 2000 Ford Windstar Sway Bar Bushing
 2000 Ford Windstar Sway Bar Link